Driveline Slip Clutch

NOTICE

A grade 8 bolt must be used to attach clutch driveline to gearbox.

A new slip clutch, or one that has been in storage over the winter, may seize.

1.Before operating slip clutch, make sure it will slip. Refer to Slip Clutch Adjustment, page 20.

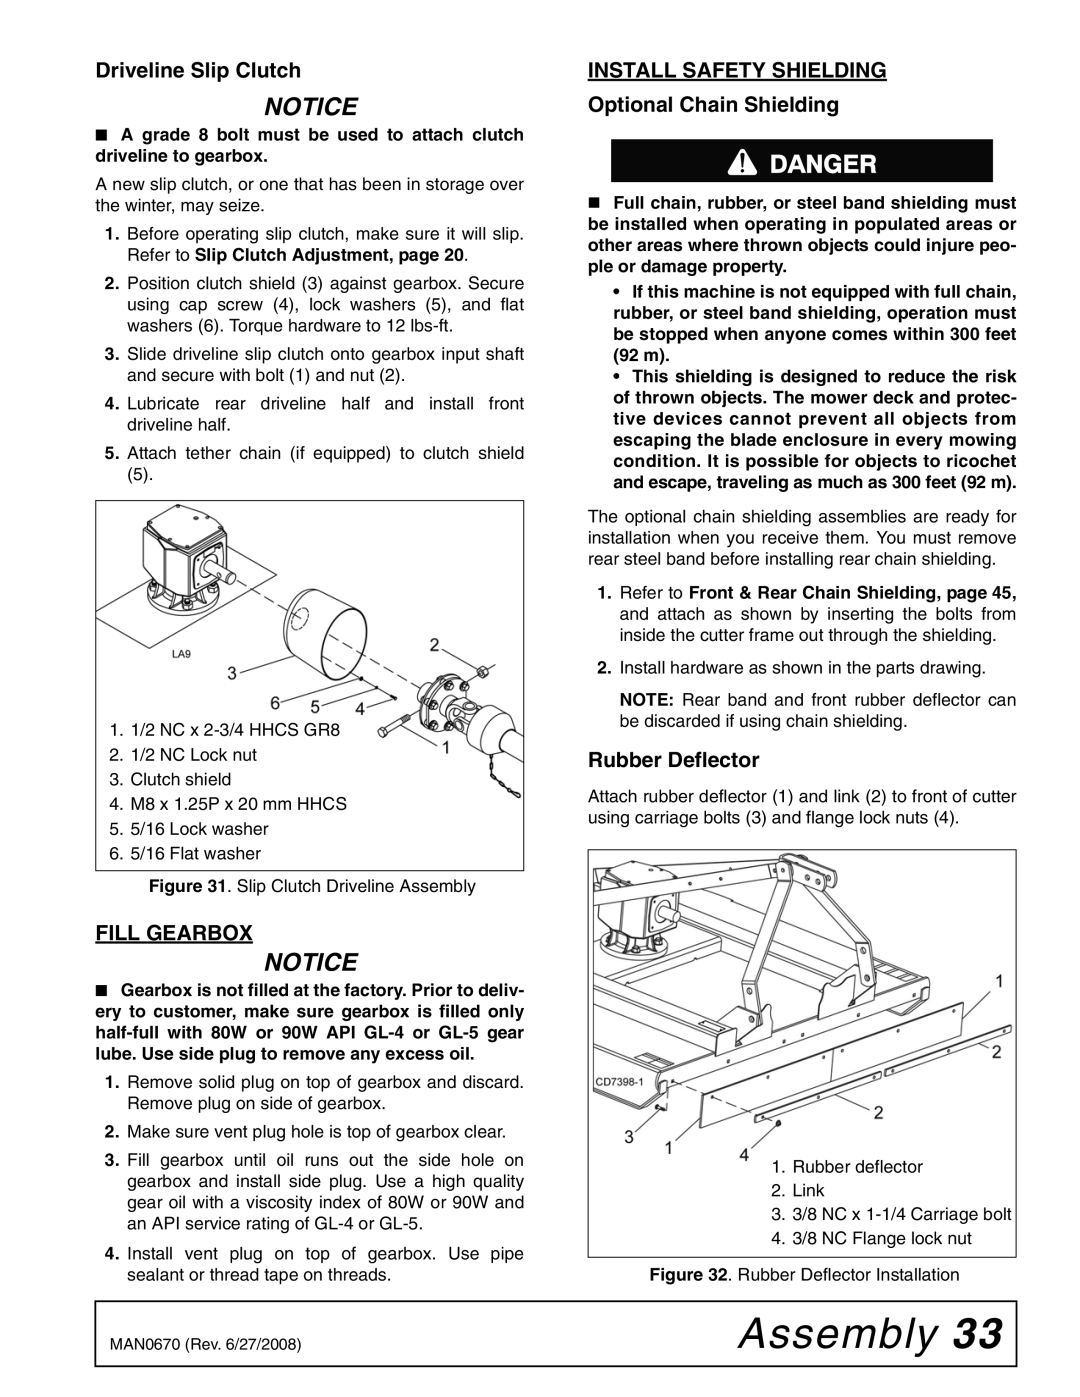
2.Position clutch shield (3) against gearbox. Secure using cap screw (4), lock washers (5), and flat washers (6). Torque hardware to 12 lbs-ft.

3.Slide driveline slip clutch onto gearbox input shaft and secure with bolt (1) and nut (2).

4.Lubricate rear driveline half and install front driveline half.

5.Attach tether chain (if equipped) to clutch shield

(5).

1.1/2 NC x 2-3/4 HHCS GR8

2.1/2 NC Lock nut

3.Clutch shield

4.M8 x 1.25P x 20 mm HHCS

5.5/16 Lock washer

6.5/16 Flat washer

Figure 31. Slip Clutch Driveline Assembly

FILL GEARBOX

NOTICE

Gearbox is not filled at the factory. Prior to deliv- ery to customer, make sure gearbox is filled only half-full with 80W or 90W API GL-4 or GL-5 gear lube. Use side plug to remove any excess oil.

1.Remove solid plug on top of gearbox and discard. Remove plug on side of gearbox.

2.Make sure vent plug hole is top of gearbox clear.

3.Fill gearbox until oil runs out the side hole on gearbox and install side plug. Use a high quality gear oil with a viscosity index of 80W or 90W and an API service rating of GL-4 or GL-5.

4.Install vent plug on top of gearbox. Use pipe sealant or thread tape on threads.

INSTALL SAFETY SHIELDING

Optional Chain Shielding

Full chain, rubber, or steel band shielding must be installed when operating in populated areas or other areas where thrown objects could injure peo- ple or damage property.

If this machine is not equipped with full chain, rubber, or steel band shielding, operation must be stopped when anyone comes within 300 feet (92 m).

This shielding is designed to reduce the risk of thrown objects. The mower deck and protec- tive devices cannot prevent all objects from escaping the blade enclosure in every mowing condition. It is possible for objects to ricochet and escape, traveling as much as 300 feet (92 m).

The optional chain shielding assemblies are ready for installation when you receive them. You must remove rear steel band before installing rear chain shielding.

1.Refer to Front & Rear Chain Shielding, page 45, and attach as shown by inserting the bolts from inside the cutter frame out through the shielding.

2.Install hardware as shown in the parts drawing.

NOTE: Rear band and front rubber deflector can be discarded if using chain shielding.

Rubber Deflector

Attach rubber deflector (1) and link (2) to front of cutter using carriage bolts (3) and flange lock nuts (4).

1.Rubber deflector

2.Link

3.3/8 NC x 1-1/4 Carriage bolt

4.3/8 NC Flange lock nut

Figure 32. Rubber Deflector Installation

MAN0670 (Rev. 6/27/2008)

Assembly 33


Page 33
Image 33
Woods Equipment HC48, HC54, HC72, HC60 manual Driveline Slip Clutch, Fill Gearbox, Install Safety Shielding, Rubber Deflector

HC60, HC72, HC48, HC54 specifications

Woods Equipment Company is a renowned manufacturer of high-quality agricultural and landscape equipment, and their line of hydraulic cutters is no exception. The Woods HC series, which includes the HC48, HC54, HC60, and HC72 models, is designed for efficiency and versatility in various applications, making them ideal for landscapers, farmers, and contractors.

One of the main features of Woods HC series cutters is their robust construction. These machines are built with high-strength materials, ensuring durability and longevity even in tough working conditions. The frames are designed to withstand significant stresses while providing stability during operation.

A standout characteristic of the HC series is its cutting capabilities. Each model is equipped with heavy-duty blades that are engineered to handle tough vegetation, including small trees, thick brush, and dense undergrowth. The cutting width increases with each model, ranging from 48 inches in the HC48 to 72 inches in the HC72, providing options for various land clearing tasks.

Another notable feature is the hydraulic drive system. This technology allows for smooth operation and precise control of cutting speed, improving overall efficiency. The hydraulic system is designed for optimal performance, ensuring that users can tackle even the most challenging jobs with ease.

The HC series also incorporates a user-friendly design. The implements are easy to attach and detach from tractors, facilitating quick transitions between different tasks. Woods has addressed safety concerns by integrating protective shielding around the cutting area, which minimizes the risk of debris being thrown during operation.

For ease of maintenance, the HC series models come with easily accessible service points, allowing operators to perform routine checks and maintenance without hassle. This feature contributes to the longevity of the equipment, ensuring that owners maximize their investment.

Compatibility is another essential advantage of the Woods HC series. Designed to work seamlessly with a variety of tractors, these cutters allow for flexibility across different tractor brands and models, making them a versatile choice for operators with mixed equipment lines.

In summary, Woods Equipment HC48, HC54, HC60, and HC72 hydraulic cutters stand out for their robust construction, cutting efficiency, hydraulic drive, user-friendly features, and compatibility with various tractors. These models are perfect for anyone looking to maintain their land effectively, making challenging cutting tasks accessible and manageable. Overall, the HC series is a reliable investment for professional land management needs.