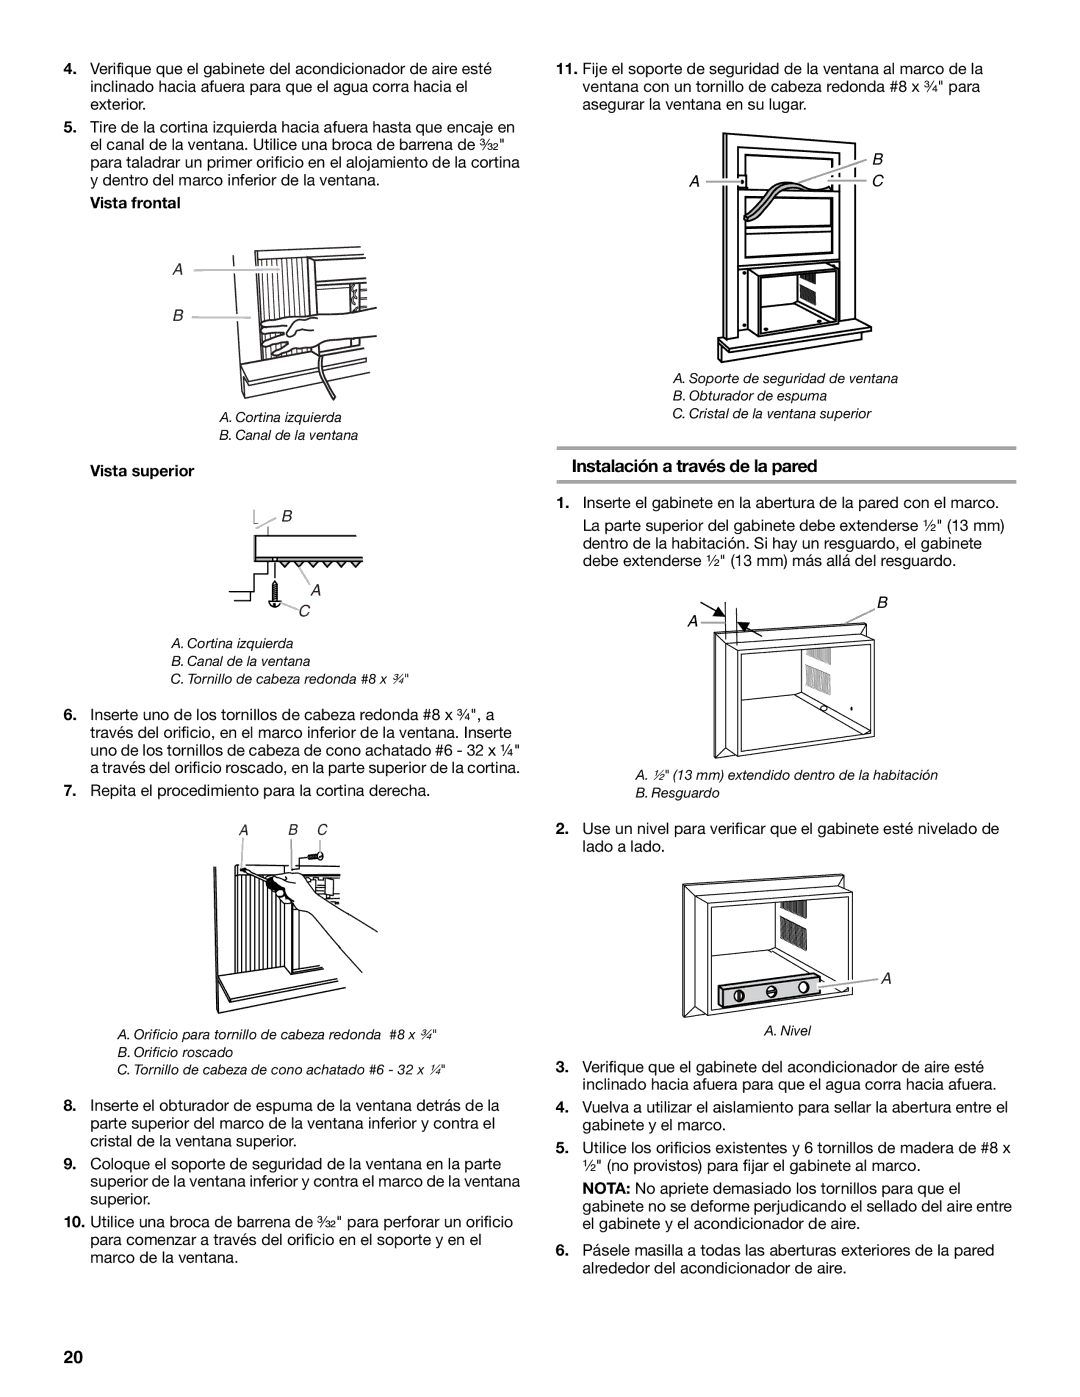
4.Verifique que el gabinete del acondicionador de aire esté inclinado hacia afuera para que el agua corra hacia el exterior.

5.Tire de la cortina izquierda hacia afuera hasta que encaje en el canal de la ventana. Utilice una broca de barrena de ³⁄₃₂" para taladrar un primer orificio en el alojamiento de la cortina y dentro del marco inferior de la ventana.

Vista frontal

A

B

A. Cortina izquierda

B. Canal de la ventana

Vista superior

B

A

C

A. Cortina izquierda

B. Canal de la ventana

C. Tornillo de cabeza redonda #8 x ³⁄₄"

6.Inserte uno de los tornillos de cabeza redonda #8 x ³⁄₄", a través del orificio, en el marco inferior de la ventana. Inserte uno de los tornillos de cabeza de cono achatado #6 - 32 x ¼" a través del orificio roscado, en la parte superior de la cortina.

7.Repita el procedimiento para la cortina derecha.

A B C

A. Orificio para tornillo de cabeza redonda #8 x ³⁄₄"

B. Orificio roscado

C. Tornillo de cabeza de cono achatado #6 - 32 x ¹⁄₄"

8.Inserte el obturador de espuma de la ventana detrás de la parte superior del marco de la ventana inferior y contra el cristal de la ventana superior.

9.Coloque el soporte de seguridad de la ventana en la parte superior de la ventana inferior y contra el marco de la ventana superior.

10.Utilice una broca de barrena de ³⁄₃₂" para perforar un orificio para comenzar a través del orificio en el soporte y en el marco de la ventana.

11.Fije el soporte de seguridad de la ventana al marco de la ventana con un tornillo de cabeza redonda #8 x ³⁄₄" para asegurar la ventana en su lugar.

B

A C

A. Soporte de seguridad de ventana

B. Obturador de espuma

C. Cristal de la ventana superior

Instalación a través de la pared

1.Inserte el gabinete en la abertura de la pared con el marco.

La parte superior del gabinete debe extenderse ¹⁄₂" (13 mm) dentro de la habitación. Si hay un resguardo, el gabinete debe extenderse ¹⁄₂" (13 mm) más allá del resguardo.

B

A

A. ¹⁄₂" (13 mm) extendido dentro de la habitación

B.Resguardo

2.Use un nivel para verificar que el gabinete esté nivelado de lado a lado.

A

A.Nivel

3.Verifique que el gabinete del acondicionador de aire esté inclinado hacia afuera para que el agua corra hacia afuera.

4.Vuelva a utilizar el aislamiento para sellar la abertura entre el gabinete y el marco.

5.Utilice los orificios existentes y 6 tornillos de madera de #8 x ¹⁄₂" (no provistos) para fijar el gabinete al marco.

NOTA: No apriete demasiado los tornillos para que el gabinete no se deforme perjudicando el sellado del aire entre el gabinete y el acondicionador de aire.

6.Pásele masilla a todas las aberturas exteriores de la pared alrededor del acondicionador de aire.

20

Page 20
Image 20
Whirlpool ACQ082XK1 manual Vista frontal, Vista superior

ACQ082XK1 specifications

The Whirlpool ACQ082XK1 is a cutting-edge air conditioning unit designed to offer efficient cooling and comfort for small to medium-sized spaces. Known for its innovative features, this model stands out in the competitive AC market where performance and energy efficiency are paramount.

One of the key characteristics of the Whirlpool ACQ082XK1 is its impressive cooling capacity of 8,000 BTUs, which makes it suitable for rooms up to 350 square feet. This makes it an ideal choice for bedrooms, living rooms, or offices where maintaining a comfortable temperature is essential, especially during the hot summer months.

The ACQ082XK1 incorporates advanced inverter technology, which adjusts the compressor speed based on the cooling requirements, ensuring optimal temperature control and energy efficiency. This technology not only helps in reducing electricity bills but also contributes to a quieter operation, enhancing the overall user experience.

With its user-friendly digital control panel, the Whirlpool ACQ082XK1 allows for easy temperature adjustments and fan speed settings. Furthermore, it is compatible with remote control operation, giving users the convenience to change settings from a distance without having to get up.

The unit also features a programmable timer, allowing users to set specific operating hours, ensuring that the AC runs only when needed. This feature is particularly useful for those who prefer to come home to a cooled space after a long day at work.

In addition to cooling, the ACQ082XK1 offers a dehumidification mode, which helps to remove excess moisture from the air, creating a more comfortable indoor environment. This can be particularly beneficial in humid climates where excessive moisture can lead to discomfort and potential mold issues.

Installation is straightforward, thanks to the unit's included mounting kit and easy-to-follow instructions. The sleek and modern design of the AC ensures it fits aesthetically into various room decors while providing the necessary cooling power.

Moreover, the Whirlpool ACQ082XK1 is designed with an easy-to-clean filter that helps improve air quality by trapping dust and allergens, ensuring that the air circulated is clean and refreshing. The filter’s accessibility makes regular maintenance hassle-free, contributing to the longevity of the unit.

In conclusion, the Whirlpool ACQ082XK1 is a robust air conditioning solution that combines efficient cooling, modern technology, and user-friendly features, making it a top choice for anyone looking to enhance their indoor comfort. Its reliability and performance make it an essential addition to any home or office.