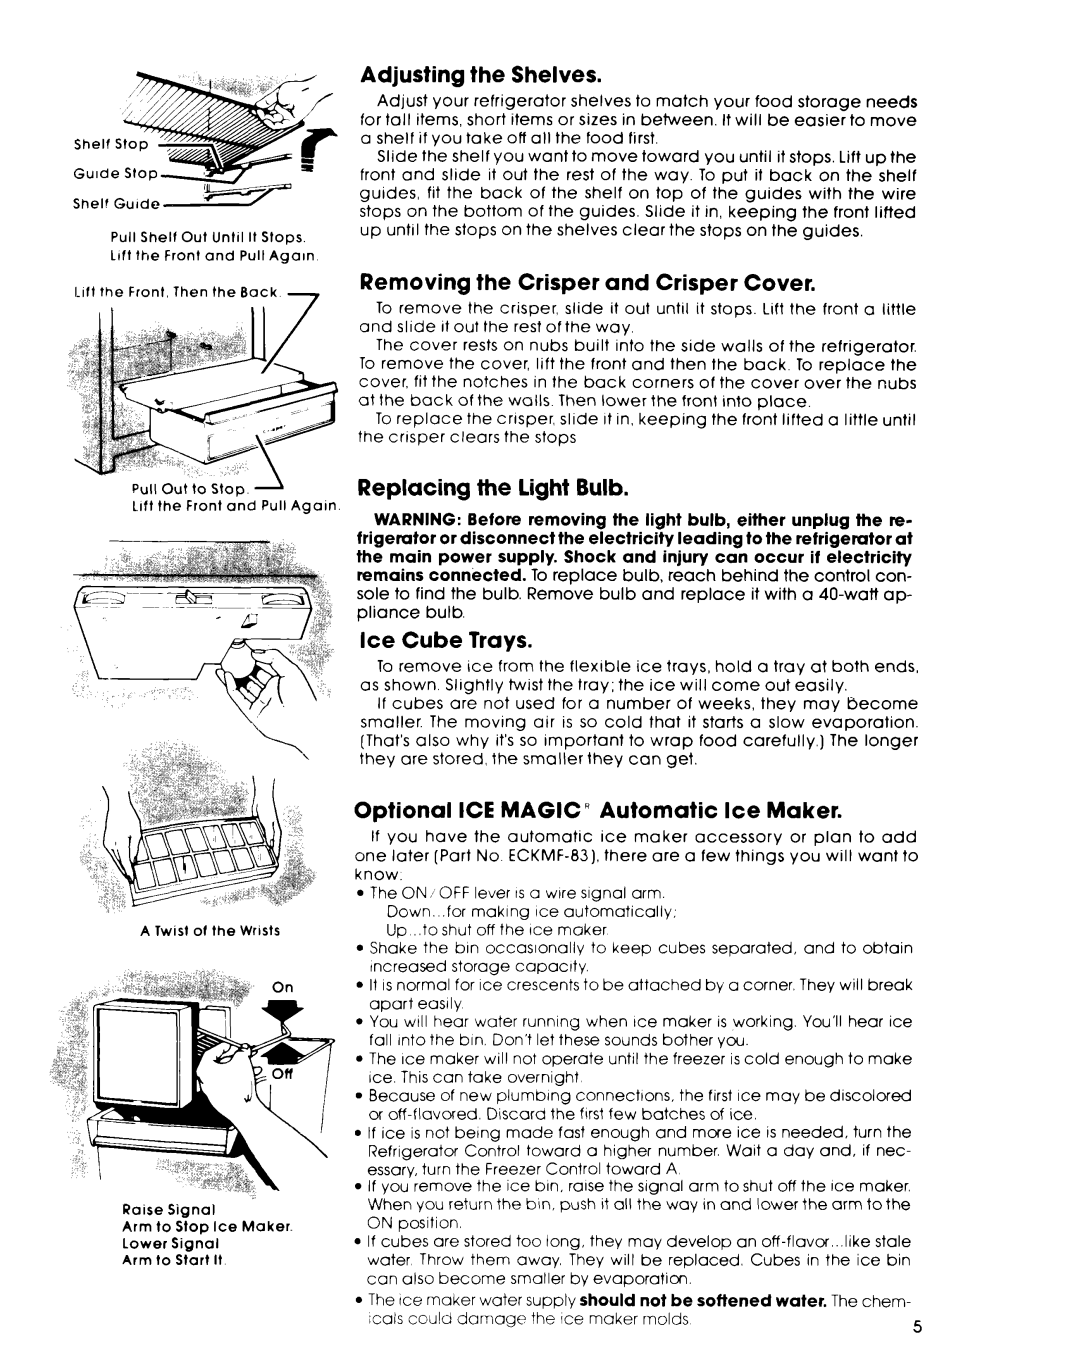
Pull Shelf Out Until It Stops. Lift the Front and Pull Agarn
Lift the Front, Then the Back -
Adjusting the Shelves.
Adjust your refrigerator shelves to match your food storage needs for tall items, short items or sizes in between. It will be easier to move a shelf if you take off all the food first.
Slide the shelf you want to move toward you until it stops. Lift up the front and slide it out the rest of the way. To put it back on the shelf guides, fit the back of the shelf on top of the guides with the wire stops on the bottom of the guides. Slide it in, keeping the front litted up until the stops on the shelves clear the stops on the guides.
Removing the Crisper and Crisper Cover.
To remove the crisper, slide it out until it stops. Lift the front a little and slide it out the rest of the way.
The cover rests on nubs built into the side walls of the refrigerator. To remove the cover, lift the front and then the back. To replace the cover, fit the notches in the back corners of the cover over the nubs at the back of the walls. Then lower the front into place.
To replace the crrsper, slide It in, keeping the front lifted a little until the crisper clears the stops
Pull out to stop. -
Lift the Front and Pull Again.
Replacing the Light Bulb.
WARNING: Before removing the light bulb, either unplug the re- frigerator or disconnect the electricity leading to the refrigerator at the main power supply. Shock and injury can occur if electricity remains connected. To replace bulb, reach behind the control con- sole to find the bulb. Remove bulb and replace it with a
Ice Cube Trays.
To remove ice from the flexible ice trays, hold a tray at both ends, as shown. Slightly twist the tray; the ice will come out easily.
If cubes are not used for a number of weeks, they may become smaller. The moving air is so cold that it starts a slow evaporation. [That’s also why it’s so important to wrap food carefully.) The longer they are stored, the smaller they can get.
A Twist of the Wrists
Raise Signal
Arm to Stop Ice Maker Lower Signal
Arm to Start It
Optional ICE MAGIC” Automatic Ice Maker.
If you have the automatic ice maker accessory or plan to add one later [Part No.
lThe ON I OFF lever IS a wtre signal arm. Down...for making Ice automatically;
| Up .to shut off the Ice maker |
|
|
|
|
|
|
|
|
|
|
| ||||||||||||
l | Shake | the | brn | occaslonally |
| to | keep cubes | separated, | and | to | obtain | |||||||||||||
| Increased | storage |
| capacity. |
|
|
|
|
|
|
|
|
|
|
|
|
| |||||||
l | It IS normal | for | Ice |
| crescents | to | be attached |
| by | a corner. | They | will break | ||||||||||||
| apart |
| easily |
|
|
|
|
|
|
|
|
|
|
|
|
|
|
|
|
|
|
| ||
l | You | wtll | hear |
| water running when Ice maker is working. You’ll hear ice | |||||||||||||||||||
| fall Into the bin. Don’t let these sounds bother you. |
|
|
|
|
| ||||||||||||||||||
l | The | Ice | maker | will | not operate |
| until | the | freezer | is cold enough | to make | |||||||||||||
| Ice. This can take overnight |
|
|
|
|
|
|
|
|
|
|
|
|
| ||||||||||
. | Because | of | new | plumbing |
| connecttons, | the | first Ice | may | be | discolored | |||||||||||||
| or |
| Discard | the | ftrst few | batches |
| of | ice. |
|
|
|
|
| ||||||||||
l | If ice |
| is not | being |
| made | fast | enough | and | mcxe | ice | is needed, | turn | the | ||||||||||
| Refrigerator |
| Control toward a higher number. Wait a day and, if nec- | |||||||||||||||||||||
| essary, turn the Freezer Control toward A |
|
|
|
|
|
|
|
| |||||||||||||||
l | If you | remove |
| the | ice bin, raise the signal arm to shut off the Ice maker. | |||||||||||||||||||
| When you return the bin, push it all the way in and lower the arm to the | |||||||||||||||||||||||
| ON | position |
|
|
|
|
|
|
|
|
|
|
|
|
|
|
|
|
|
|
| |||
l | If cubes | are |
| stored | too long, they may develop | an | stale | |||||||||||||||||
| water |
| Throw | them | away. |
| They | will | be | replaced, | Cubes | in the | ice | bin | ||||||||||
| can |
| also | become |
| smaller | by | evaporation. |
|
|
|
|
|
|
|
|
| |||||||
l | The | ICE: maker |
| water supply | should | not | be | softened | water. | The | chem- | |||||||||||||
| icals |
| could | damage | the | Ice | maker | rnolds |
|
|
|
|
|
|
| 5 | ||||||||
|
|
|
|
|
|
|
|
|
|
|
|
|
|
|
|
|
|
|
|
|
|
|
| |