Manuals
/
Whirlpool
/
Kitchen Appliance
/
Dishwasher
Whirlpool
W10167841A Installation Requirements, Tools and Parts, Location Requirements, C B Ad
Models:
W10167841A
GU3100XTVS
GU3100XTVQ
GU3100XTVB
1
3
32
32
Download
32 pages
30.4 Kb
1
2
3
4
5
6
7
8
Install
Direct Wire Connection
Dimension
Weight
Exigences demplacement
Safety
Power Supply Cord Method
Page 3
Image 3
Page 2
Page 4
Page 3
Image 3
Page 2
Page 4
Contents
INSTRUCTIONS D’INSTALLATION DU LAVE
Table of Contents / Table des matières
Models/Modèles GU3100XTVB GU3100XTVQ GU3100XTVS
UNDERCOUNTER DISHWASHER INSTALLATIONINSTRUCTIONS
DANGER
DISHWASHER SAFETY
Your safety and the safety of others are very important
Do not use dishwasher until completely installed
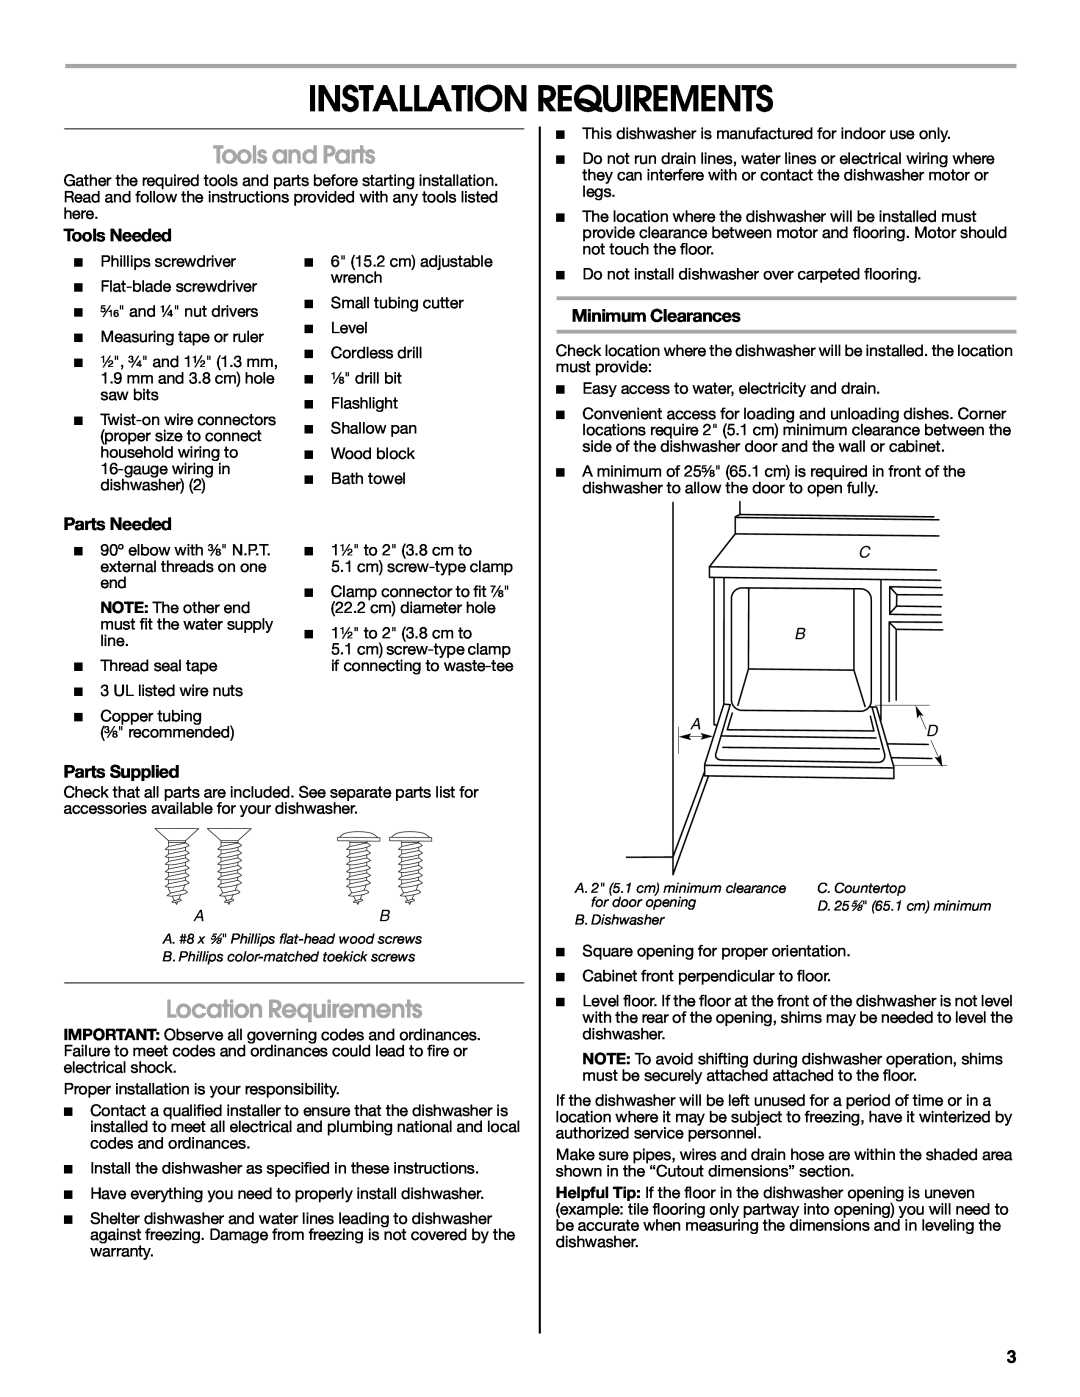
Tools Needed
INSTALLATION REQUIREMENTS
Tools and Parts
Location Requirements
24 61 cm 32¹⁄₂ to 34¹⁄₂ 82.6 to 87.6 cm
Product Dimensions Side View
Installation Clearances Cutout Dimensions
Rear View
GROUNDING INSTRUCTIONS
Direct Wire Connection
Power Supply Cord Connection
Electrical Requirements
Connect Drain Hose to Air Gap-No Waste Disposal
INSTALLATION INSTRUCTIONS
Prepare Cabinet Opening-Existing Utility Hookups
Connect Drain Hose to Air Gap-Waste Disposal
C. Disposal inlet
Connect Drain Hose to Waste Disposal-No Air Gap
Connect Drain Hose-No Waste Disposal or Air Gap
A BC E D
Install Electrical Connection-Direct Wire Method
Install Electrical Connection-Power Supply Cord Method
Prepare Cabinet Opening-No Existing Utility Hookups
Install Water Line
Connect Drain Hose to Waste Disposal-No Air Gap
Use two or more people to move and install dishwasher
Install Dishwasher
Prepare Dishwasher for Installation
Excessive Weight Hazard
Check Door Spring Tension
Move Dishwasher into Cabinet Opening
Level the Dishwasher
Electrical Shock Hazard Electrically ground dishwasher
Make Electrical Connections-Direct Wire Method
Make Electrical Connections-Power Supply Cord Method
Connect ground wire to green ground connector in terminal box
Connect Dishwasher to Water Supply
Connect Dishwasher to Drain
C B A
Complete Installation
Attach Dishwasher to Cabinet
BA A
Electrical Shock Hazard Disconnect power before servicing
Direct Wire Method
Power Supply Cord Method
If you need Assistance or Service
Votre sécurité et celle des autres est très importante
SÉCURITÉ DU LAVE-VAISSELLE
DANGER AVERTISSEMENT
AVERTISSEMENT
Outillage nécessaire
EXIGENCES D’INSTALLATION
Exigences demplacement
Outils et pièces
Distances de dégagement à respecter
Dimensions du produit Vue latérale
Dimensions de l’ouverture à découper
Vue arrière
Spécifications de l’alimentation en eau
Spécifications électriques
INSTRUCTIONS DE MISE À LA TERRE
CONSERVEZ CES INSTRUCTIONS
raccordement préexistants
INSTRUCTIONS D’INSTALLATION
Exigences dévacuation
Préparation de louverture dencastrement du placard - Moyens de
F. Raccord du tuyau de
un cordon
Préparation de louverture dencastrement du placard-Sans
moyens de raccordement préexistants
Pour un lave-vaisselle relié à la terre, branché avec
Raccordement électrique - Méthode de raccordement direct
Installation de la canalisation deau
B C D E G F
2. Ôter l’opercule arrachable du broyeur à déchets
Installation du lave-vaisselle
Préparation du lave-vaisselle pour l’installation
Risque du poids excessif
Établissement de l’aplomb du lave-vaisselle
Contrôle de la tension des ressorts de la porte
Raccordement électrique - Méthode de raccordement direct
Relier le lave-vaisselle à la terre d’une méthode électrique
Ne pas utiliser un câble de rallonge
Raccordement du lave-vaisselle au circuit dévacuation
Raccordement du lave-vaisselle à lalimentation en eau
Fixation du lave-vaisselle au placard
Vérification du fonctionnement du lave-vaisselle
Achever linstallation
Si vous avez besoin d’assistance ou de service
Méthode avec cordon dalimentation électrique
Top
Page
Image
Contents