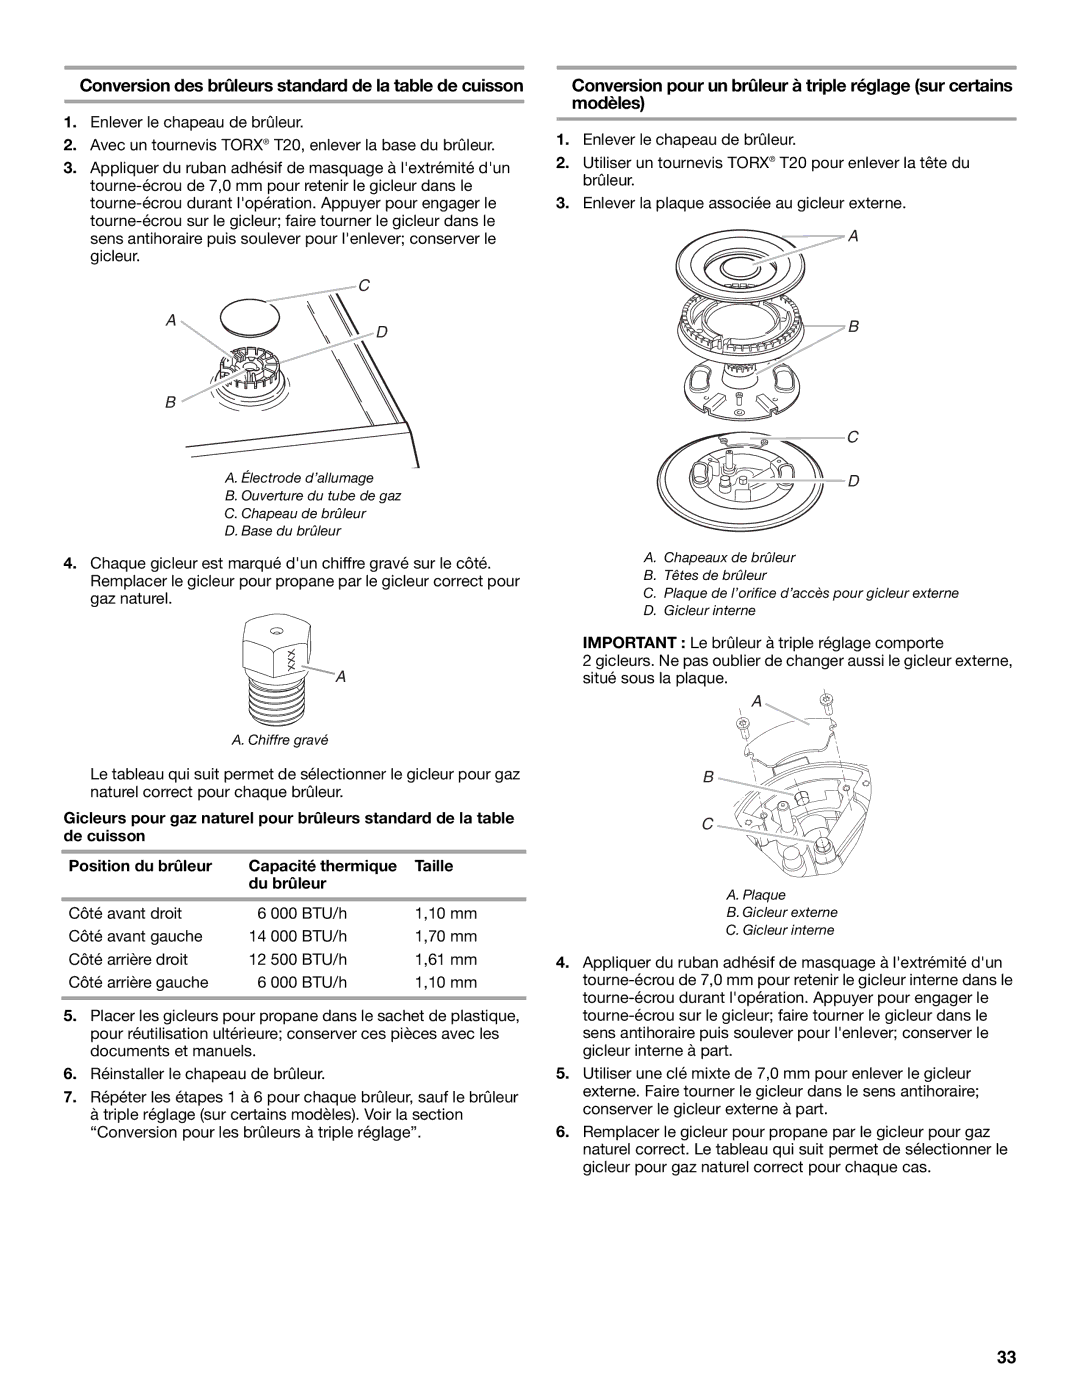
Conversion des brûleurs standard de la table de cuisson

1.Enlever le chapeau de brûleur.

2.Avec un tournevis TORX® T20, enlever la base du brûleur.

3.Appliquer du ruban adhésif de masquage à l'extrémité d'un tourne-écrou de 7,0 mm pour retenir le gicleur dans le tourne-écrou durant l'opération. Appuyer pour engager le tourne-écrou sur le gicleur; faire tourner le gicleur dans le sens antihoraire puis soulever pour l'enlever; conserver le gicleur.

C

A

D

B

A. Électrode d’allumage

B. Ouverture du tube de gaz

C. Chapeau de brûleur

D. Base du brûleur

4.Chaque gicleur est marqué d'un chiffre gravé sur le côté. Remplacer le gicleur pour propane par le gicleur correct pour gaz naturel.

XXX

A


A. Chiffre gravé

Le tableau qui suit permet de sélectionner le gicleur pour gaz naturel correct pour chaque brûleur.

Gicleurs pour gaz naturel pour brûleurs standard de la table de cuisson

Position du brûleur

Capacité thermique

Taille


du brûleur


Côté avant droit

6 000

BTU/h

1,10 mm

Côté avant gauche

14 000 BTU/h

1,70 mm

Côté arrière droit

12 500

BTU/h

1,61 mm

Côté arrière gauche

6 000

BTU/h

1,10 mm


5.Placer les gicleurs pour propane dans le sachet de plastique, pour réutilisation ultérieure; conserver ces pièces avec les documents et manuels.

6.Réinstaller le chapeau de brûleur.

7.Répéter les étapes 1 à 6 pour chaque brûleur, sauf le brûleur

à triple réglage (sur certains modèles). Voir la section “Conversion pour les brûleurs à triple réglage”.

Conversion pour un brûleur à triple réglage (sur certains modèles)

1.Enlever le chapeau de brûleur.

2.Utiliser un tournevis TORX® T20 pour enlever la tête du brûleur.

3.Enlever la plaque associée au gicleur externe.

A

B

C

D

A.Chapeaux de brûleur

B.Têtes de brûleur

C.Plaque de l’orifice d’accès pour gicleur externe

D.Gicleur interne

IMPORTANT : Le brûleur à triple réglage comporte

2 gicleurs. Ne pas oublier de changer aussi le gicleur externe, situé sous la plaque.

A

B

C

A.Plaque

B.Gicleur externe

C.Gicleur interne

4.Appliquer du ruban adhésif de masquage à l'extrémité d'un tourne-écrou de 7,0 mm pour retenir le gicleur interne dans le tourne-écrou durant l'opération. Appuyer pour engager le tourne-écrou sur le gicleur; faire tourner le gicleur dans le sens antihoraire puis soulever pour l'enlever; conserver le gicleur interne à part.

5.Utiliser une clé mixte de 7,0 mm pour enlever le gicleur externe. Faire tourner le gicleur dans le sens antihoraire; conserver le gicleur externe à part.

6.Remplacer le gicleur pour propane par le gicleur pour gaz naturel correct. Le tableau qui suit permet de sélectionner le gicleur pour gaz naturel correct pour chaque cas.

33

Page 33
Image 33
Whirlpool Slide-In Electric Ranges installation instructions Chiffre gravé

Slide-In Electric Ranges specifications

Whirlpool slide-in electric ranges are designed to bring convenience, style, and efficiency to the modern kitchen. These innovative appliances stand out not just for their aesthetics but also for their advanced features and technology that cater to a range of cooking needs.

One of the main characteristics of Whirlpool slide-in electric ranges is their seamless design. Unlike traditional freestanding models, slide-in ranges have a built-in appearance, fitting snugly between cabinets for a sophisticated look. This design eliminates the gap between the range and the countertop, preventing spills and crumbs from accumulating. Additionally, the front-control design places the controls at the front of the unit, allowing easy access and eliminating the need to reach over hot pots and pans.

Whirlpool electric ranges are equipped with powerful and precise cooking technologies. Many models feature advanced induction cooking options that provide rapid heating and consistent temperature control. Induction cooking utilizes electromagnetic energy to directly heat pots and pans, making it faster and more energy-efficient compared to traditional electric coils or radiant burners. For those who prefer traditional cooking, the ranges often come with smooth-top radiant elements, which provide a modern surface that is easy to clean.

In terms of oven features, Whirlpool slide-in electric ranges include convection cooking options, which circulate hot air throughout the oven for even baking and roasting. This technology ensures that food cooks consistently and eliminates the need for manual rotation. Additionally, many models offer self-cleaning options, making maintenance easier and freeing up time for users.

Another noteworthy feature is the FlexHeat Dual Radiant Element, offering flexibility in cooking. This element is equipped with both 6-inch and 9-inch zones, allowing cooks to match the size of their cookware with the burner size, optimizing energy use.

Connectivity is also a significant aspect of modern Whirlpool electric ranges. Many of their models are Wi-Fi-enabled, allowing users to control their ovens remotely using a smartphone. This means preheating the oven, adjusting cooking temperatures, and even setting timers can all be accomplished from anywhere in the home.

Whirlpool slide-in electric ranges combine functionality with stylish design, bringing energy-efficient cooking and advanced technology to kitchens. With features such as versatile cooking surfaces, advanced oven technology, and smart capabilities, these ranges are ideal for both seasoned chefs and home cooks alike. Whether you’re baking, broiling, or simmering, a Whirlpool slide-in electric range is designed to enhance culinary experiences while complementing any kitchen décor.