To Convert Standard Surface Burners

1.Remove burner cap.

2.Using a T20 TORX® screwdriver, remove the burner base.

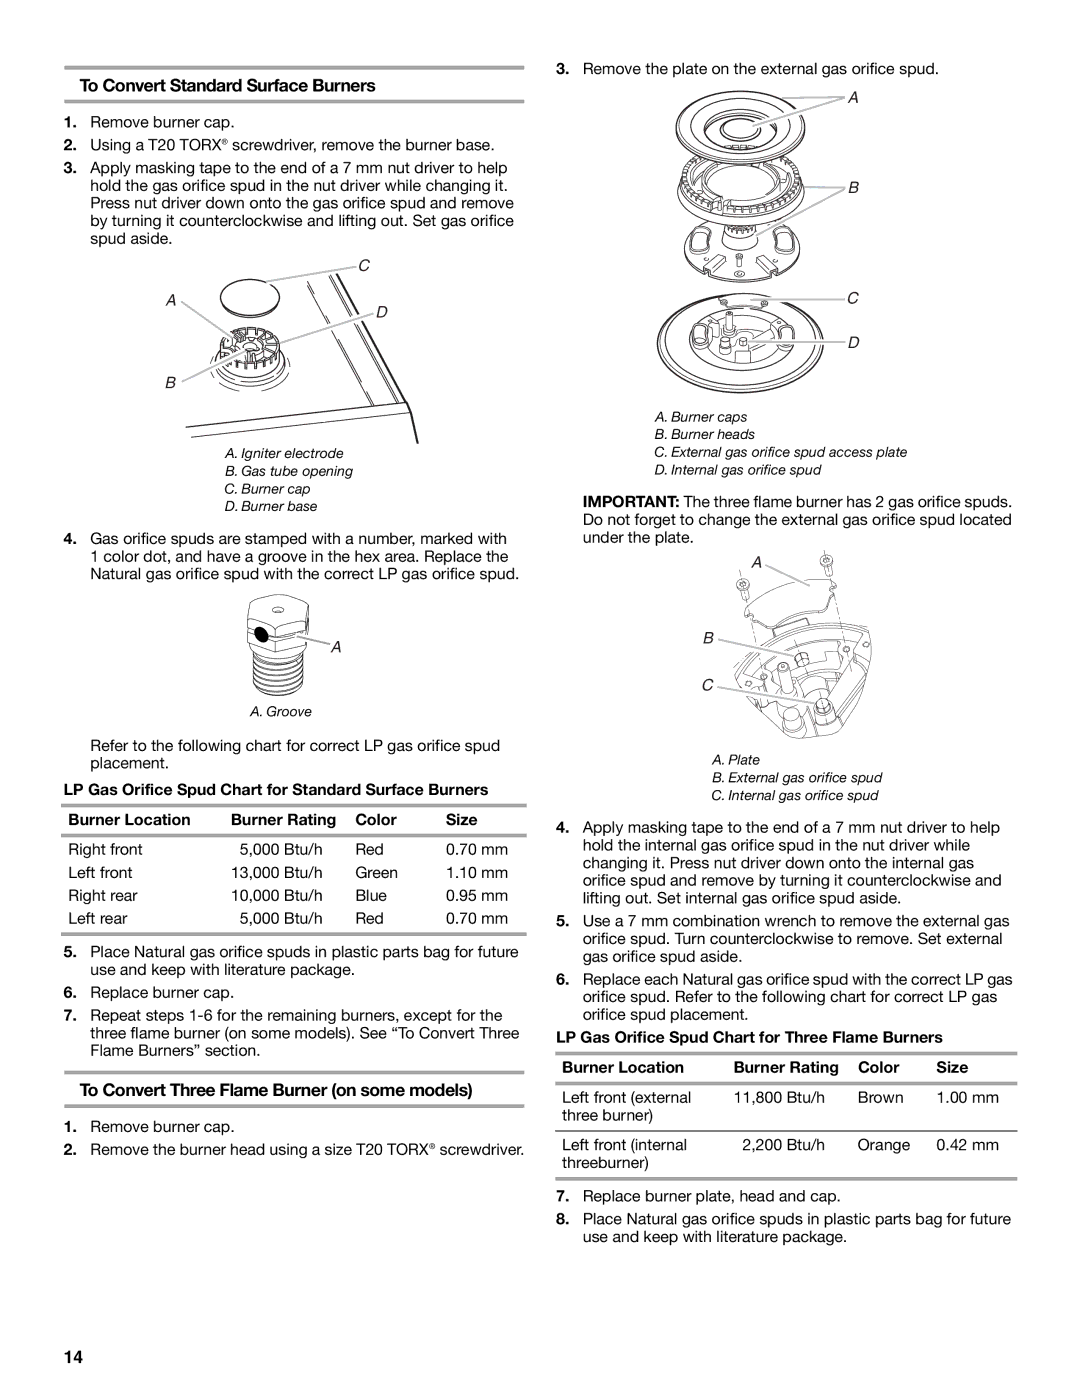
3.Apply masking tape to the end of a 7 mm nut driver to help hold the gas orifice spud in the nut driver while changing it. Press nut driver down onto the gas orifice spud and remove by turning it counterclockwise and lifting out. Set gas orifice spud aside.

C

A

D

B

A. Igniter electrode

B. Gas tube opening

C. Burner cap

D. Burner base

4.Gas orifice spuds are stamped with a number, marked with

1 color dot, and have a groove in the hex area. Replace the Natural gas orifice spud with the correct LP gas orifice spud.

A

A. Groove

Refer to the following chart for correct LP gas orifice spud placement.

LP Gas Orifice Spud Chart for Standard Surface Burners

Burner Location

Burner Rating

Color

Size

Right front

5,000

Btu/h

Red

0.70 mm

Left front

13,000

Btu/h

Green

1.10 mm

Right rear

10,000

Btu/h

Blue

0.95 mm

Left rear

5,000

Btu/h

Red

0.70 mm


5.Place Natural gas orifice spuds in plastic parts bag for future use and keep with literature package.

6.Replace burner cap.

7.Repeat steps 1-6 for the remaining burners, except for the three flame burner (on some models). See “To Convert Three Flame Burners” section.

To Convert Three Flame Burner (on some models)

1.Remove burner cap.

2.Remove the burner head using a size T20 TORX® screwdriver.

3.Remove the plate on the external gas orifice spud.

A

B

C

D

A. Burner caps

B. Burner heads

C. External gas orifice spud access plate

D. Internal gas orifice spud

IMPORTANT: The three flame burner has 2 gas orifice spuds. Do not forget to change the external gas orifice spud located under the plate.

A

B

C

A.Plate

B.External gas orifice spud

C.Internal gas orifice spud

4.Apply masking tape to the end of a 7 mm nut driver to help hold the internal gas orifice spud in the nut driver while changing it. Press nut driver down onto the internal gas orifice spud and remove by turning it counterclockwise and lifting out. Set internal gas orifice spud aside.

5.Use a 7 mm combination wrench to remove the external gas orifice spud. Turn counterclockwise to remove. Set external gas orifice spud aside.

6.Replace each Natural gas orifice spud with the correct LP gas orifice spud. Refer to the following chart for correct LP gas orifice spud placement.

LP Gas Orifice Spud Chart for Three Flame Burners

Burner Location

Burner Rating

Color

Size

Left front (external

11,800

Btu/h

Brown

1.00 mm

three burner)


Left front (internal

2,200

Btu/h

Orange

0.42 mm

threeburner)


7.Replace burner plate, head and cap.

8.Place Natural gas orifice spuds in plastic parts bag for future use and keep with literature package.

14

Page 14
Image 14
Whirlpool Slide-In Electric Ranges To Convert Standard Surface Burners, To Convert Three Flame Burner on some models

Slide-In Electric Ranges specifications

Whirlpool slide-in electric ranges are designed to bring convenience, style, and efficiency to the modern kitchen. These innovative appliances stand out not just for their aesthetics but also for their advanced features and technology that cater to a range of cooking needs.

One of the main characteristics of Whirlpool slide-in electric ranges is their seamless design. Unlike traditional freestanding models, slide-in ranges have a built-in appearance, fitting snugly between cabinets for a sophisticated look. This design eliminates the gap between the range and the countertop, preventing spills and crumbs from accumulating. Additionally, the front-control design places the controls at the front of the unit, allowing easy access and eliminating the need to reach over hot pots and pans.

Whirlpool electric ranges are equipped with powerful and precise cooking technologies. Many models feature advanced induction cooking options that provide rapid heating and consistent temperature control. Induction cooking utilizes electromagnetic energy to directly heat pots and pans, making it faster and more energy-efficient compared to traditional electric coils or radiant burners. For those who prefer traditional cooking, the ranges often come with smooth-top radiant elements, which provide a modern surface that is easy to clean.

In terms of oven features, Whirlpool slide-in electric ranges include convection cooking options, which circulate hot air throughout the oven for even baking and roasting. This technology ensures that food cooks consistently and eliminates the need for manual rotation. Additionally, many models offer self-cleaning options, making maintenance easier and freeing up time for users.

Another noteworthy feature is the FlexHeat Dual Radiant Element, offering flexibility in cooking. This element is equipped with both 6-inch and 9-inch zones, allowing cooks to match the size of their cookware with the burner size, optimizing energy use.

Connectivity is also a significant aspect of modern Whirlpool electric ranges. Many of their models are Wi-Fi-enabled, allowing users to control their ovens remotely using a smartphone. This means preheating the oven, adjusting cooking temperatures, and even setting timers can all be accomplished from anywhere in the home.

Whirlpool slide-in electric ranges combine functionality with stylish design, bringing energy-efficient cooking and advanced technology to kitchens. With features such as versatile cooking surfaces, advanced oven technology, and smart capabilities, these ranges are ideal for both seasoned chefs and home cooks alike. Whether you’re baking, broiling, or simmering, a Whirlpool slide-in electric range is designed to enhance culinary experiences while complementing any kitchen décor.