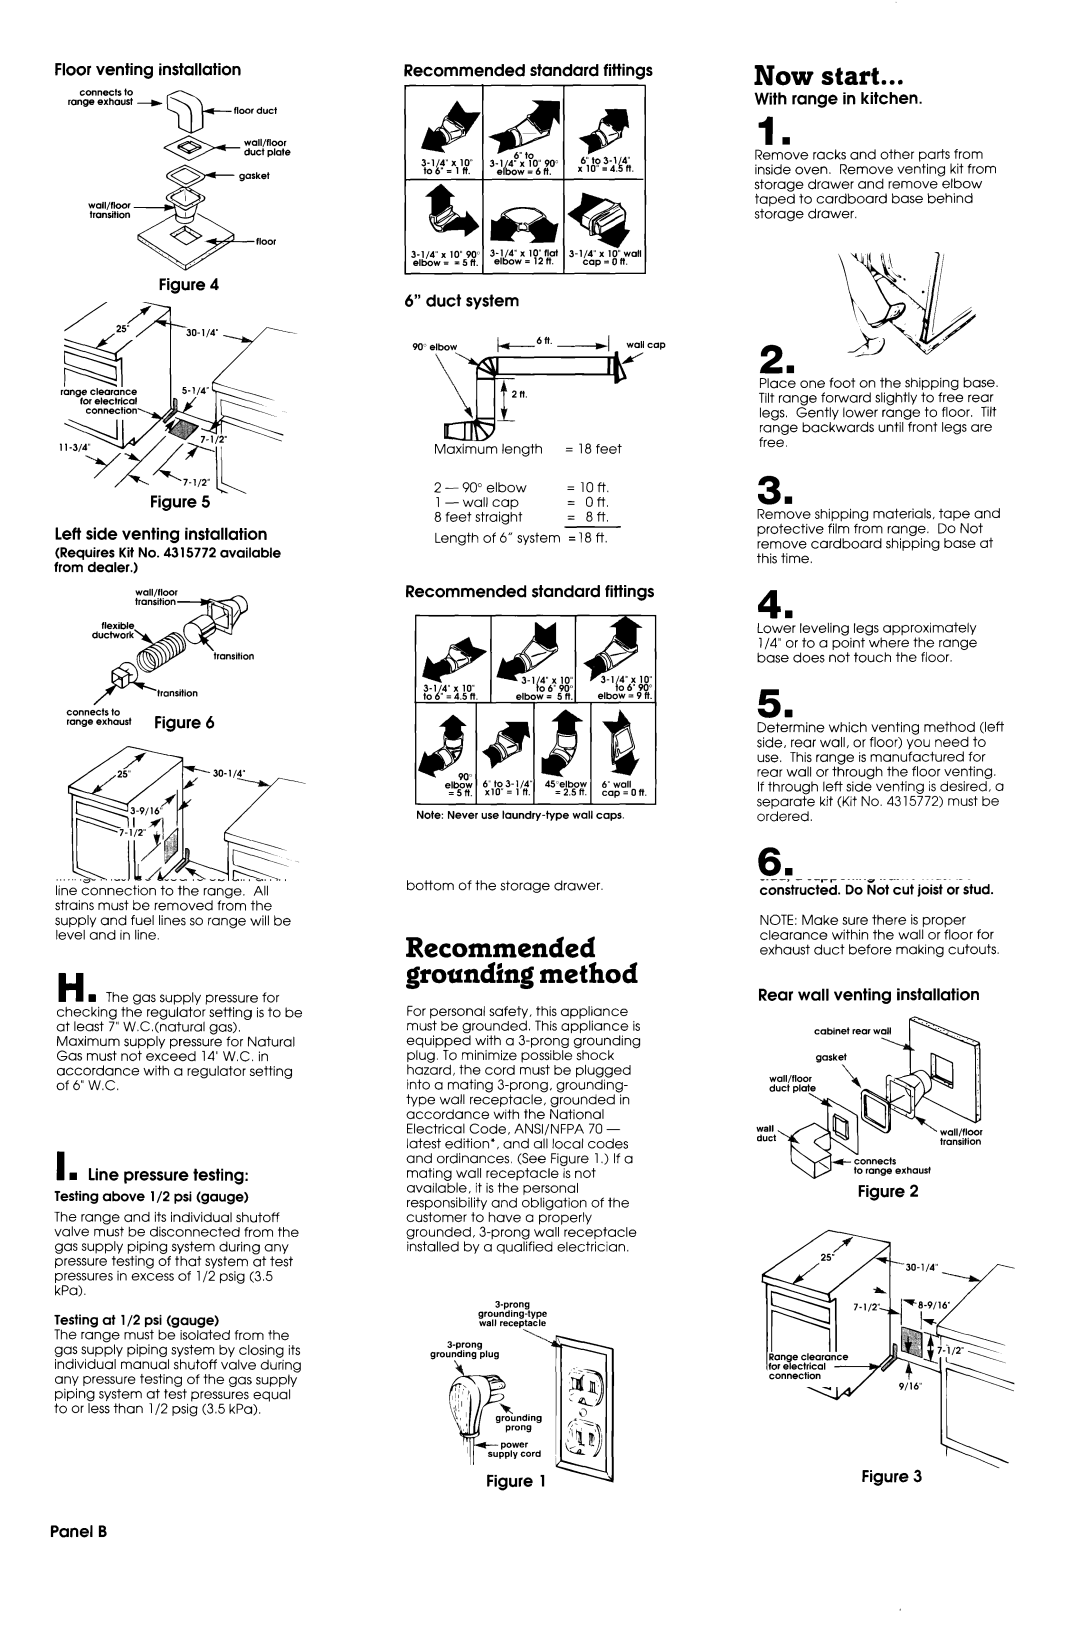
Floor venting installation

connects to range exhaust +

floor duct

Q-

wall/floor transition

Figure 4

Figure 5

Left side venting installation

(Requires Kit No. 43 15772 available from dealer.)

connects to

range exhaust Figure 6

nce

Figure 7

Recommended duct length for island or peninsula installations

Use 6” or 3-l /4” x 10” duct with a maximum of 18 feet for duct system. For best performance, use no more than three 90” elbows. To calculate the length of system you need, add the equivalent feet for each duct piece used in the system, See the following example:

3- l/4” x 10” duct system

3-l/4” x 10” elbow

6” to 3-l/4” x 10”

ET+- transition

Maximum length = 18 ft.

90”

elbow

= 5ft.


1 -wall

cap

= Oft.


1 -

transition

=

4-l/2

ft.

8- l/2 feet straight

=

8-l/2

ft.

Length

of


3- l/4”

x 10” system

=18 ft.


Recommended standard fittings

3-l/4” x

10”

900

3-l/4”

x 10” flat

3-l/4” x 10”

wall

elbow=

=5R.

elbow

= 12 ft.

cap=Oft.


I


I


I

I

6”

duct

system


90”

e


cap

Maximum

length

=

18 feet

2-9O”elbow

=

loft.

1 -wall

cap

=

Oft.

8 feet straight

=

8ft.

Length of 6” system = 18 ft.

Recommended standard fittings

IIII

Note: Never use laundry-type wall caps.

Now start...

With range in kitchen.

1.

Remove racks and other parts from inside oven. Remove venting kit from storage drawer and remove elbow taped to cardboard base behind storage drawer.

2.

Place one foot on the shipping base. Tilt range forward slightly to free rear legs. Gently lower range to floor. Tilt range backwards until front legs are free.

3.

Remove shipping materials, tape and protective film from range. Do Not remove cardboard shipping base at this time.

4.

Lower leveling legs approximately l/4” or to a point where the range base does not touch the floor.

5

Det:mine which venting method (left side, rear wall, or floor) you need to

use. This range is manufactured for rear wall or through the floor venting.

If through left side venting is desired, a separate kit (Kit No. 4315772) must be ordered.

6.

Clearly mark where vent opening will be made in cabinet opening according to the venting method needed. See Venting requirements for dimensions.

7

Usin:a saber saw, cut a 7-l /2” x

7-l /2” square opening for the vent ductwork.

8.

For rear wall venting: Install wall/floor transition through back of cabinet using 8 wood screws (or anchor bolts if fastening to drywall or masonry). Stretch slotted gasket over edge of wall/floor transition.

For countertops without a backsplash, the distance from the rear wall to the gasket must be at least 3/4”;

7/8” maximum.

Panel C

Page 4
Image 4
Whirlpool SS373PEX1 installation instructions Now start

SS373PEX1 specifications

The Whirlpool SS373PEX1 is a state-of-the-art refrigerator that epitomizes modern design and advanced technology. With its sleek stainless-steel finish, this refrigerator adds a touch of sophistication to any kitchen while providing top-notch functionality. One of the main features of the SS373PEX1 is its generous storage capacity. With multiple spacious compartments and adjustable shelving, this model is designed to accommodate various food items, from large party trays to delicate vegetables, ensuring that everything has its designated space.

A standout technology featured in the SS373PEX1 is the Adaptive Defrost system. This innovative feature automatically determines when defrosting is needed, making it both energy-efficient and convenient. As a result, the refrigerator maintains optimal cooling performance without unnecessary energy consumption, which ultimately saves on utility bills.

Another notable characteristic of the Whirlpool SS373PEX1 is the advanced cooling system. The refrigerator uses the Accu-Chill Temperature Management System, which efficiently senses and adapts to cooling needs. This ensures a consistent temperature throughout the unit, preserving the freshness and quality of your food items for a longer period. Additionally, the Energy Star certification of this model underscores Whirlpool's commitment to energy conservation, allowing consumers to enjoy a high-performance appliance that is also eco-friendly.

The Whirlpool SS373PEX1 is designed with user convenience in mind. It includes convenience features such as humidity-controlled crisper drawers, which help maintain optimal moisture levels for fruits and vegetables, preserving their freshness. Furthermore, it comes with adjustable bins and shelves, making it easy to organize and access food items without hassle.

For those who appreciate connectivity, the Whirlpool SS373PEX1 is compatible with smart home systems, allowing users to monitor and control the refrigerator remotely. This feature offers peace of mind and practicality for busy households.

In conclusion, the Whirlpool SS373PEX1 stands out as a modern refrigerator that combines elegance, efficiency, and advanced technology. Its impressive features and user-friendly design make it an ideal choice for anyone looking to enhance their kitchen while enjoying reliable performance and functionality. Whether you are storing everyday essentials or preparing for special events, this refrigerator is equipped to meet all your cooling needs.