Attaching the optional ice maker to a water supply (cont.)

Raccordement de la machine

àglaçons optionelle à une canalisation d’eau (suite)

Connecting to refrigerator

NOTE: The first step for connecting the water line to your refrigerator is different depending on the type of water valve provided with your refrig- erator. See the diagrams at right to determine the style of valve you have. (On kit models, assemble water valve to refrigerator per kit instructions.)

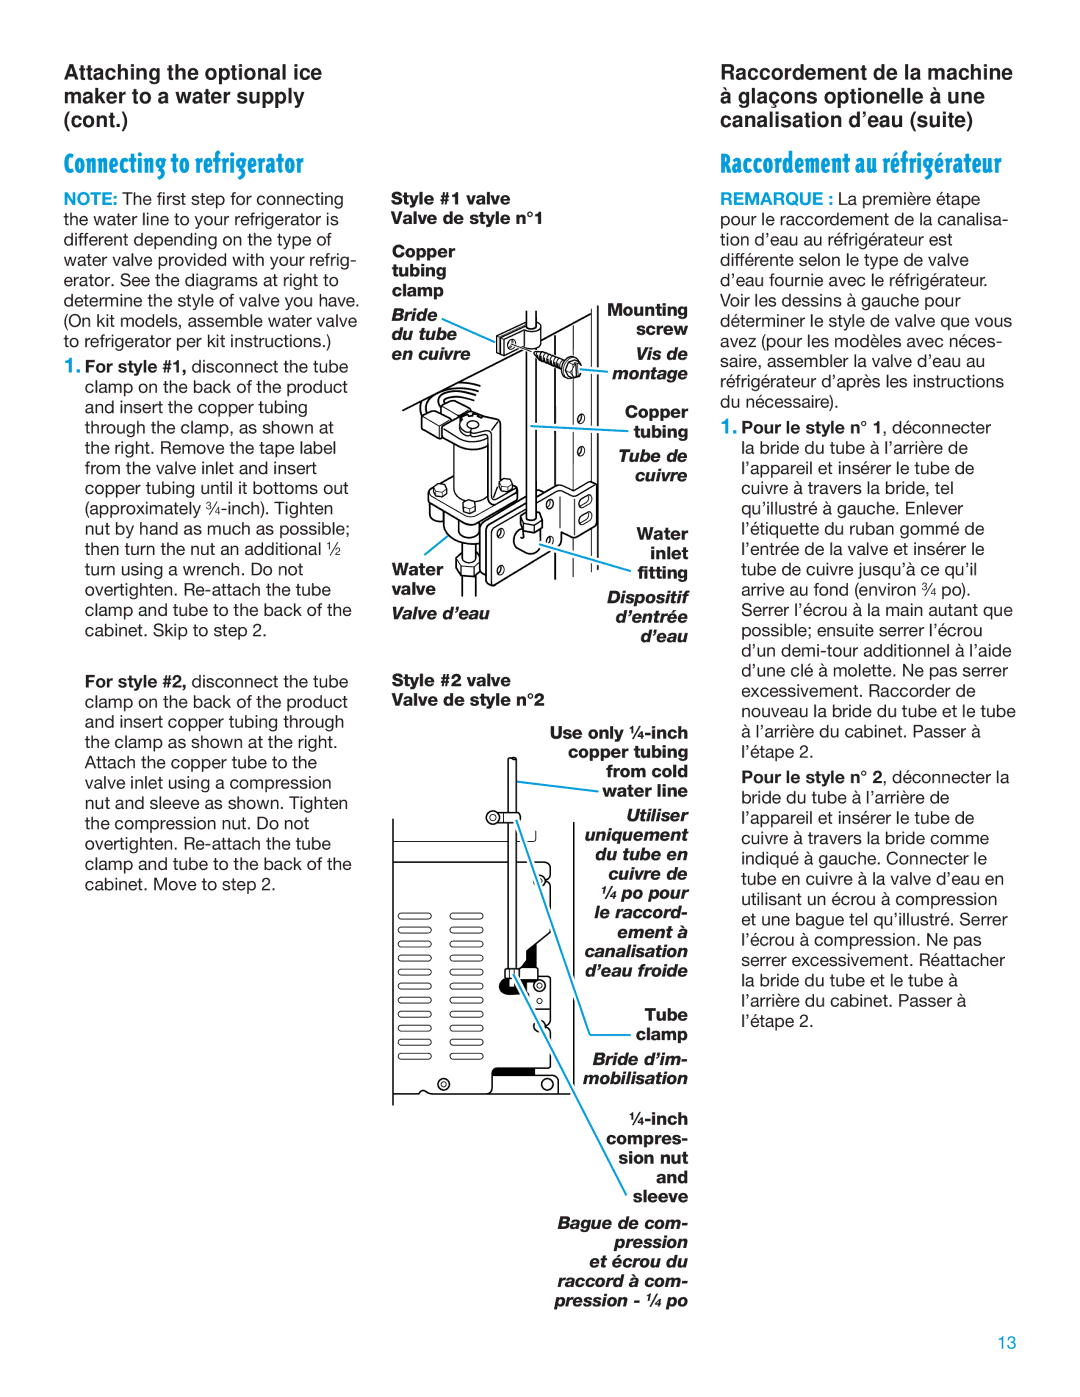
1.For style #1, disconnect the tube clamp on the back of the product and insert the copper tubing through the clamp, as shown at the right. Remove the tape label from the valve inlet and insert copper tubing until it bottoms out (approximately 34-inch). Tighten nut by hand as much as possible; then turn the nut an additional 12 turn using a wrench. Do not overtighten. Re-attach the tube clamp and tube to the back of the cabinet. Skip to step 2.

For style #2, disconnect the tube clamp on the back of the product and insert copper tubing through the clamp as shown at the right.

Attach the copper tube to the valve inlet using a compression nut and sleeve as shown. Tighten the compression nut. Do not overtighten. Re-attach the tube clamp and tube to the back of the cabinet. Move to step 2.

Style #1 valve

Valve de style n°1

Copper


tubing


clamp

Mounting

Bride

du tube

screw

en cuivre

Vis de


montage


Copper


tubing


Tube de


cuivre


Water

Water

inlet

fitting

valve

Dispositif

Valve d’eau

d’entrée

d’eau

Style #2 valve

Valve de style n°2

Use only 14-inch copper tubing from cold water line

Utiliser uniquement du tube en cuivre de

14 po pour le raccord- ement à canalisation d’eau froide

Tube clamp

Bride d’im- mobilisation

14-inch compres- sion nut and sleeve

Bague de com- pression et écrou du

raccord à com- pression - 14 po

Raccordement au rŽfrigŽrateur

REMARQUE : La première étape pour le raccordement de la canalisa- tion d’eau au réfrigérateur est différente selon le type de valve d’eau fournie avec le réfrigérateur. Voir les dessins à gauche pour déterminer le style de valve que vous avez (pour les modèles avec néces- saire, assembler la valve d’eau au réfrigérateur d’après les instructions du nécessaire).

1.Pour le style n°Ê 1, déconnecter la bride du tube à l’arrière de l’appareil et insérer le tube de cuivre à travers la bride, tel qu’illustré à gauche. Enlever l’étiquette du ruban gommé de l’entrée de la valve et insérer le tube de cuivre jusqu’à ce qu’il arrive au fond (environ 34Ê po). Serrer l’écrou à la main autant que possible; ensuite serrer l’écrou d’un demi-tour additionnel à l’aide d’une clé à molette. Ne pas serrer excessivement. Raccorder de nouveau la bride du tube et le tube à l’arrière du cabinet. Passer à l’étape 2.

Pour le style n° 2, déconnecter la bride du tube à l’arrière de l’appareil et insérer le tube de cuivre à travers la bride comme indiqué à gauche. Connecter le tube en cuivre à la valve d’eau en utilisant un écrou à compression et une bague tel qu’illustré. Serrer l’écrou à compression. Ne pas serrer excessivement. Réattacher la bride du tube et le tube à l’arrière du cabinet. Passer à l’étape 2.

13

Page 13
Image 13
Whirlpool TT14DKXEW11 manual Screw, Water Inlet Fitting Valve, Tube clamp, ⁄4-inch compres- sion nut and sleeve

TT14DKXEW11 specifications

The Whirlpool TT14DKXEW11 is a top-freezer refrigerator that blends style, functionality, and efficient performance. Known for its classic design and user-friendly features, this model is well-suited for a variety of kitchen spaces, whether compact or larger environments.

One of the standout characteristics of the TT14DKXEW11 is its ample storage capacity. With a total volume of approximately 14 cubic feet, this refrigerator offers a spacious interior to accommodate all your food storage needs. The refrigerator compartment features adjustable shelves that can be customized to fit different sized items, allowing for optimal organization.

The refrigerator also boasts an advanced cooling system that ensures consistent temperatures throughout the unit, helping to keep fruits, vegetables, and dairy products fresher for longer. The separate freezer compartment is designed with an integrated ice maker option, providing convenient access to ice as needed.

Another notable feature is the Energy Star certification, which signifies that the TT14DKXEW11 meets strict energy efficiency guidelines set by the U.S. Environmental Protection Agency. This not only aids in reducing your carbon footprint but also contributes to lower energy bills, a valuable consideration for budget-conscious consumers.

The interior lighting in the Whirlpool TT14DKXEW11 is designed for clarity and visibility, allowing users to easily locate items in both the fridge and freezer sections without hassle. The door bins are also adjustable, providing users with the flexibility to store taller bottles or larger containers without sacrificing storage space.

In terms of technology, the unit incorporates a reliable defrost system, which works by automatically defrosting the freezer when necessary, thus eliminating the need for manual defrosting and making maintenance simpler.

The sleek white exterior of the TT14DKXEW11 adds a touch of elegance and blends seamlessly with various kitchen styles. Its user-friendly controls are easy to navigate, making temperature adjustments quick and straightforward.

Overall, the Whirlpool TT14DKXEW11 stands out as a reliable refrigerator that combines essential features with modern technologies, ensuring efficient storage and convenience for every household.