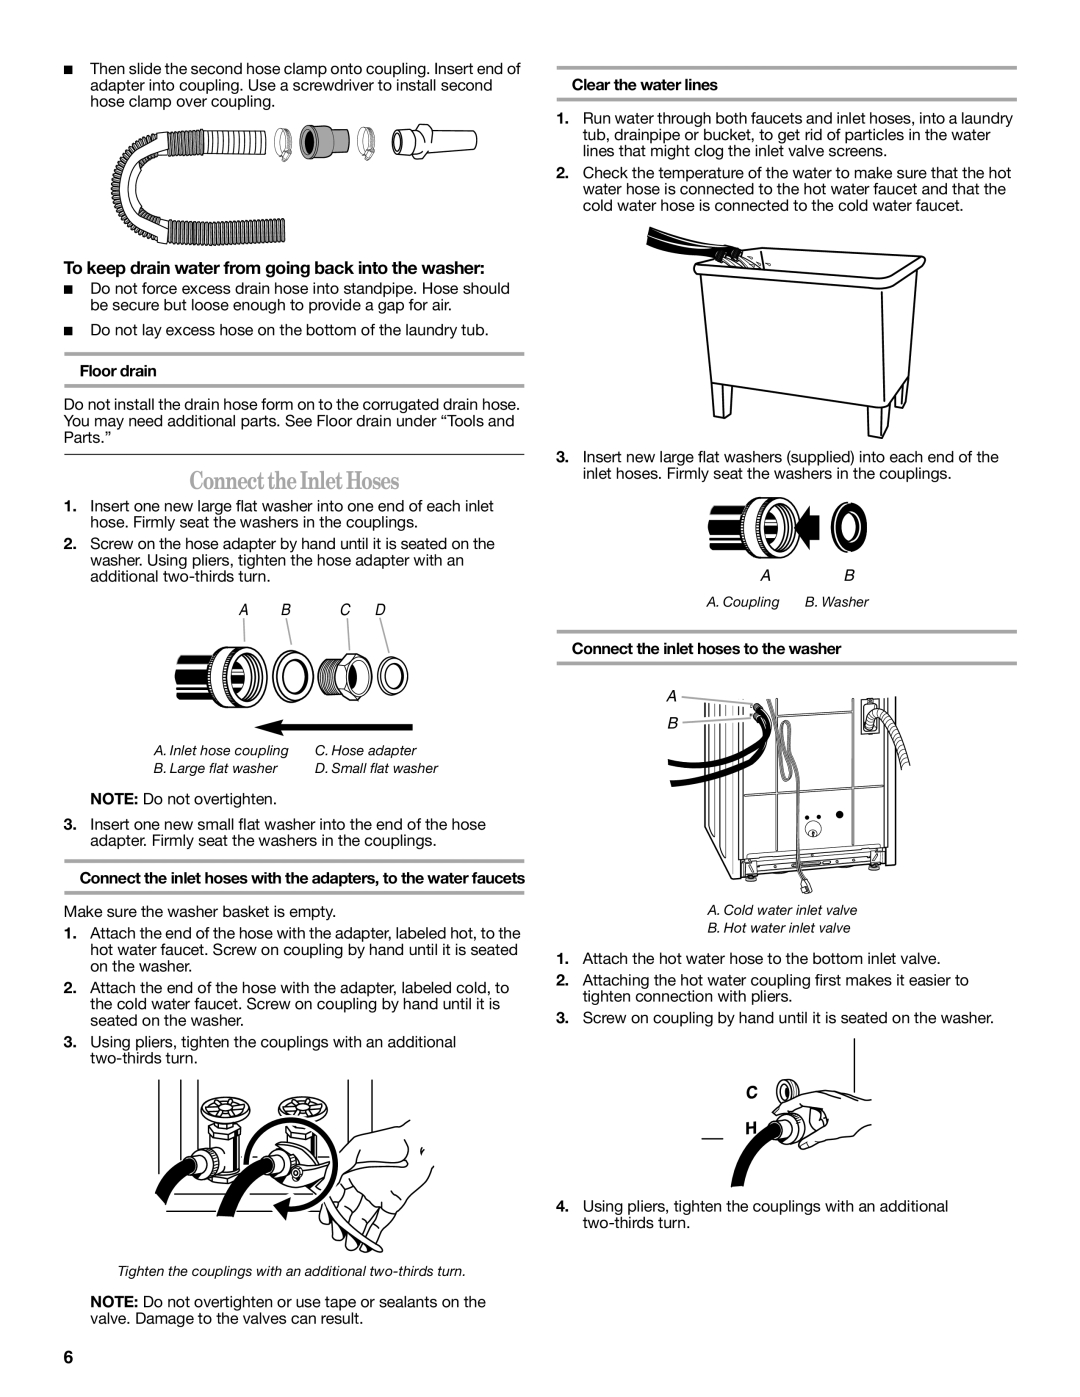
Then slide the second hose clamp onto coupling. Insert end of adapter into coupling. Use a screwdriver to install second hose clamp over coupling.

To keep drain water from going back into the washer:

Do not force excess drain hose into standpipe. Hose should be secure but loose enough to provide a gap for air.

Do not lay excess hose on the bottom of the laundry tub.

Floor drain

Do not install the drain hose form on to the corrugated drain hose. You may need additional parts. See Floor drain under “Tools and Parts.”

Connect the Inlet Hoses

1.Insert one new large flat washer into one end of each inlet hose. Firmly seat the washers in the couplings.

2.Screw on the hose adapter by hand until it is seated on the washer. Using pliers, tighten the hose adapter with an additional two-thirds turn.

A B C D

A. Inlet hose coupling

C. Hose adapter

B. Large flat washer

D. Small flat washer

NOTE: Do not overtighten.

3.Insert one new small flat washer into the end of the hose adapter. Firmly seat the washers in the couplings.

Connect the inlet hoses with the adapters, to the water faucets

Make sure the washer basket is empty.

1.Attach the end of the hose with the adapter, labeled hot, to the hot water faucet. Screw on coupling by hand until it is seated on the washer.

2.Attach the end of the hose with the adapter, labeled cold, to the cold water faucet. Screw on coupling by hand until it is seated on the washer.

3.Using pliers, tighten the couplings with an additional two-thirds turn.

Tighten the couplings with an additional two-thirds turn.

NOTE: Do not overtighten or use tape or sealants on the valve. Damage to the valves can result.

Clear the water lines

1.Run water through both faucets and inlet hoses, into a laundry tub, drainpipe or bucket, to get rid of particles in the water lines that might clog the inlet valve screens.

2.Check the temperature of the water to make sure that the hot water hose is connected to the hot water faucet and that the cold water hose is connected to the cold water faucet.

3.Insert new large flat washers (supplied) into each end of the inlet hoses. Firmly seat the washers in the couplings.

AB

A. Coupling

B. Washer

Connect the inlet hoses to the washer

A

B

A. Cold water inlet valve

B. Hot water inlet valve

1.Attach the hot water hose to the bottom inlet valve.

2.Attaching the hot water coupling first makes it easier to tighten connection with pliers.

3.Screw on coupling by hand until it is seated on the washer.

4.Using pliers, tighten the couplings with an additional two-thirds turn.

6

Page 6
Image 6
Whirlpool W10038100 Connect the Inlet Hoses, To keep drain water from going back into the washer, Floor drain

W10038100 specifications

The Whirlpool W10038100 is a highly regarded kitchen appliance designed to optimize the cooking experience while enhancing culinary capabilities. This model seamlessly blends style, efficiency, and functionality, making it suitable for both amateur cooks and seasoned chefs alike.

One of the standout features of the W10038100 is its advanced temperature management system. This technology ensures that heat is evenly distributed throughout the cooking space, allowing for perfectly cooked dishes every time. The system minimizes hot spots and cold zones that can lead to uneven cooking, making it ideal for roasting meats or baking cakes.

The Whirlpool W10038100 incorporates innovative self-cleaning capabilities. This feature not only saves time but also ensures that maintenance is minimal. The self-cleaning function operates at high temperatures to burn off residue, leaving the appliance clean and ready for the next cooking adventure with just a touch of a button.

In terms of design, the W10038100 boasts a sleek, modern appearance that fits seamlessly into any kitchen aesthetic. Its stainless steel finish not only provides a durable surface that resists fingerprints and smudges but also adds a touch of elegance to your culinary space. The user-friendly interface features clear digital displays and intuitive controls that simplify the cooking process.

The W10038100 also leverages smart technology, allowing users to connect their devices and monitor cooking progress remotely. This connectivity means that whether you’re in the living room or at the grocery store, you can adjust cooking settings or check on your meal’s status through a smartphone app. This level of convenience is particularly beneficial for busy households juggling multiple tasks.

Energy efficiency is another highlight of the Whirlpool W10038100. This model is designed to consume less energy than traditional appliances without sacrificing performance. This not only benefits the environment but also leads to reduced utility bills—a win-win for environmentally conscious consumers.

Furthermore, the appliance includes multiple cooking modes, allowing users to experiment with various techniques such as baking, broiling, and sautéing. With versatile options, it accommodates various recipes and cooking styles, making every meal a possibility.

In summary, the Whirlpool W10038100 stands out for its excellent temperature management, self-cleaning capabilities, modern design, smart technology, energy efficiency, and versatile cooking modes. This combination of features makes it a top choice for anyone looking to elevate their kitchen experience.