Replace Doors and Hinges

1.Assemble the parts for the top hinges as shown in Top Hinge graphic. Do not tighten the screws completely.

2.Replace the parts for the bottom hinge as shown in Bottom Hinge graphic. Tighten screws. Replace the refrigerator door.

NOTE: Provide additional support for the refrigerator door while the hinges are being moved. Do not depend on the door gasket magnets to hold the door in place while you are working.

3.Align the door so that the bottom of the refrigerator door aligns evenly with the top of the freezer drawer. Tighten all screws.

4.Reconnect the wiring plug on top of the left-hand side refrigerator door.

5.Reconnect the water line by pulling back the locking collar ring while firmly pushing the water line into the connector.

6.Check for leaks. Replace the façade and top hinge covers.

Remove and Replace Freezer Drawer

IMPORTANT: Two people may be required to remove and replace the freezer drawer. Graphics are included later in this section.

Remove Drawer Front

1.Open the freezer drawer to full extension.

2.Loosen the four screws attaching the drawer glides to the drawer front. See Drawer Front Removal graphic.

NOTE: Loosen screws three to four turns. Keep the screws in the drawer front.

3.Lift drawer front upward and off the screws. See Drawer Front Removal graphic.

Replace Drawer Front

1.Slide the drawer glides out of the freezer compartment. Insert the screws in the top of the drawer front into the slots in the drawer brackets. See Drawer Front Replacement graphic.

2.Pull the drawer brackets toward you to position the two screws in the bottom of the drawer front into the brackets. See Drawer Front Replacement graphic.

3.Completely tighten the four screws.

Adjust the Doors

1.If your refrigerator seems unsteady or you want the door to close more easily, raise or lower the cabinet. Using a ³⁄₈" hex driver, turn the roller adjustment screw(s) on each side to raise or lower that side of the refrigerator.

NOTE: Having someone push against the top of the refrigerator takes some weight off the adjustment screws and rollers. This makes it easier to turn the screws. It may take several turns of the roller adjustment screw to adjust the tilt of the refrigerator.

To raise, turn the roller adjustment screw to the right.

To lower, turn the roller adjustment screw to the left.

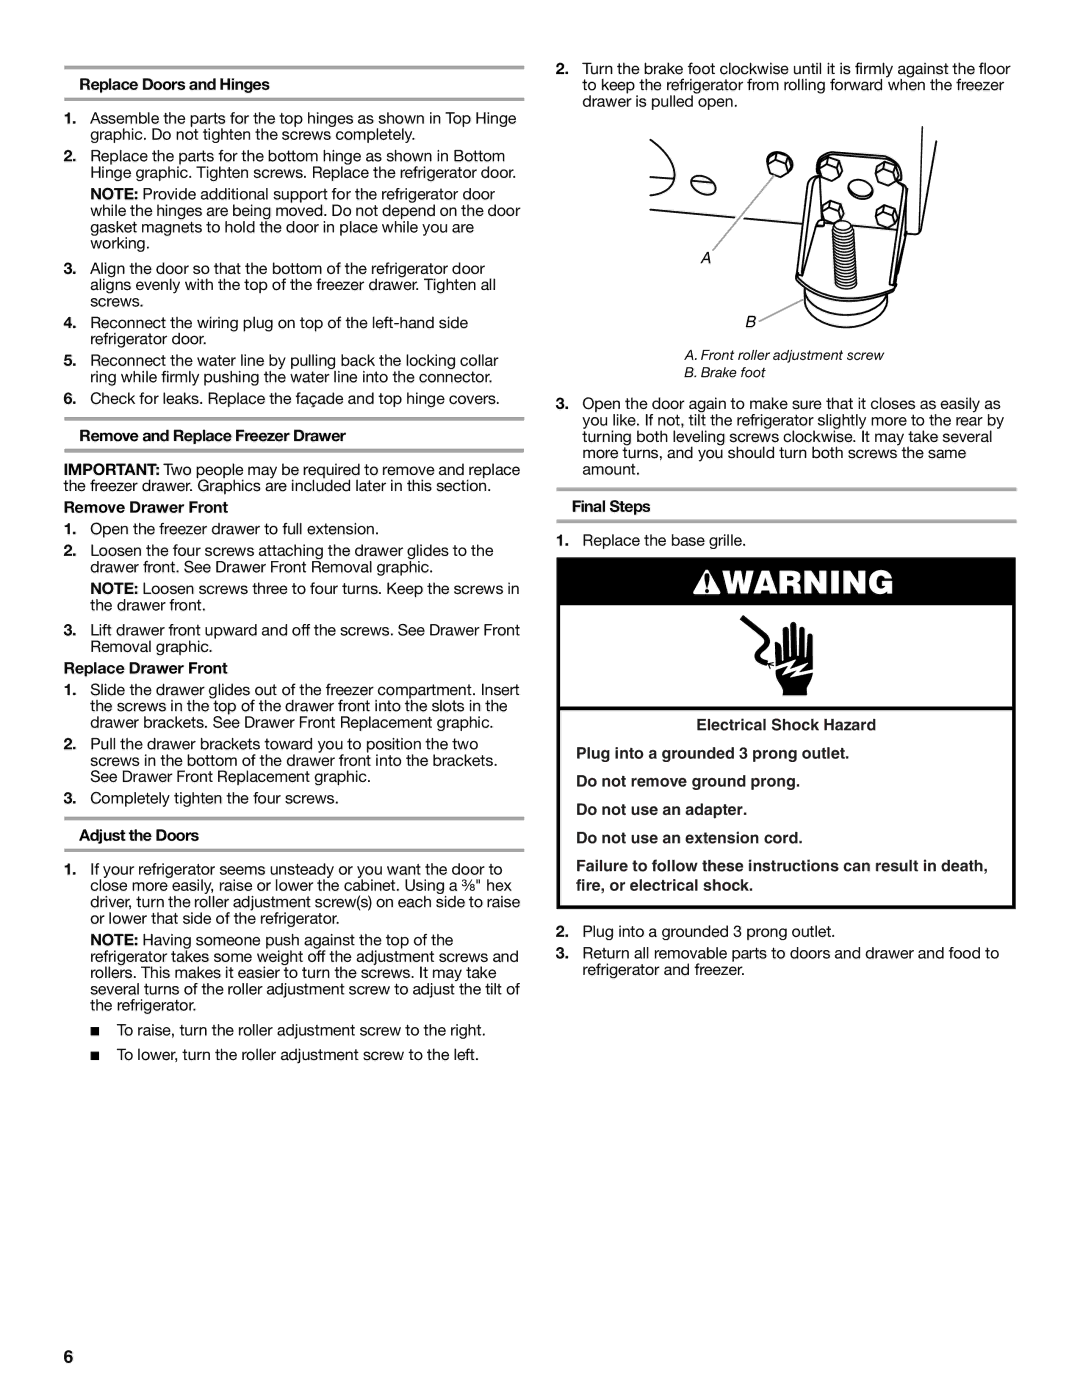
2.Turn the brake foot clockwise until it is firmly against the floor to keep the refrigerator from rolling forward when the freezer drawer is pulled open.

A

B

A. Front roller adjustment screw

B. Brake foot

3.Open the door again to make sure that it closes as easily as you like. If not, tilt the refrigerator slightly more to the rear by turning both leveling screws clockwise. It may take several more turns, and you should turn both screws the same amount.

Final Steps

1.Replace the base grille.

WARNING

Electrical Shock Hazard

Plug into a grounded 3 prong outlet.

Do not remove ground prong.

Do not use an adapter.

Do not use an extension cord.

Failure to follow these instructions can result in death, fire, or electrical shock.

2.Plug into a grounded 3 prong outlet.

3.Return all removable parts to doors and drawer and food to refrigerator and freezer.

6

Page 6
Image 6
Whirlpool W10226405A Replace Doors and Hinges, Remove and Replace Freezer Drawer, Remove Drawer Front, Adjust the Doors

W10245525A, W10226405A specifications

Whirlpool has long been a household name in appliances, revered for its innovative products that combine efficiency with user-friendly features. Among its notable offerings are the Whirlpool W10226405A and W10245525A, two appliance components designed to enhance the performance of Whirlpool washing machines.

The Whirlpool W10226405A is primarily a washing machine door latch, engineered for reliability and optimal safety. One of its standout features is its compatibility with various Whirlpool washer models, making it a versatile choice for repairs. This door latch ensures a secure closure during the washing cycle, preventing any leaks or interruptions. Its durable construction is designed to withstand repeated use, providing peace of mind for homeowners concerned about appliance longevity.

In terms of technology, the W10226405A employs a user-friendly design that simplifies installation. It provides an intuitive fit, allowing users to replace the part without the need for professional assistance, thereby saving time and repair costs. Furthermore, its robust design minimizes the risk of malfunction, ensuring that your washing machine operates seamlessly.

On the other hand, the Whirlpool W10245525A is a washing machine control board, which serves as the brain of the appliance. This component integrates advanced control technology that optimizes the washing process. One of its main features is the ability to manage various wash cycles and settings, catering to different fabric types and laundry needs. The control board also provides feedback and diagnostic capabilities, allowing users to identify and troubleshoot issues with ease.

Another key characteristic of the W10245525A is its energy efficiency. By optimizing the wash cycle based on the load, it helps reduce water and electricity consumption, which is not only good for the environment but also beneficial for utility bills. The control board supports smart technology applications, adding convenience and modern functionality to traditional washing machines.

Both the Whirlpool W10226405A and W10245525A exemplify the brand's commitment to quality and innovation. With durable construction, ease of installation, and efficient performance, these components enhance the overall user experience. Whether you’re looking to replace a malfunctioning part or upgrade your washing machine’s capabilities, these Whirlpool products stand out as reliable, cost-effective solutions for any home.