Surface Burners

A

C

B

D

E

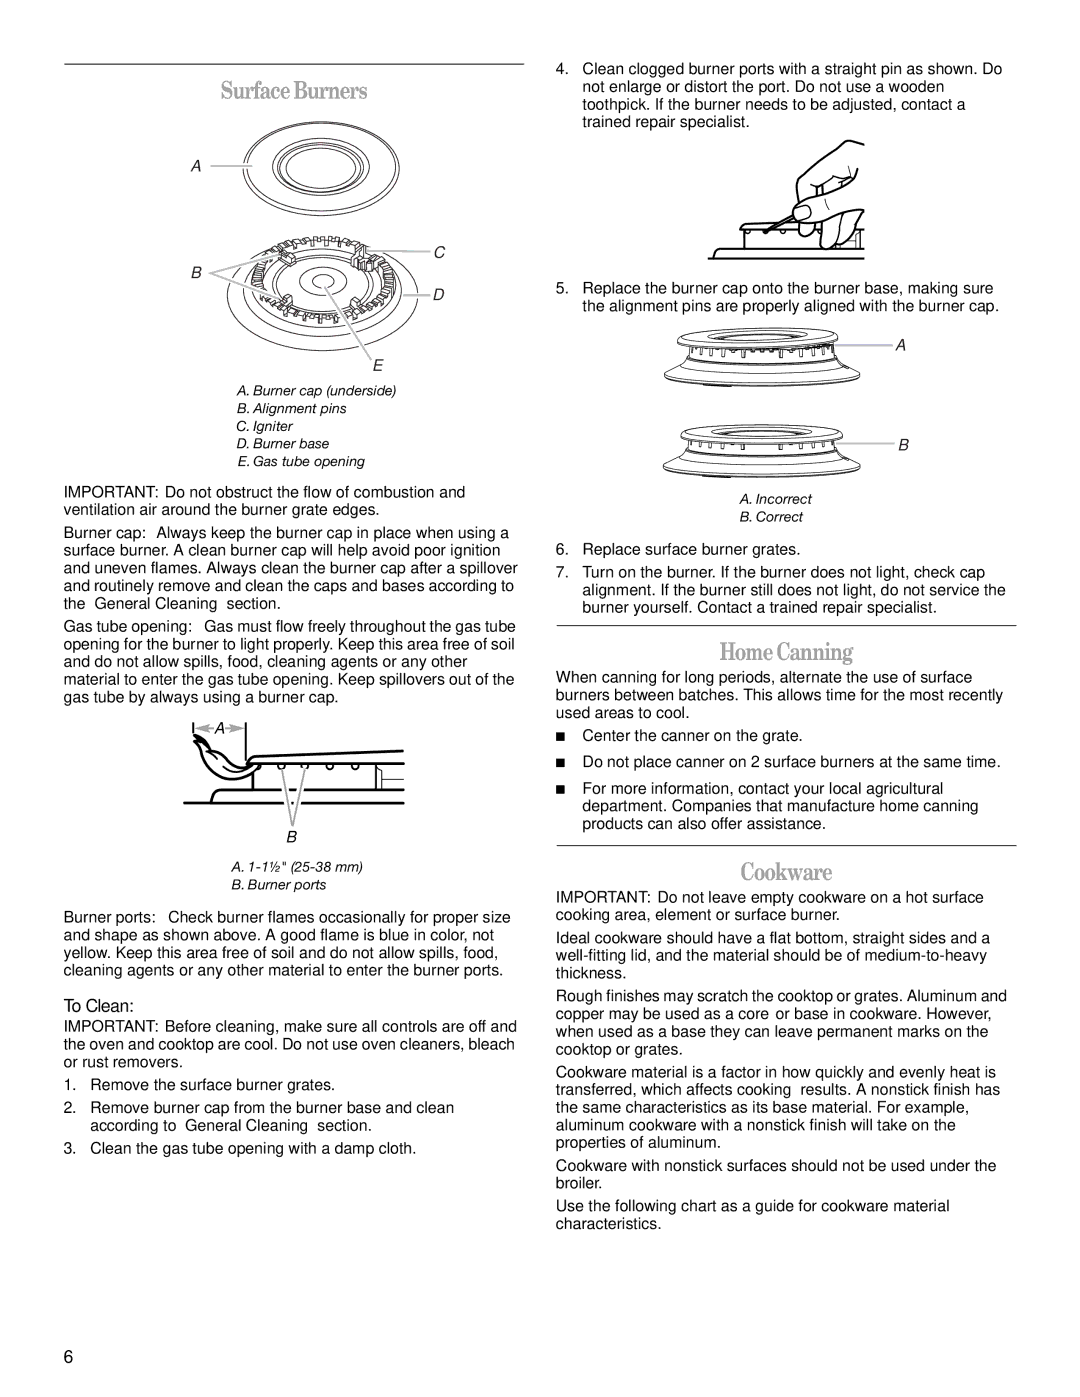
A. Burner cap (underside)

B. Alignment pins

C.Igniter

D.Burner base

E.Gas tube opening

IMPORTANT: Do not obstruct the flow of combustion and ventilation air around the burner grate edges.

Burner cap: Always keep the burner cap in place when using a surface burner. A clean burner cap will help avoid poor ignition and uneven flames. Always clean the burner cap after a spillover and routinely remove and clean the caps and bases according to the “General Cleaning” section.

Gas tube opening: Gas must flow freely throughout the gas tube opening for the burner to light properly. Keep this area free of soil and do not allow spills, food, cleaning agents or any other material to enter the gas tube opening. Keep spillovers out of the gas tube by always using a burner cap.

A

B

A.1-1½" (25-38 mm)

B.Burner ports

Burner ports: Check burner flames occasionally for proper size and shape as shown above. A good flame is blue in color, not yellow. Keep this area free of soil and do not allow spills, food, cleaning agents or any other material to enter the burner ports.

To Clean:

IMPORTANT: Before cleaning, make sure all controls are off and the oven and cooktop are cool. Do not use oven cleaners, bleach or rust removers.

1.Remove the surface burner grates.

2.Remove burner cap from the burner base and clean according to “General Cleaning” section.

3.Clean the gas tube opening with a damp cloth.

4.Clean clogged burner ports with a straight pin as shown. Do not enlarge or distort the port. Do not use a wooden toothpick. If the burner needs to be adjusted, contact a trained repair specialist.

5.Replace the burner cap onto the burner base, making sure the alignment pins are properly aligned with the burner cap.

A

B

A.Incorrect

B.Correct

6.Replace surface burner grates.

7.Turn on the burner. If the burner does not light, check cap alignment. If the burner still does not light, do not service the burner yourself. Contact a trained repair specialist.

Home Canning

When canning for long periods, alternate the use of surface burners between batches. This allows time for the most recently used areas to cool.

Center the canner on the grate.

Do not place canner on 2 surface burners at the same time.

For more information, contact your local agricultural department. Companies that manufacture home canning products can also offer assistance.

Cookware

IMPORTANT: Do not leave empty cookware on a hot surface cooking area, element or surface burner.

Ideal cookware should have a flat bottom, straight sides and a well-fitting lid, and the material should be of medium-to-heavy thickness.

Rough finishes may scratch the cooktop or grates. Aluminum and copper may be used as a core or base in cookware. However, when used as a base they can leave permanent marks on the cooktop or grates.

Cookware material is a factor in how quickly and evenly heat is transferred, which affects cooking results. A nonstick finish has the same characteristics as its base material. For example, aluminum cookware with a nonstick finish will take on the properties of aluminum.

Cookware with nonstick surfaces should not be used under the broiler.

Use the following chart as a guide for cookware material characteristics.

6

Page 6
Image 6
Whirlpool W10309091A manual Surface Burners, Home Canning, Cookware, To Clean

W10309091A specifications

The Whirlpool W10309091A is a versatile and efficient appliance designed to enhance the functionality of modern kitchens. As a popular model in the Whirlpool lineup, it embodies a blend of advanced technologies and user-friendly features that cater to diverse cooking needs.

One of the primary characteristics of the W10309091A is its spacious design, allowing for ample food storage, which is crucial for those who enjoy hosting gatherings or meal prepping for the week. The capacity is well-suited to accommodate various sizes of cookware, making it easier to prepare large meals or multiple dishes simultaneously.

Equipped with advanced cooking technologies, the Whirlpool W10309091A utilizes precision cooking methods to ensure optimal results. The appliance often includes features like sensor cooking, which automatically adjusts cooking times and power levels based on the moisture levels detected in the food, promoting even cooking and reducing the chances of overcooking. This technology takes the guesswork out of cooking, resulting in meals that are perfectly cooked every time.

Another defining quality of the W10309091A is its user-friendly interface. The appliance generally features intuitive controls that simplify the process of selecting cooking settings. With options for various cooking methods such as baking, broiling, and microwaving, users can easily switch between functions depending on their culinary needs.

The design of the Whirlpool W10309091A is also noteworthy. It typically features a sleek and modern appearance that can seamlessly blend into any kitchen decor. The appliance often comes with a stainless steel finish, making it not only aesthetically pleasing but also resistant to smudges and fingerprints, enhancing its durability and ease of maintenance.

In terms of safety, the W10309091A incorporates features like a control lock to prevent accidental operation, particularly important in households with young children. This thoughtful addition ensures that the appliance can be used safely without compromising performance.

Overall, the Whirlpool W10309091A stands out as a reliable appliance that excels in both functionality and design. With its spacious interior, sophisticated cooking technologies, user-friendly interface, and safety features, it’s an ideal choice for anyone looking to elevate their kitchen experience. Whether you are a seasoned cook or a beginner, the W10309091A promises to deliver convenience and quality with every use.