Install Anti-Tip Bracket

WARNING

Tip Over Hazard

A child or adult can tip the range and be killed.

Install anti-tip bracket to floor or wall per installation instructions.

Slide range back so rear range foot is engaged in the slot of the anti-tip bracket.

Re-engage anti-tip bracket if range is moved.

Do not operate range without anti-tip bracket installed and engaged.

Failure to follow these instructions can result in death or serious burns to children and adults.

1.Remove the anti-tip bracket that is taped in the oven cavity.

2.Determine which mounting method to use: floor or wall.

3.For wall mounting method only: Remove 30" (76.2 cm) wide by 4" (10.2 cm) high section of sheetrock, with the bottom of the area removed to be flush with the floor support slats. (See “Cabinet Dimensions” illustration in the “Location Requirements” section.) Securely attach a ³⁄₈" (1.0 cm) thick piece of plywood to at least two wall studs in place of the sheetrock. Plywood should span the width of the cabinet opening and sit flush with the top edge of the floor support slats.

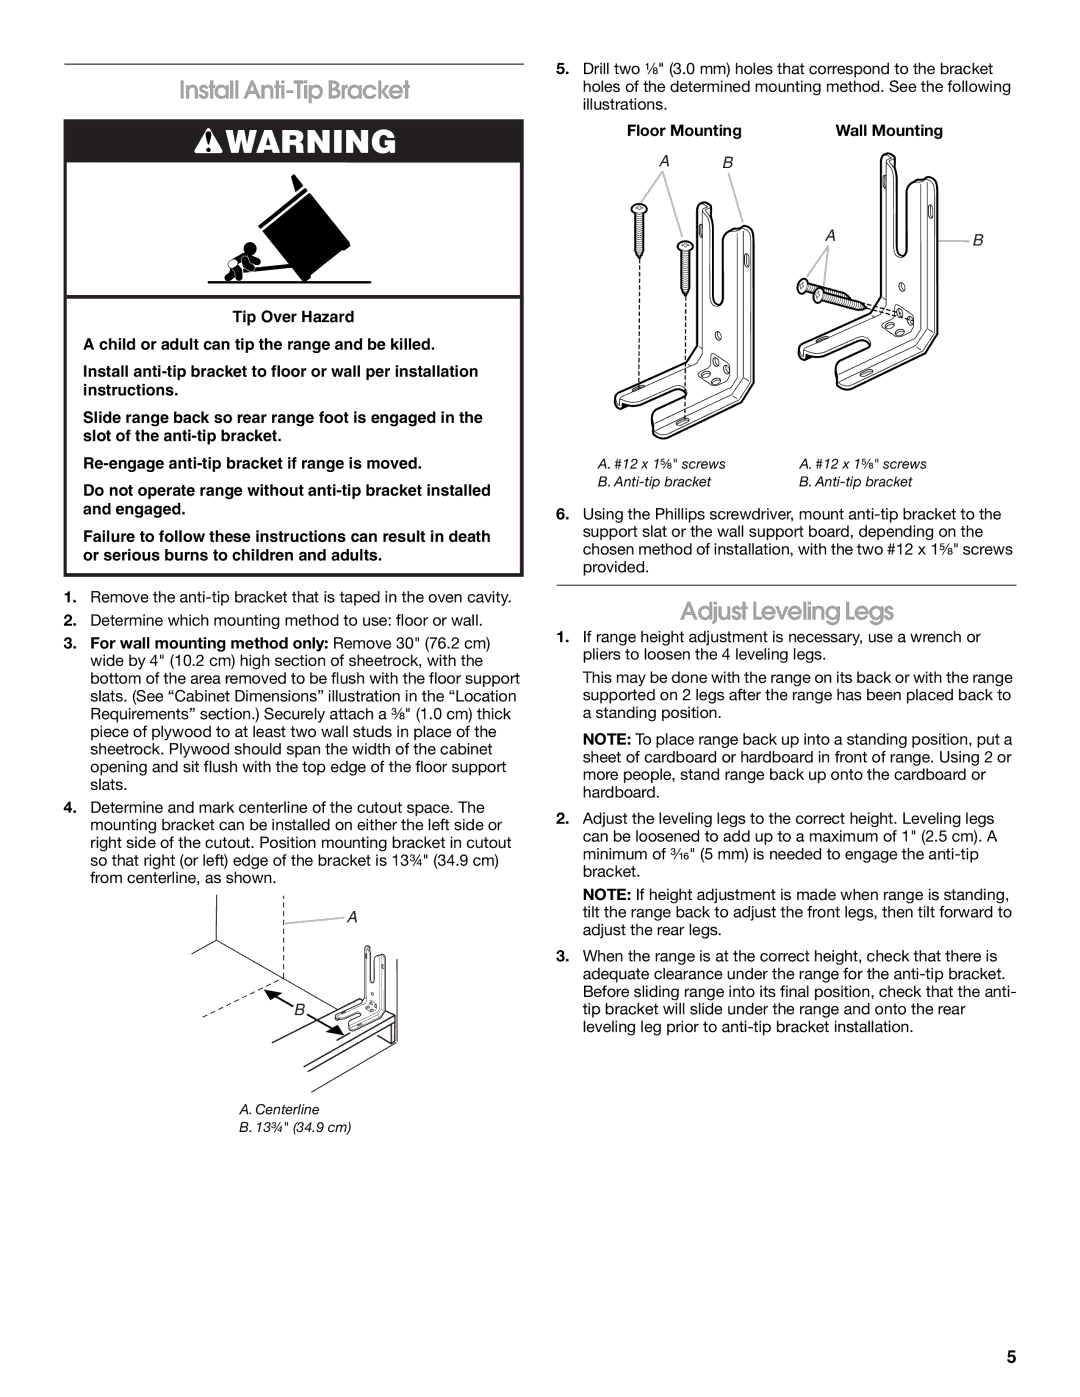
4.Determine and mark centerline of the cutout space. The mounting bracket can be installed on either the left side or right side of the cutout. Position mounting bracket in cutout so that right (or left) edge of the bracket is 13¾" (34.9 cm) from centerline, as shown.

A

B

5.Drill two ¹⁄₈" (3.0 mm) holes that correspond to the bracket holes of the determined mounting method. See the following illustrations.

Floor Mounting

Wall Mounting

A B

AB

A. #12 x 1⁵⁄₈" screws

A. #12 x 1⁵⁄₈" screws

B. Anti-tip bracket

B. Anti-tip bracket

6.Using the Phillips screwdriver, mount anti-tip bracket to the support slat or the wall support board, depending on the chosen method of installation, with the two #12 x 1⁵⁄₈" screws provided.

Adjust Leveling Legs

1.If range height adjustment is necessary, use a wrench or pliers to loosen the 4 leveling legs.

This may be done with the range on its back or with the range supported on 2 legs after the range has been placed back to a standing position.

NOTE: To place range back up into a standing position, put a sheet of cardboard or hardboard in front of range. Using 2 or more people, stand range back up onto the cardboard or hardboard.

2.Adjust the leveling legs to the correct height. Leveling legs can be loosened to add up to a maximum of 1" (2.5 cm). A minimum of ³⁄₁₆" (5 mm) is needed to engage the anti-tip bracket.

NOTE: If height adjustment is made when range is standing, tilt the range back to adjust the front legs, then tilt forward to adjust the rear legs.

3.When the range is at the correct height, check that there is adequate clearance under the range for the anti-tip bracket. Before sliding range into its final position, check that the anti- tip bracket will slide under the range and onto the rear leveling leg prior to anti-tip bracket installation.

A.Centerline

B.13¾" (34.9 cm)

5

Page 5
Image 5
Whirlpool W10430948A installation instructions Install Anti-Tip Bracket, Adjust Leveling Legs, Floor Mounting Wall Mounting

W10430948A specifications

The Whirlpool W10430948A is a versatile and innovative refrigerator water filter designed to optimize the quality of drinking water and ice produced by compatible Whirlpool refrigerators. Its primary function is to reduce harmful contaminants, ensuring that every sip and scoop is clean and refreshing.

One of the standout features of the W10430948A is its advanced filtration technology. The filter comprises a carbon block, which effectively reduces chlorine taste and odor, along with a variety of other impurities such as lead, mercury, and cadmium. This technology not only improves the taste of water and ice but also promotes a healthier lifestyle by providing access to cleaner drinking water.

Installation of the W10430948A is user-friendly, thanks to its easy twist-and-lock design. This allows homeowners to quickly replace the filter without requiring any special tools or technical expertise. The filter’s compatible models ensure it fits seamlessly into numerous Whirlpool refrigerator models, reinforcing its status as a practical and efficient choice for many households.

The longevity of the W10430948A filter is another essential characteristic. Typically, this filter can last up to six months under normal use conditions, which helps reduce maintenance efforts and costs over time. The filter also features an easy-to-read indicator that alerts users when it’s time for a replacement, ensuring optimal performance and uninterrupted access to clean water.

In addition to its primary function, the W10430948A filter exemplifies Whirlpool's commitment to environmental sustainability. By using this filter, households can reduce reliance on bottled water, thereby minimizing plastic waste and contributing to eco-friendly practices. As more consumers seek environmentally conscious choices, products like the W10430948A align with this growing trend.

Ultimately, the Whirlpool W10430948A offers a perfect blend of advanced filtration technology, user convenience, and environmental responsibility. This filter not only enhances the overall quality of water and ice but also underscores Whirlpool's dedication to providing innovative solutions for healthier living spaces. Whether you’re hydrating, cooking, or entertaining, the W10430948A ensures that every drop counts, reinforcing the importance of clean water in daily life.