Manuals
/
Whirlpool
/
Kitchen Appliance
/
Dishwasher
Whirlpool
W10435039A
installation instructions
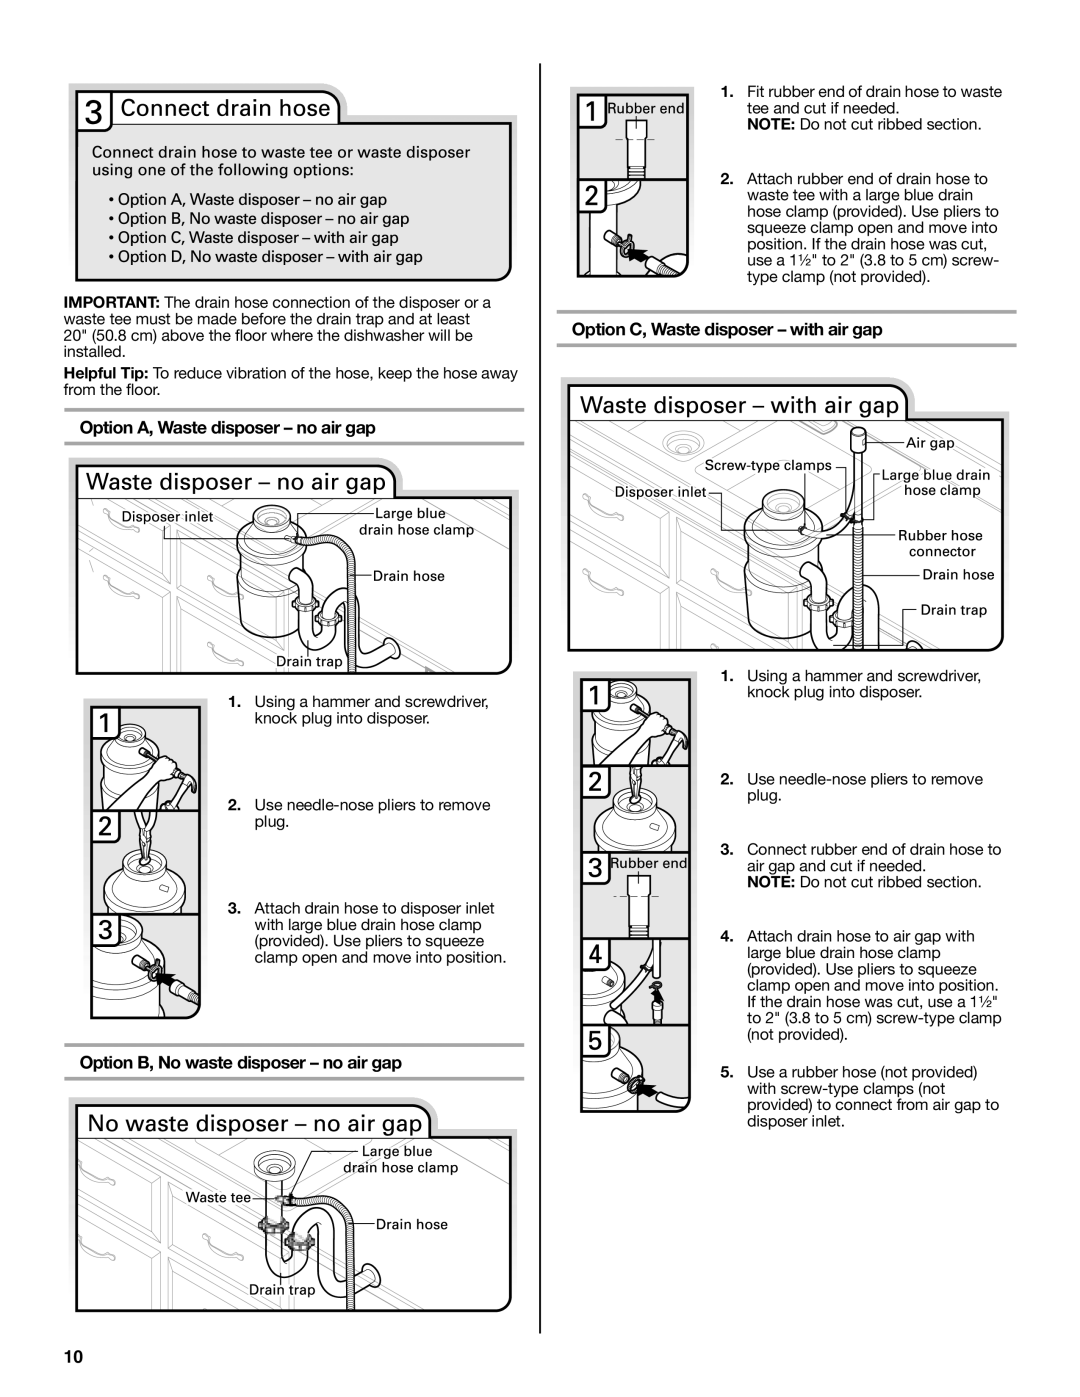
Option A, Waste disposer - no air gap
Models:
W10435039A
1
10
23
23
Download
23 pages
37.92 Kb
7
8
9
10
11
12
13
14
Install
Option B, Direct Wire
Weight
Option A, Power Supply Cord
Page 10
Image 10
Page 9
Page 11
Page 10
Image 10
Page 9
Page 11
Contents
LAVE-VAISSELLE SOUS COMPTOIR MODÈLES À TRÈS GRANDE CUVE EN PLASTIQUE
INSTALLATION INSTRUCTIONS UNDERCOUNTER DISHWASHER
PLASTIC GIANT TUB MODELS INSTRUCTIONS DINSTALLATION
W10435039A
You Need to
TABLE OF CONTENTS
DISHWASHER SAFETY
Tip Over Hazard
In addition, for first-time installations
INSTALLATION REQUIREMENTS
All Installations
Tools and Parts
Location Requirements
Page
Drain Requirements
If connecting dishwasher with a power supply cord
If connecting dishwasher with direct wiring
Water Supply Requirements
Prepare Cabinet Opening-Existing Utilities
INSTALLATION INSTRUCTIONS
Option A, Power Supply Cord
Prepare Cabinet Opening-New Utilities
Option B, Direct Wire
Prepare and Route Water Line
Install Drain Hose
Option B, No waste disposer - no air gap
Option A, Waste disposer - no air gap
Option C, Waste disposer - with air gap
Prepare Dishwasher
Excessive Weight Hazard
Use two or more people to move and install dishwasher
Option D, No waste disposer - with air gap
Make Power Supply Cord Connection
Electrical Shock Hazard Electrically ground dishwasher
Connect ground wire to green ground connector in terminal box
Do not use an extension cord
Determine Cabinet Opening
Option 1, Countertop Attachment
Choose Attachment Option
Prepare Water Supply Line
Option 2, Side Attachment
Move Dishwasher Close to Cabinet Opening
NOTE Springs should be in the same notches on left and right sides
Connect to Water Supply
Connect to Drain
Make Direct Wire Electrical Connection
Secure Dishwasher in Cabinet Opening
Secure dishwasher to countertop
Side mount dishwasher to cabinet
Electrical Shock Hazard Plug into a grounded 3 prong outlet
Complete Installation
Reconnect Power
Do not remove ground prong Do not use an adapter
If Dishwasher Does Not Operate
Check Operation
Additional Tips
Top
Page
Image
Contents