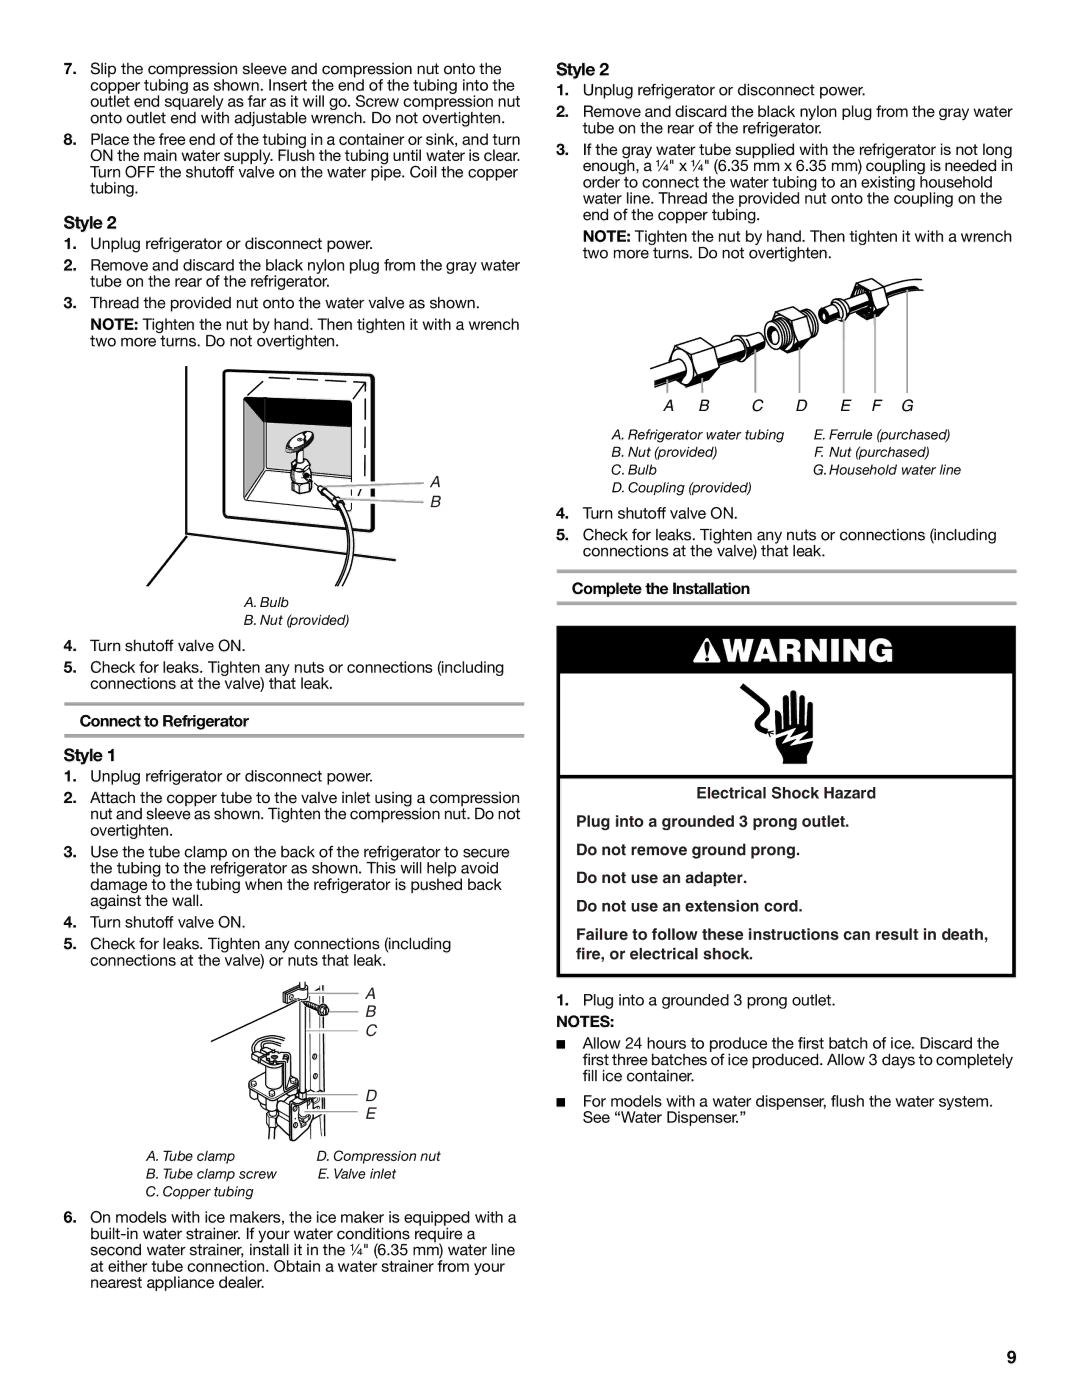
7.Slip the compression sleeve and compression nut onto the copper tubing as shown. Insert the end of the tubing into the outlet end squarely as far as it will go. Screw compression nut onto outlet end with adjustable wrench. Do not overtighten.

8.Place the free end of the tubing in a container or sink, and turn ON the main water supply. Flush the tubing until water is clear. Turn OFF the shutoff valve on the water pipe. Coil the copper tubing.

Style 2

1.Unplug refrigerator or disconnect power.

2.Remove and discard the black nylon plug from the gray water tube on the rear of the refrigerator.

3.Thread the provided nut onto the water valve as shown.

NOTE: Tighten the nut by hand. Then tighten it with a wrench two more turns. Do not overtighten.

A

B

A.Bulb

B.Nut (provided)

4.Turn shutoff valve ON.

5.Check for leaks. Tighten any nuts or connections (including connections at the valve) that leak.

Connect to Refrigerator

Style 1

1.Unplug refrigerator or disconnect power.

2.Attach the copper tube to the valve inlet using a compression nut and sleeve as shown. Tighten the compression nut. Do not overtighten.

3.Use the tube clamp on the back of the refrigerator to secure the tubing to the refrigerator as shown. This will help avoid damage to the tubing when the refrigerator is pushed back against the wall.

4.Turn shutoff valve ON.

5.Check for leaks. Tighten any connections (including connections at the valve) or nuts that leak.


A


B


C


D


E

A. Tube clamp

D. Compression nut

B. Tube clamp screw

E. Valve inlet

C. Copper tubing


6.On models with ice makers, the ice maker is equipped with a built-in water strainer. If your water conditions require a second water strainer, install it in the ¹⁄₄" (6.35 mm) water line at either tube connection. Obtain a water strainer from your nearest appliance dealer.

Style 2

1.Unplug refrigerator or disconnect power.

2.Remove and discard the black nylon plug from the gray water tube on the rear of the refrigerator.

3.If the gray water tube supplied with the refrigerator is not long enough, a ¹⁄₄" x ¹⁄₄" (6.35 mm x 6.35 mm) coupling is needed in order to connect the water tubing to an existing household water line. Thread the provided nut onto the coupling on the end of the copper tubing.

NOTE: Tighten the nut by hand. Then tighten it with a wrench two more turns. Do not overtighten.

A

B

C

D

E F G

A. Refrigerator water tubing


E. Ferrule (purchased)

B. Nut (provided)


F. Nut (purchased)

C. Bulb


G. Household water line

D. Coupling (provided)


4.Turn shutoff valve ON.

5.Check for leaks. Tighten any nuts or connections (including connections at the valve) that leak.

Complete the Installation

WARNING

Electrical Shock Hazard

Plug into a grounded 3 prong outlet.

Do not remove ground prong.

Do not use an adapter.

Do not use an extension cord.

Failure to follow these instructions can result in death, fire, or electrical shock.

1.Plug into a grounded 3 prong outlet.

NOTES:

Allow 24 hours to produce the first batch of ice. Discard the first three batches of ice produced. Allow 3 days to completely fill ice container.

For models with a water dispenser, flush the water system. See “Water Dispenser.”

9

Page 9
Image 9
Whirlpool WRF560SEYM, WRF560SEYW, WRF560SMYW, WRF560SMYM, WRF560SEYB installation instructions Connect to Refrigerator

WRF560SEYM, WRF560SEYB, WRF560SMYM, WRF560SMYW, WRF560SEYW specifications

The Whirlpool WRF560 series of refrigerators, including models WRF560SEYW, WRF560SMYW, WRF560SMYM, WRF560SEYB, and WRF560SEYM, offers a blend of cutting-edge technology, spacious design, and user-friendly features that cater to the diverse needs of modern kitchens.

One of the most prominent features of the WRF560 series is its French door design. This allows for easy access to both the refrigerator and freezer compartments, making it simpler to organize and retrieve food items. The spacious interior is complemented by a variety of adjustable shelf options, including spill-proof glass shelves that help contain messes for easier cleanup. With a total capacity of about 19 cubic feet, these models are designed to meet the needs of families while providing enough space for groceries, leftovers, and more.

Energy efficiency is another key characteristic of the WRF560 series. These refrigerators are designed to meet strict Energy Star standards, helping homeowners save on their energy bills while supporting environmentally friendly practices. The use of LED lighting throughout the interior enhances visibility, illuminating every corner of the fridge to ensure users can find what they need without hassle.

In terms of technology, the WRF560 series incorporates Whirlpool’s innovative Adaptive Defrost feature. This technology optimizes the defrosting process by learning how often the freezer is used and adjusting the schedule accordingly, helping to maximize energy efficiency while keeping food at the ideal temperature. The exterior Ice and Water Dispenser offers convenient access to refreshingly cold water and ice when needed, making the kitchen experience more enjoyable.

Additionally, these refrigerator models feature a humidity-controlled crisper drawer designed to keep fruits and vegetables fresher for longer. The adjustable door bins allow for easy storage of large containers and gallon-sized items, ensuring maximum flexibility in organization.

With modern finishes, including sleek stainless steel options, the WRF560 series adds a touch of elegance to any kitchen décor. The overall performance, combined with aesthetic appeal and practicality, makes these models a popular choice for homeowners seeking a reliable and stylish refrigerator.

In summary, the Whirlpool WRF560SEYW, WRF560SMYW, WRF560SMYM, WRF560SEYB, and WRF560SEYM represent a harmonious blend of design, functionality, and technology, making them excellent additions to contemporary kitchens.