5 CHECK THERMOSTAT OPERATION

NOTE

To prevent static discharge problems, touch side of ther- mostat to release static build-up before touching any keys.

If at any time during testing your system does not operate properly, contact a qualified serviceperson.

Fan Operation

If your system does not have a G terminal connection, skip to Heating System.

1.Turn on power to the system.

2.Move fan switch to ON position. The blower should begin to operate.

3.Move fan switch to AUTO position. The blower should stop immediately.

!CAUTION

Do not allow the compressor to run unless the compres- sor oil heaters have been operational for 6 hours and the system has not been operational for at least 5 minutes.

Heating System

1.Move SYSTEM switch to HEAT position. If the auxiliary heating system has a standing pilot, be sure to light it.

2.Press to adjust thermostat setting to 1° above room temperature. The heat pump system should begin to operate. However, if the Flame icon () and Snowflake icon () are flashing, the compressor lockout feature is operating (see Configuration menu, item 2.)

3.Adjust temperature setting to 4° above room temperature. The auxiliary heat system should begin to operate and the Flame icon () will be flashing.

4.Press to adjust thermostat setting below room tempera- ture. The heating system should stop operating.

Emergency System

EMER bypasses the Heat Pump to use the heat source wired to terminal E on the thermostat. EMER is typically used when compressor operation is not desired, or you prefer back-up heat only.

1.Move SYSTEM switch to EMER position. EMER will flash on the display.

2.Press to adjust thermostat setting above room tempera- ture. The Aux heating system will begin to operate. The Flame icon () will display flashing to indicate that the Aux system is operating.

3.Press to adjust the thermostat below room temperature. The Aux heating system should stop operating.

!CAUTION

To prevent compressor and/or property damage, if the outdoor temperature is below 50°F, DO NOT operate the cooling system

Cooling System

1.Move SYSTEM switch to COOL position.

2.Press to adjust thermostat setting below room tempera- ture. The blower should come on immediately on high speed, followed by cold air circulation.

4.Press to adjust temperature setting above room tem- perature. The cooling system should stop operating.

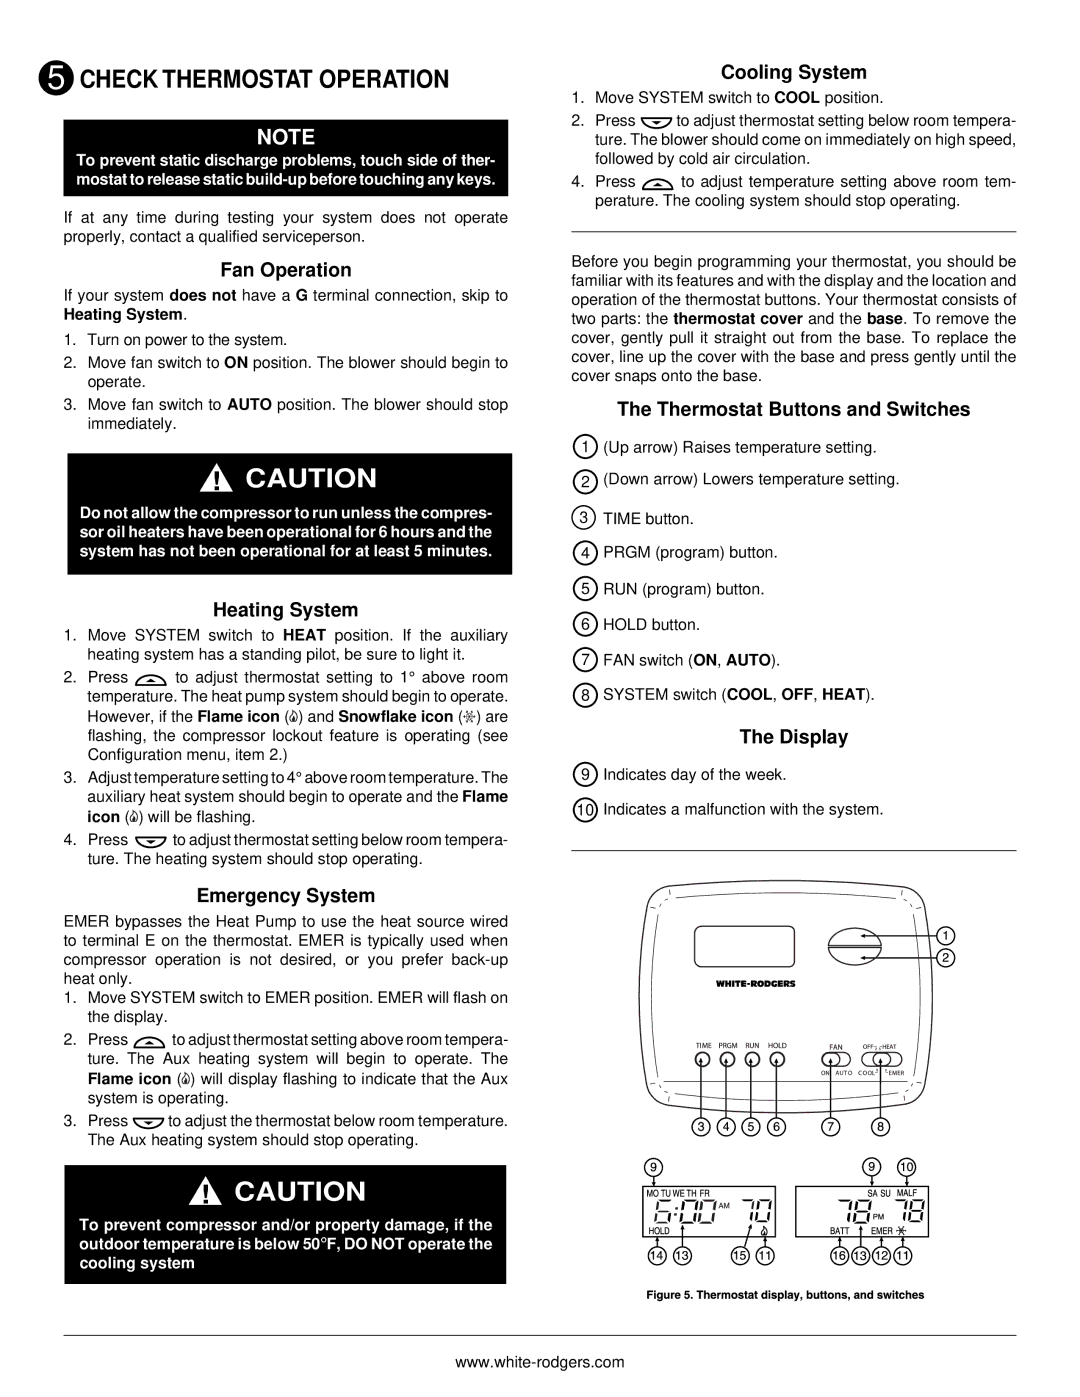
Before you begin programming your thermostat, you should be familiar with its features and with the display and the location and operation of the thermostat buttons. Your thermostat consists of two parts: the thermostat cover and the base. To remove the cover, gently pull it straight out from the base. To replace the cover, line up the cover with the base and press gently until the cover snaps onto the base.

The Thermostat Buttons and Switches

1(Up arrow) Raises temperature setting.

2(Down arrow) Lowers temperature setting.

3 TIME button.

4PRGM (program) button.

5RUN (program) button.

6HOLD button.

7FAN switch (ON, AUTO).

8SYSTEM switch (COOL, OFF, HEAT).

The Display

9 Indicates day of the week.

10 Indicates a malfunction with the system.

www.white-rodgers.com

Page 4
Image 4
White Rodgers 1F72 installation instructions Check Thermostat Operation

1F72 specifications

The White Rodgers 1F72 is a highly regarded thermostat known for its reliability and advanced features, designed primarily to enhance comfort and energy efficiency in residential heating and cooling systems. A product of White Rodgers, a reputable brand in HVAC controls, the 1F72 is engineered to integrate seamlessly with various HVAC systems while providing intuitive user control.

One of the standout features of the White Rodgers 1F72 is its programmable capabilities. This thermostat allows users to set different temperature schedules for various times of the day and days of the week. Users can easily program it to lower the temperature at night and raise it again in the morning, leading to significant energy savings without sacrificing comfort. The flexible scheduling feature makes it suitable for families with varying routines.

The user interface of the 1F72 is designed for ease of use. It features a large, easy-to-read display that provides clear temperature settings and options. The thermostat’s buttons are intuitive, allowing users to adjust settings with minimal effort. The simple design is especially beneficial for individuals who may not be technically inclined.

Another notable technology incorporated in the White Rodgers 1F72 is the Smart Recovery feature. This innovative capability enables the thermostat to start heating or cooling the home before the programmed time, ensuring that the desired temperature is reached just when it's needed. This proactive approach contributes to improved energy efficiency.

The 1F72 is compatible with a wide range of heating and cooling systems, including conventional systems, heat pumps, and multi-stage systems. This versatility makes it an excellent choice for different types of homes and setups.

In addition to its programmable functionality, the thermostat also features advanced temperature control capabilities. With the precision of its temperature sensor, the 1F72 ensures that the home's temperature remains as consistent as possible, enhancing comfort and reducing energy waste.

Overall, the White Rodgers 1F72 thermostat is an exemplary device for anyone looking to manage their home’s heating and cooling needs effectively. With its programmable schedules, user-friendly interface, and compatibility with various systems, it stands out as an optimal solution for modern HVAC control demands.