Dehumidistat Installation Instructions

APPLICATION

The dehumidistat (humidity controller) provides automatic low voltage control of the dehumidifier in central heating and air conditioning systems. It has a SPST, snap-acting, dust-proof switch and is designed for wall or surface duct mounting.

INSTALLATION

When installing the product . . .

1.Read these instructions carefully. Failure to follow them could damage the product or cause a hazardous condition.

2.Check the ratings given in the instructions and on the product to make sure the product is suitable for your application.

3.Installer must be trained, experienced service technician.

4.After installation is complete, check out product operation as provided in these instructions.

Personal Injury Hazard.

Power supply can cause electrical shock. Disconnect power supply before beginning installation.

Location and Mounting

The dehumidistat can be mounted at any convenient location in the living area or equipment room. NOTE: The electrical connections are not shared with the thermostat.

Wall Mounting

IMPORTANT - Mount the control in an area with average room temperature and average relative humidity.

1.Mark the holes for the two mounting screws (included). Then mark the hole for the low voltage wiring.

2.Drill the holes.

3.Run low voltage wiring to the location and pull about 6 inches (152 mm) of wire through the hole.

4.Plug the hole with nonflammable insulation to prevent drafts from affecting the control operation.

5.Remove the case from the base.

6.Position the base on the wall with the arrow up.

7.Use the two, one inch (25 mm) mounting screws to secure the base to the wall.

IMPORTANT – Use 18- to 22-gauge wire for proper wiring.

8.Connect the low voltage wires to the leads.

9.Replace the case.

Duct Mounting

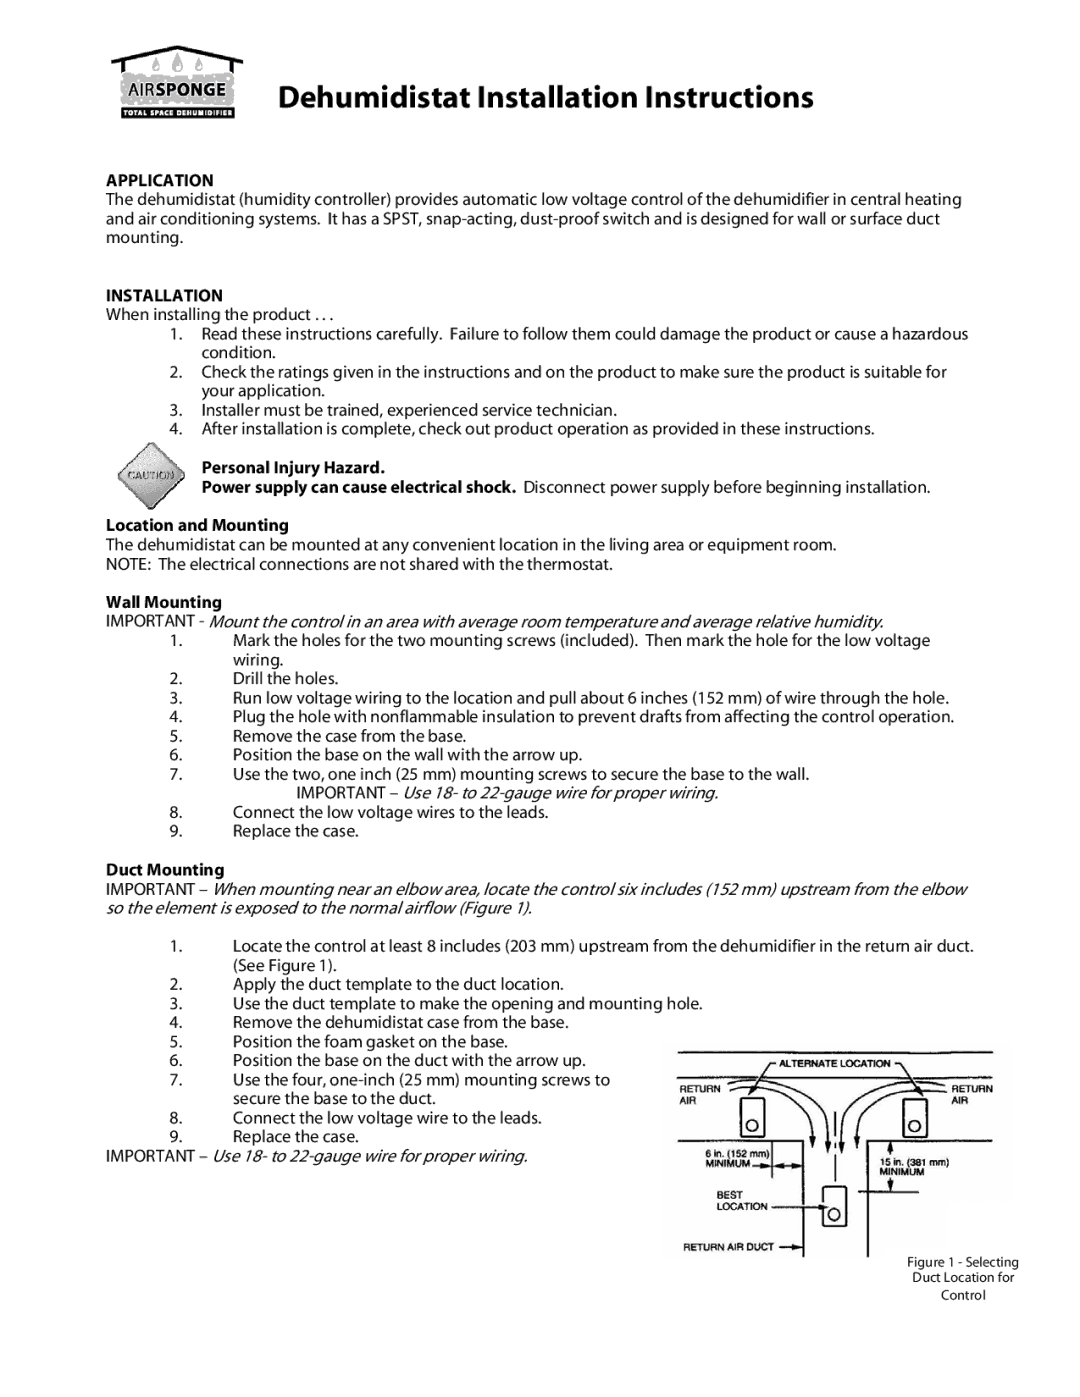
IMPORTANT – When mounting near an elbow area, locate the control six includes (152 mm) upstream from the elbow so the element is exposed to the normal airflow (Figure 1).

1.Locate the control at least 8 includes (203 mm) upstream from the dehumidifier in the return air duct. (See Figure 1).

2.Apply the duct template to the duct location.

3.Use the duct template to make the opening and mounting hole.

4.Remove the dehumidistat case from the base.

5.Position the foam gasket on the base.

6.Position the base on the duct with the arrow up.

7.Use the four, one-inch (25 mm) mounting screws to secure the base to the duct.

8.Connect the low voltage wire to the leads.

9.Replace the case.

IMPORTANT – Use 18- to 22-gauge wire for proper wiring.

Figure 1 - Selecting

Duct Location for

Control

Page 1
Image 1
Williams Airsponge installation instructions Application, Installation

Airsponge specifications

Williams Airsponge stands at the forefront of innovative air purification technology, addressing the growing necessity for clean indoor air. Designed for both residential and commercial applications, the Airsponge harnesses cutting-edge features and technologies to enhance the quality of the air we breathe.

One of the Airsponge's standout features is its advanced filtration system. The device employs a multi-layered filter mechanism that captures not only dust and allergens but also microscopic particles, mold spores, and volatile organic compounds (VOCs). This comprehensive filtration ensures that the air released back into the environment is not only cleaner but also healthier, providing peace of mind for users concerned about indoor air quality.

The Airsponge is equipped with a powerful yet quiet fan system, enabling it to circulate air efficiently throughout a room without causing disruptive noise. This whisper-quiet operation is essential in environments such as offices, bedrooms, or healthcare settings, where tranquility is paramount. The fan can adjust its speed based on the air quality detected, optimizing performance while minimizing energy consumption.

At the heart of the Airsponge’s functionality is its integrated smart technology. Users can connect the device to their smartphones or home automation systems for real-time monitoring and control. The accompanying app allows for the tracking of indoor air quality metrics, including PM2.5 levels, humidity, and temperature. Such connectivity empowers users to make informed decisions about their air quality management.

Durability and energy efficiency are also significant characteristics of the Williams Airsponge. Built with high-quality materials, the unit is designed for long-lasting performance and minimal maintenance. Energy-efficient components ensure that the device operates with a low carbon footprint, making it an environmentally conscious choice.

Aesthetic versatility rounds out the Williams Airsponge’s appeal. Available in various colors and styles, it can seamlessly integrate into any home or office décor, proving that functionality doesn't have to come at the expense of style.

In conclusion, the Williams Airsponge embodies the perfect blend of advanced technology, user-friendly design, and aesthetic appeal. With its robust features, including multi-layer filtration, smart technology integration, and energy efficiency, it is an ideal choice for anyone seeking to improve indoor air quality and promote a healthier living or working environment.