INSTRUCTIONS (continued)

Adjust the tailwheel and lift arms so the cutter is level. Then raise the tractor lift very slowly, making sure that the front drive shaft shield does not hit the front of the cutter. If it does, damage will be done to the drive shaft shield and, if interference is bad enough, it WILL also damage the drive shaft itself.

NOTE: This type of damage is NOT covered under warranty, as it is totally under the control and the responsibility of the operator.

Use the lift control limiting stop on the tractor control lever to limit the upward travel of the lever so the lift can- not be raised high enough to cause contact between the drive shaft shield and front shielding.

7.Check the swinging drawbar of the tractor and make sure the PTO driveline assembly will not contact. The swinging drawbar can be moved forward on some tractors or it can be removed.

If the PTO driveline assembly contacts the swinging drawbar, damage will occur to the driveshaft shield and possibly the driveshaft itself. (NOT covered under warranty.)

Check your lift arm hydraulic controls. Be sure the hydraulic 3-pt. hitch control is in the float position and the draft control is turned off.

Adjust lower lift arm(s) to level cutter right to left. Refer to tractor operator’s manual for instructions.

Cutting height is controlled with tractor 3-point arms, and rear tailwheel adjustment.

PTO DRIVELINE INSTA L L ATION

Spray WD-40 into the yoke and wipe. This should remove some of the paint and make it easier to slide the yoke onto the input shaft of the gearbox.

Remove shearbolt and retaining ring (4) from gearbox input shaft (3).

Grease the input shaft of the gearbox before installing the PTO shaft. This reduces the chance of the PTO shaft yoke from galling to the input shaft if the shear pin should break.

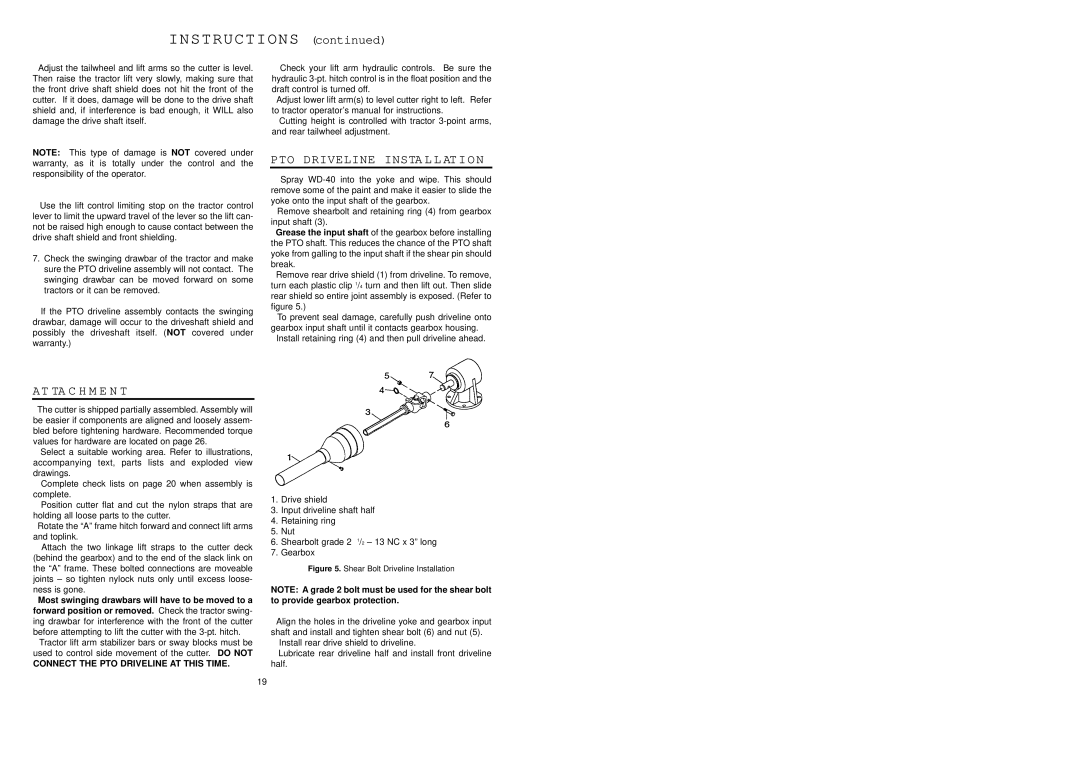
Remove rear drive shield (1) from driveline. To remove, turn each plastic clip 1/4 turn and then lift out. Then slide rear shield so entire joint assembly is exposed. (Refer to figure 5.)

To prevent seal damage, carefully push driveline onto gearbox input shaft until it contacts gearbox housing.

Install retaining ring (4) and then pull driveline ahead.

AT TA C H M E N T

The cutter is shipped partially assembled. Assembly will be easier if components are aligned and loosely assem- bled before tightening hardware. Recommended torque values for hardware are located on page 26.

Select a suitable working area. Refer to illustrations, accompanying text, parts lists and exploded view drawings.

Complete check lists on page 20 when assembly is complete.

Position cutter flat and cut the nylon straps that are holding all loose parts to the cutter.

Rotate the “A” frame hitch forward and connect lift arms and toplink.

Attach the two linkage lift straps to the cutter deck (behind the gearbox) and to the end of the slack link on the “A” frame. These bolted connections are moveable joints – so tighten nylock nuts only until excess loose- ness is gone.

Most swinging drawbars will have to be moved to a forward position or removed. Check the tractor swing- ing drawbar for interference with the front of the cutter before attempting to lift the cutter with the 3-pt. hitch.

Tractor lift arm stabilizer bars or sway blocks must be used to control side movement of the cutter. DO NOT

CONNECT THE PTO DRIVELINE AT THIS TIME.

1. Drive shield

3.Input driveline shaft half

4.Retaining ring

5.Nut

6.Shearbolt grade 2 1/2 – 13 NC x 3” long

7.Gearbox

Figure 5. Shear Bolt Driveline Installation

NOTE: A grade 2 bolt must be used for the shear bolt to provide gearbox protection.

Align the holes in the driveline yoke and gearbox input shaft and install and tighten shear bolt (6) and nut (5).

Install rear drive shield to driveline.

Lubricate rear driveline half and install front driveline half.

19

Page 20
Image 20
Worksaver SDM40-60, SDM40-48 manual PTO Driveline Insta L L Ation, At Ta C H M E N T, Connect the PTO Driveline AT this Time

SDM40-60, SDM40-48, SDM40-72 specifications

The Worksaver SDM series, including models SDM40-72, SDM40-48, and SDM40-60, represents a significant advancement in material handling technology designed for agricultural and landscaping applications. These robust and versatile skid-steer and tractor attachments provide users with an efficient solution for a variety of tasks, including moving and grading soil, gravel, and other materials.

The SDM40-72 model boasts a 72-inch wide blade, while the SDM40-48 and SDM40-60 come with 48-inch and 60-inch blades, respectively. This range in size allows users to choose the perfect model to fit their specific needs and the dimensions of their equipment. The heavy-duty construction of the blades ensures durability and toughness, capable of withstanding rigorous use in demanding environments.

One of the standout features of the Worksaver SDM series is the intelligent design of the blade itself. The blades are equipped with a quick-attach system, making it easy for operators to switch attachments quickly, enhancing productivity on the job site. This feature is particularly valuable for contractors who may need to adapt to varying application requirements throughout the day.

The SDM series also incorporates innovative tilt and angle adjustment mechanisms. This allows operators to fine-tune the blade position for precise material handling and grading. With adjustable tilt angles, users can achieve optimal results whether they are leveling surfaces, backfilling, or creating drainage ditches.

Additionally, the Worksaver SDM models are designed to integrate seamlessly with a variety of skid-steers and tractors, ensuring versatility across different machinery brands. The universal mounting plate allows for quick attachment to most popular equipment models, eliminating compatibility issues that can slow down operations.

Safety is prioritized in the design of the SDM series, which includes reinforced edges and a robust framework. This ensures not only the safety of the operator but also the longevity of the attachment. The blades are constructed from high-quality materials designed to resist wear and enhance performance over time.

In summary, the Worksaver SDM40-72, SDM40-48, and SDM40-60 models are exceptional choices for professionals seeking reliable and efficient material handling solutions. Their innovative features, durable construction, and compatibility with various equipment make them ideal for tackling a wide range of tasks in agricultural and landscaping applications. Users can expect enhanced efficiency and productivity with these outstanding attachments.