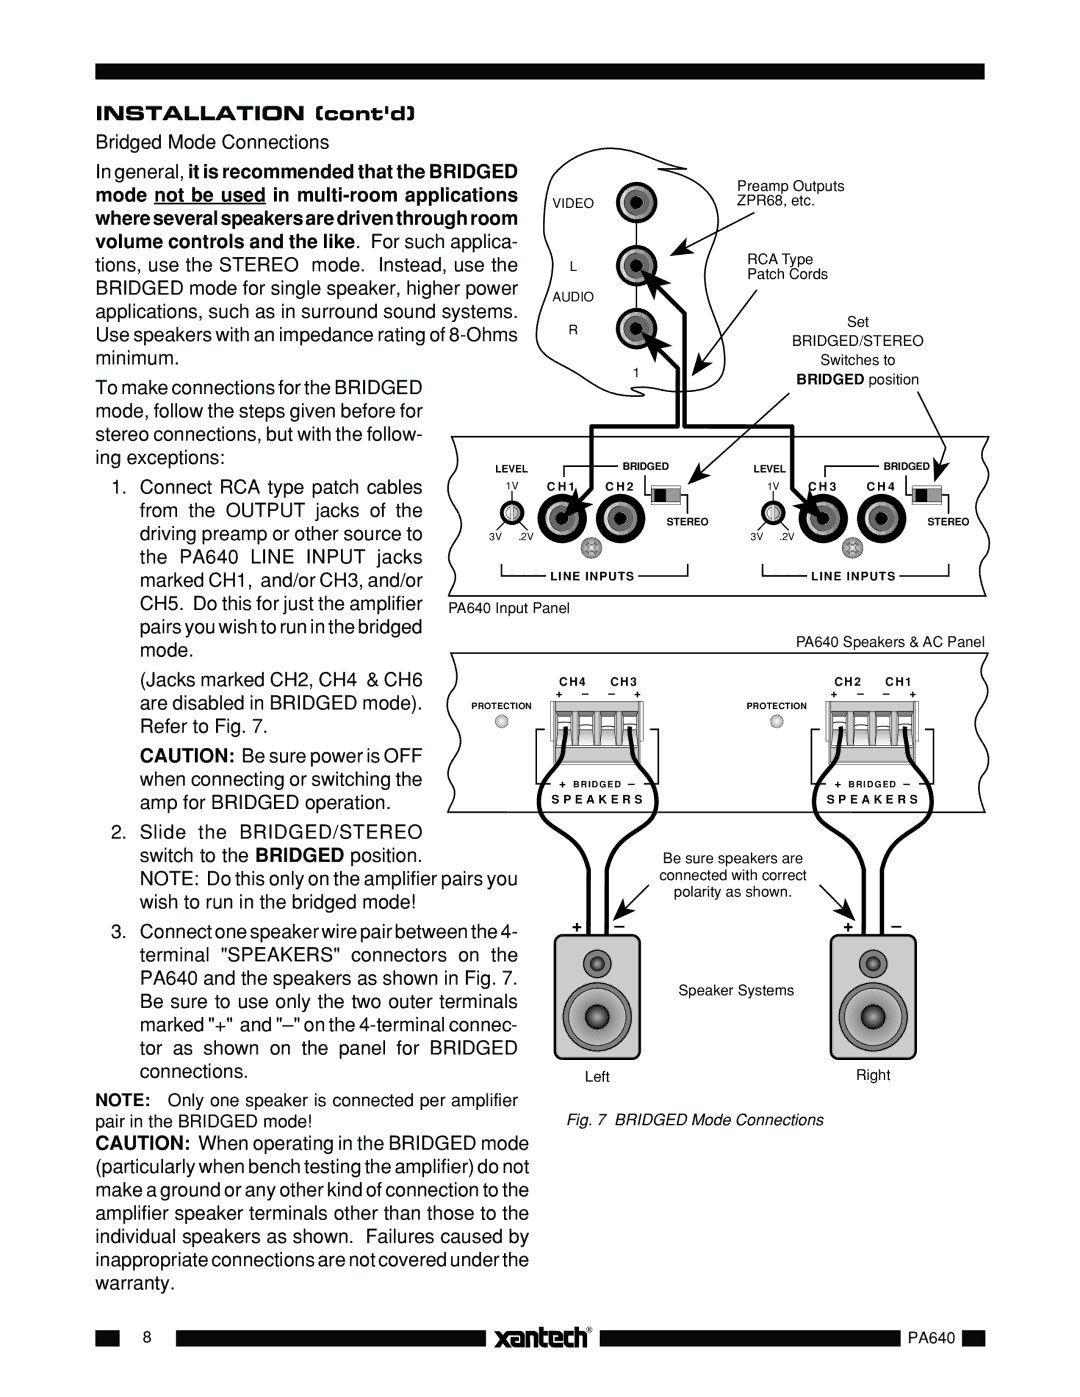
INSTALLATION (cont'd)
Bridged Mode Connections
In general, it is recommended that the BRIDGED
mode not be used in |
|
|
| Preamp Outputs |
| |||
VIDEO |
|
| ZPR68, etc. |
| ||||
where several speakers are driven through room |
|
|
| |||||
|
|
|
|
|
| |||
volume controls and the like. For such applica- |
|
|
| RCA Type |
| |||
tions, use the STEREO mode. Instead, use the | L |
|
|
| ||||
BRIDGED mode for single speaker, higher power |
|
|
| Patch Cords |
| |||
AUDIO |
|
|
|
|
| |||
applications, such as in surround sound systems. |
|
|
|
|
| |||
R |
|
|
| Set | ||||
Use speakers with an impedance rating of |
|
|
| |||||
|
|
| BRIDGED/STEREO | |||||
|
|
|
| |||||
minimum. |
|
| 1 |
|
| Switches to | ||
To make connections for the BRIDGED |
|
|
|
| BRIDGED position | |||
|
|
|
|
| ||||
|
|
|
|
|
|
| ||
mode, follow the steps given before for |
|
|
|
|
|
|
| |
stereo connections, but with the follow- |
|
|
|
|
|
|
| |
ing exceptions: | LEVEL | BRIDGED | LEVEL | BRIDGED | ||||
|
| |||||||
1. | Connect RCA type patch cables | 1V | C H 1 | C H 2 |
| 1V | H 3 | C H 4 |
| from the OUTPUT jacks of the |
|
|
| STEREO |
| STEREO | |
| driving preamp or other source to |
|
|
|
| |||
| 3V | .2V |
|
| 3V | .2V |
| |
| the PA640 LINE INPUT jacks |
|
|
|
|
|
|
|
| marked CH1, and/or CH3, and/or |
| LINE INPUTS |
|
| LINE INPUTS | ||
|
|
|
|
|
|
|
| |
| CH5. Do this for just the amplifier | PA640 Input Panel |
|
|
|
|
| |
| pairs you wish to run in the bridged |
|
|
|
|
| PA640 Speakers & AC Panel | |
| mode. |
|
|
|
|
| ||
|
|
|
|
|
|
|
| |
| (Jacks marked CH2, CH4 & CH6 |
| CH4 | CH3 |
|
| CH2 | CH1 |
| are disabled in BRIDGED mode). |
| + – | – + |
|
| + – | – + |
| PROTECTION |
|
| PROTECTION |
| |||
| Refer to Fig. 7. |
|
|
|
|
|
|
|
| CAUTION: Be sure power is OFF |
|
|
|
|
|
|
|
| when connecting or switching the |
| + B R I D G E D – |
|
| + B R I D G E D – | ||
| amp for BRIDGED operation. |
| S P E A K E R S |
|
| S P E A K E R S | ||
|
|
|
|
|
|
|
| |
2. | Slide the BRIDGED/STEREO |
|
|
|
|
|
|
|
| switch to the BRIDGED position. |
|
|
| Be sure speakers are |
| ||
| NOTE: Do this only on the amplifier pairs you |
|
| connected with correct |
| |||
| wish to run in the bridged mode! |
|
|
|
| polarity as shown. |
| |
|
|
|
|
|
|
|
| |
3.Connect one speaker wire pair between the 4- terminal "SPEAKERS" connectors on the PA640 and the speakers as shown in Fig. 7. Be sure to use only the two outer terminals marked "+" and
NOTE: Only one speaker is connected per amplifier pair in the BRIDGED mode!
+ | – | + | – |
Speaker Systems
Left | Right |
Fig. 7 BRIDGED Mode Connections
CAUTION: When operating in the BRIDGED mode (particularly when bench testing the amplifier) do not make a ground or any other kind of connection to the amplifier speaker terminals other than those to the individual speakers as shown. Failures caused by inappropriate connections are not covered under the warranty.
8
PA640
