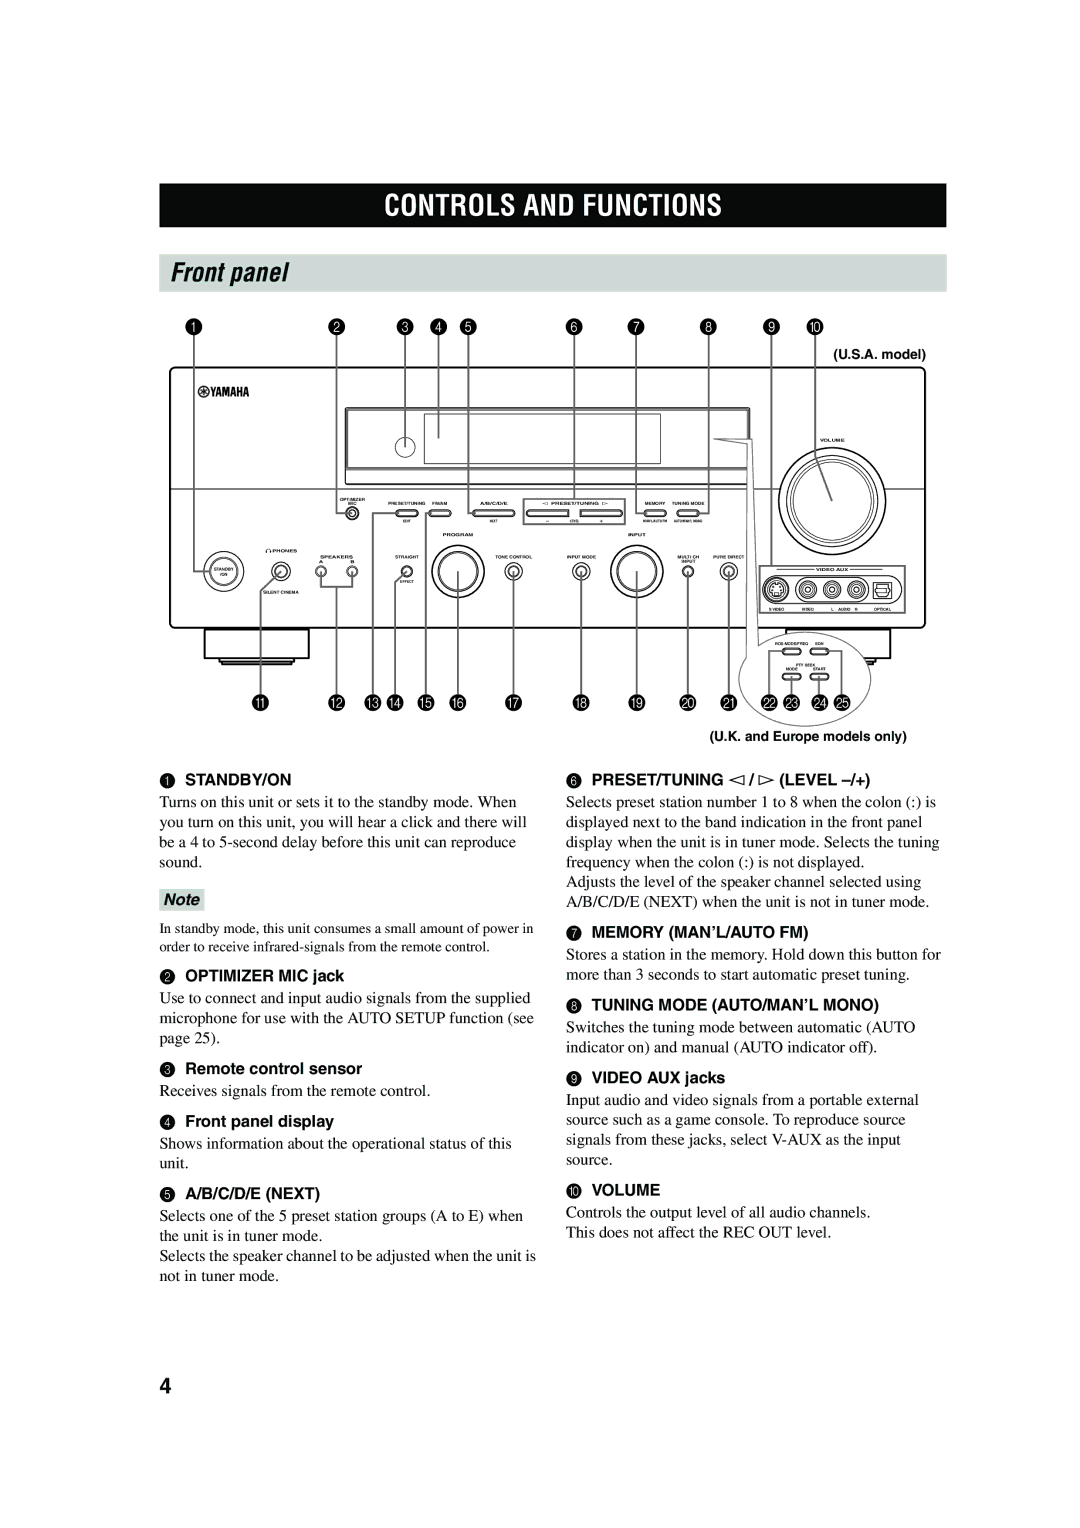
RX-V650
AV Receiver Ampli-tuner audio-vidéo
CAUTION READ THIS BEFORE OPERATING YOUR UNIT
For U.K. customers
Special Instructions for U.K. Model
CONTENTS
Sound field features
FEATURES
Built-in 7-channelpower amplifier
Other features
GETTING STARTED
Supplied accessories
Installing batteries in the remote control
Notes on batteries
CONTROLS AND FUNCTIONS
Front panel
B C D E F G H I J K L M N O
APHONES SILENT CINEMA jack
CPRESET/TUNING EDIT
U.K. and Europe models only
BSPEAKERS A/B
4 5 6
Remote control
D E F
G H J
KRDS tuning buttons FREQ/RDS
Using the remote control
Handling the remote control
GSTRAIGHT EFFECT
D E F G
Front panel display
7 8 9 0 A B
J K L M N
MInput channel indicators
K96/24 indicator
LLFE indicator
NPresence and surround back speaker indicators
Rear panel
Front speakers FR and FL
SPEAKER SETUP
Speaker placement
Center speaker C
3Return the tab to secure the wire
Connecting to PRESENCE speaker terminals
5Tighten the knob to secure the wire
Speaker connections
Subwoofer system
SURROUND terminals
FRONT terminals
CENTER terminals
SUB WOOFER jack
Cable indications
Before connecting components
CONNECTIONS
Analog jacks
CONNECTIONS
Connecting video components
Connections for DVD playback
DIGITAL INPUT
Connecting to the MULTI CH INPUT jacks
game console or video camera, to this unit
Connections for other video components
VIDEO AUX jacks on the front panel
CONNECTIONS
CONNECTIONS
Connecting audio components
Connections for audio components
Coaxial out
2SURROUND PRE OUT jacks
Connecting to an external amplifier
1FRONT PRE OUT jacks
3CENTER PRE OUT jack
FREQUENCY STEP switch
Connecting the antennas
Connecting the AM loop antenna
3Cut the lead wire and
VOLTAGE SELECTOR Asia and General models only
Connecting the AC power cord
AC OUTLETS SWITCHED
Memory back-up
IMPEDANCE SELECTOR switch
POWER
Turning on the power
2Turn on the video monitor connected to this unit
CONNECTIONS
AUTO SETUP
Optimizer microphone setup
Introduction
1Switch on this unit and your video monitor
Starting the setup
RESULT WIRING
4Press u / d to select AUTO SETUP
If an error screen appears
ERROR
ERROR E-5
9When finished, press SELECT
If a warning screen appears
2When you are finished, press SELECT
WARNING W-1
RESULT WIRING
Errors during auto setup
Troubleshooting for auto setup procedure
Before auto setup
Warnings after auto setup
Basic operations
6Adjust the volume to the desired output level
PLAYBACK
10DVD
7Select a sound field program if desired
To listen with headphones SILENT CINEMA
To adjust the tone
To mute the sound
MULTI CH INPUT
Selecting sound field programs
10DJAZZACLUBO00dB
Selecting MULTI CH INPUT
To select a decoder, press j / i repeatedly when
Remote control operation
Enjoying multi-channelsoftware
PLIIxMusic etc. is displayed
Enjoying 2-channelsoftware
Effect.Lvl MID
To cancel, press PURE DIRECT again
Press j / i to adjust the effect level while
Listening to high fidelity stereo sound
2ch Stereo
Listening to unprocessed input signals
Selecting input modes
STRAIGHT
source
information about the input signal
Displaying information about the input
3 Press u / d to display the following
Automatic tuning
TUNING
Automatic and manual tuning
1A-AAM11440kkHz
Automatically presetting FM stations
Presetting stations
Manual tuning
1Press FM/AM to select the FM band
1A1 FM187.5kMHzdB
Manually presetting stations
Automatic preset tuning options
1A1 AM18630kkHzdB
1C3 AM18630kkHzdB
Selecting preset stations
When performing this operation with the remote
x 1E1 FM187.5kMHzft
2,4 1,3 1,3
1EEDIT18E1-A5HzdB
x 1A5 FM190.6kMHzft
Exchanging preset stations
Changing the RDS mode
PS Program Service name mode
Receiving RDS stations
PTY Program Type mode
1 Press PTY SEEK MODE to set this unit in the
To cancel this function
PTY SEEK function
PTY SEEK mode
EON function
To cancel this function
RDS MODE/FREQ EON
DTS software
Special considerations when recording
RECORDING
4Start recording on the recording component
SOUND FIELD PROGRAM DESCRIPTIONS
For movie/video sources
DOLBY DIGITAL
PRO LOGIC
For music sources
ADVANCED OPERATIONS
Using the sleep timer
Setting the sleep timer
Selecting the OSD mode
3Press j / i to adjust the speaker output level
Manually adjusting speaker levels
Canceling the sleep timer
SLEEP OFF
3,4,6,7
Using the test tone
4Press j / i to adjust the speaker volumes
2,5,8
SET MENU
AUTO SETUP
MANUAL SETUP
1 SOUND MENU
4Press SELECT to enter MANUAL SETUP
Using SET MENU
3Press u / d to select MANUAL SETUP
To exit, press SET MENU when finished
CENTER SP
1 SOUND MENU
1 SOUND MENU 1/2
FRONT SP
LFE/BASS OUT
SURR B L/R SP
PRESENCE SP
CROSS OVER
CSP DISTANCE
02ASUBWOOFER PHASE
Subwoofer phase SUBWOOFER PHASE
Speaker distance CSP DISTANCE
ELFE LEVEL
Audio delay AUDIO DELAY
DCENTER GEQ
FDYNAMIC RANGE
2 INPUT MENU
2 INPUT MENU
HPR/SB SELECT
CMPNT-VINPUT
BINPUT MODE
3 OPTION MENU
COAXIAL IN
3 OPTION MENU1/2
DZONE SET
BMEMORY GUARD
CPARAM. INI
Parameter initialization CPARAM. INI
Controlling this unit
REMOTE CONTROL FEATURES
Control area
Controlling other components
Setting manufacturer codes
Component
Code
Controlling other components
B C D
Clearing setup manufacturer codes
4Enter the code number “0000”
EDITING SOUND FIELD PARAMETERS
What is a sound field
Changing parameter settings
Elements of a sound field
To reset all parameters
Resetting parameters to the factory presets
To reset a certain parameter
4Press u / d to select the parameters
DSP LEVEL
INIT. DLY Initial delay
SOUND FIELD PARAMETER DESCRIPTIONS
ROOM SIZE/P. ROOM SIZE Room size
LIVENESS
S. INIT. DLY Surround initial delay
SB INIT. DLY Surround back initial delay
S. ROOM SIZE Surround room size
REV.DELAY Reverberation delay
REV.TIME Reverberation time
REV. LEVEL Reverberation level
For 7ch Stereo
DIMENSION
DIALG.LIFT Dialog lift
CT LEVEL Center level
TROUBLESHOOTING
General
page
page
Tuner
page
Remote control
The remote control
does not work nor
RESETTING THE FACTORY PRESETS
Be sure this unit is in standby mode
3Press STANDBY/ON to confirm your selection
Dolby Digital
GLOSSARY
Audio formats
Dolby Digital Surround EX
CINEMA DSP
Sound field programs
Audio information
SILENT CINEMA
Composite video signal
Video signal information
Component video signal
S-Videosignal
VIDEO SECTION
SPECIFICATIONS
AUDIO SECTION
FM SECTION
Page
KORTING
SATELLITE TUNER
CABLE TV
CD PLAYER
DVD RECORDER
LD PLAYER
DVD PLAYER
CD RECORDER
MD RECORDER
TAPE DECK
WD06180
2004
All rights reserved