8.Tighten the hex bolt which secures the pintle arm extension to the pintle arm.

9.Release the clutch-brake pedal by pushing all the way forward, then releasing the pedal.

Check the wheels for movement. They should not rotate in either direction. If they do, readjust until the wheels do not move (steps 4, 7 and 8). Then adjust the posi- tion of the hydrostatic control lever as follows.

10.Depress the clutch-brake pedal all the way and set the parking brake.

11.Shut off the engine.

12.Depress the clutch-brake pedal all the way and set the parking brake.

13.Place the hydrostatic control lever in neutral (N).

14.Tighten the bolt and nut on the bracket on the hydrostatic control lever.

15.Replace the transmission panel and parking brake knob.

16.Remove the blocks from under the frame, and test the operation of the lawn tractor.

DECKLEVELINGADJUSTMENT

If an uneven cut is obtained, the deck may be leveled by following instructions in Assembly section.

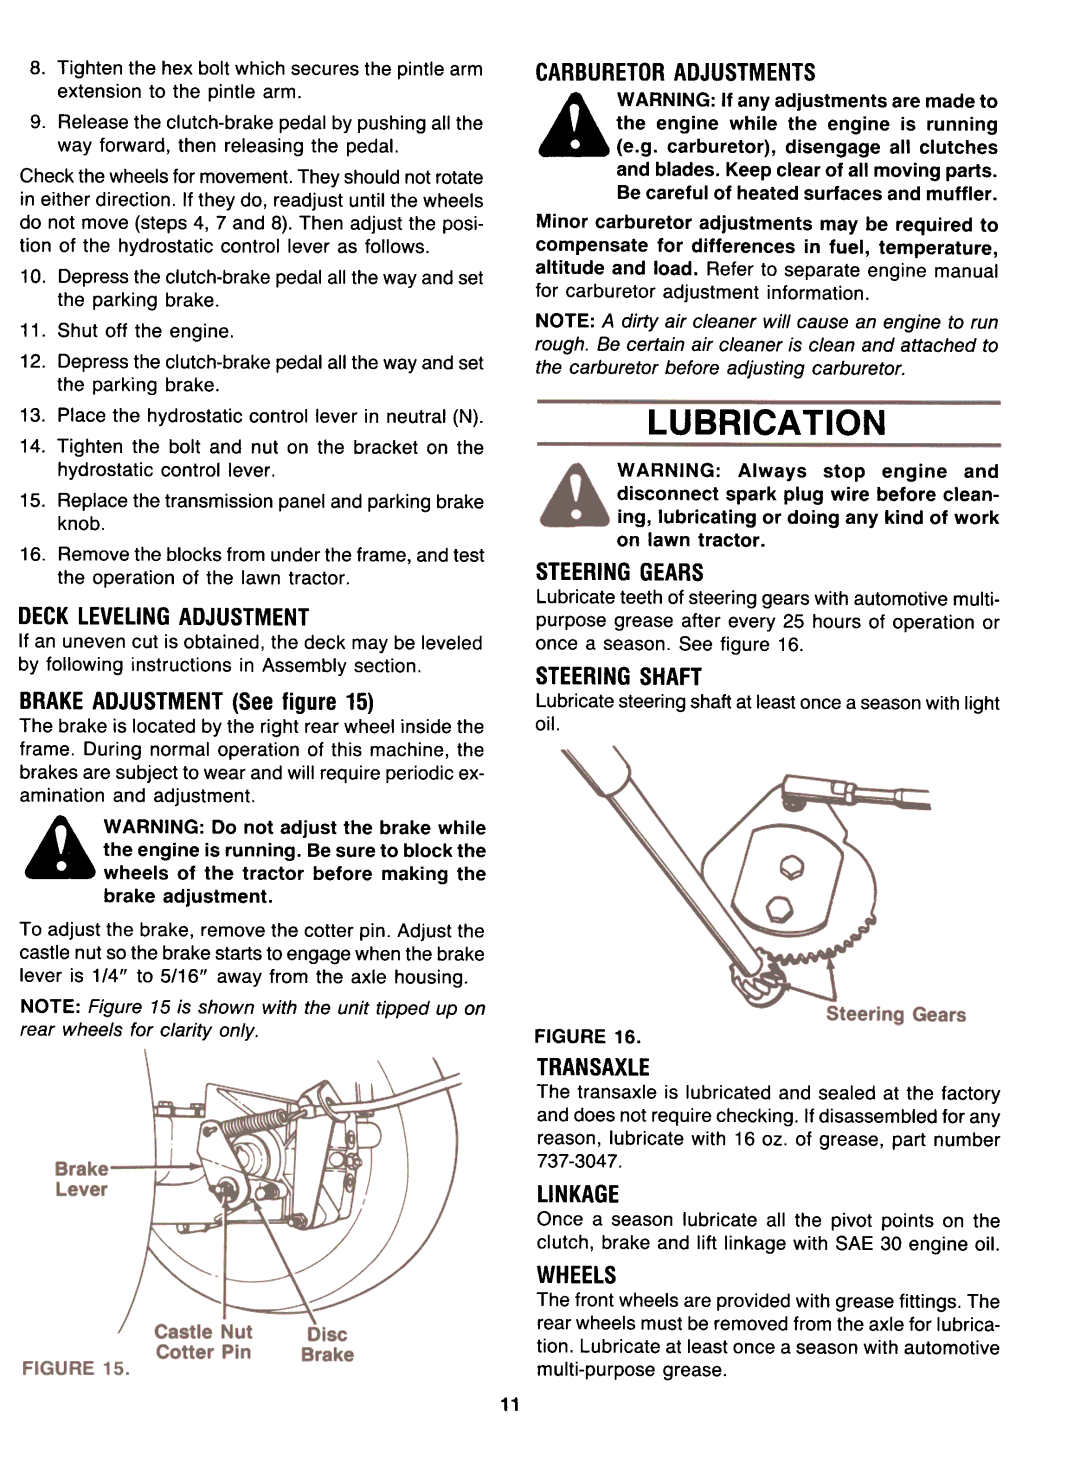
BRAKEADJUSTMENT(See figure 15)

The brake is located by the right rear wheel inside the frame. During normal operation of this machine, the brakes are subject to wear and will require periodic ex- amination and adjustment.

AWARNING: Do not adjust the brake while the engine is running. Be sure to block the wheels of the tractor before making the brake adjustment.

To adjust the brake, remove the cotter pin. Adjust the castle nut so the brake starts to engage when the brake lever is 1/4" to 5/16" away from the axle housing.

NOTE: Figure 15 is shown with the unit tipped up on rear wheels for clarity only.

CARBURETORADJUSTMENTS

AWARNING: If any adjustments are made to the engine while the engine is running (e.g. carburetor), disengage all clutches and blades. Keep clear of all moving parts. Be careful of heated surfaces and muffler.

Minor carburetor adjustments may be required to compensate for differences in fuel, temperature, altitude and load. Refer to separate engine manual for carburetor adjustment information.

NOTE: A dirty air cleaner will cause an engine to runrough. Be certain air cleaner is clean and attached to

the carburetor before adjusting carburetor.

LUBRICA TION

WARNING: Always stop engine and disconnect spark plug wire before clean- ing, lubricating or doing any kind of work on lawn tractor.

STEERINGGEARS

Lubricate teeth of steering gears with automotive multi- purpose grease after every 25 hours of operation or once a season. See figure 16.

STEERINGSHAFT

Lubricate steering shaft at least once a season with lightoil.

FIGURE 16.

TRANSAXLE

The transaxle is lubricated and sealed at the factory and does not require checking. If disassembled for any reason, lubricate with 16 oz. of grease, part number 737-3047.

LINKAGE

Once a season lubricate all the pivot points on the clutch, brake and lift linkage with SAE 30 engine oil.

WHEELS

The front wheels are provided with grease fittings. The rear wheels must be removed from the axle for lubrica- tion. Lubricate at least once a season with automotive multi-purpose grease.

11

Page 11
Image 11
Yard-Man 131734G Decklevelingadjustment, Carburetoradjustments, Steeringgears, Steeringshaft, Transaxle, Linkage, Wheels

131734G, 131704F, 131704G specifications

The Yard-Man 131704F, 131704G, and 131734G are standout models in the extensive lineup of lawn and garden equipment offered by Yard-Man, a brand known for its commitment to quality and innovation in outdoor power tools. These models cater primarily to homeowners and professional landscapers, providing robust solutions for maintaining lawns and gardens effectively.

One of the main features of the Yard-Man 131704F is its reliable engine performance. Powered by a potent motor, this model is designed to tackle both small and large areas with ease, ensuring a uniform cut and enhancing the appearance of your lawn. The 131704G variant similarly boasts a powerful engine, but the notable feature here is its focus on fuel efficiency. This model integrates advanced technology to optimize fuel consumption without compromising cutting power, making it an environmentally friendly choice.

The Yard-Man 131734G distinguishes itself with its cutting-edge features, including a multi-height adjustment system. Users can easily modify the cutting height to suit various grass types and seasonal conditions. This flexibility allows for tailored lawn care, ensuring that the grass remains healthy and vibrant throughout the year. Moreover, this model often includes a large grass catcher, which minimizes the need for raking and promotes a cleaner mowing experience.

In terms of durability, all three models come equipped with robust construction materials that ensure longevity and resistance to the elements. The decks are typically made from durable steel, which provides stability and strength, while the ergonomic designs make them user-friendly, reducing fatigue even during extended use.

Safety features are also paramount in these Yard-Man models. Each is equipped with safety guards and easy-start mechanisms that enhance the user experience, allowing homeowners and professionals alike to operate the equipment with confidence.

In summary, the Yard-Man 131704F, 131704G, and 131734G present an excellent combination of performance, efficiency, and user-friendly design. Their exceptional engine capabilities, cutting height adjustments, and durable construction make them ideal for anyone looking to maintain a pristine lawn or garden. Whether for personal use or professional landscaping, these models represent a solid investment in outdoor maintenance equipment.