7.Disconnectthestabilizerplatefromthe _tabilizer shaftassemblybyremovingthehairpinI:lipsand
flatwashersandslidingouttherod.Refertofigure
12.
8.Disconnectthe six deck linksby remoJingthe hairpinclipsandflatwashers.
9.PlacetheliftleverintheBLADESOFFpcsition.
10. Slidethedeckfrombeneaththelawntrac:or.
11.Removethetopdeckdrivebeltbylifting_ponthe stabilizerplate,andslippingbeltofftheptIley.
12.Removethebeltcoveratthetwoouside(eckpul-
13.Releasethetensionon thespringIoadecidlerby pushingtheidlertowardtherearofthede_k.
14.Removethe belt fromaroundthe idlerpulleys, andremovefromthethreedeckpulleys.
15.Reassemblenew belts,followinginstru(tionsin reverseorder.
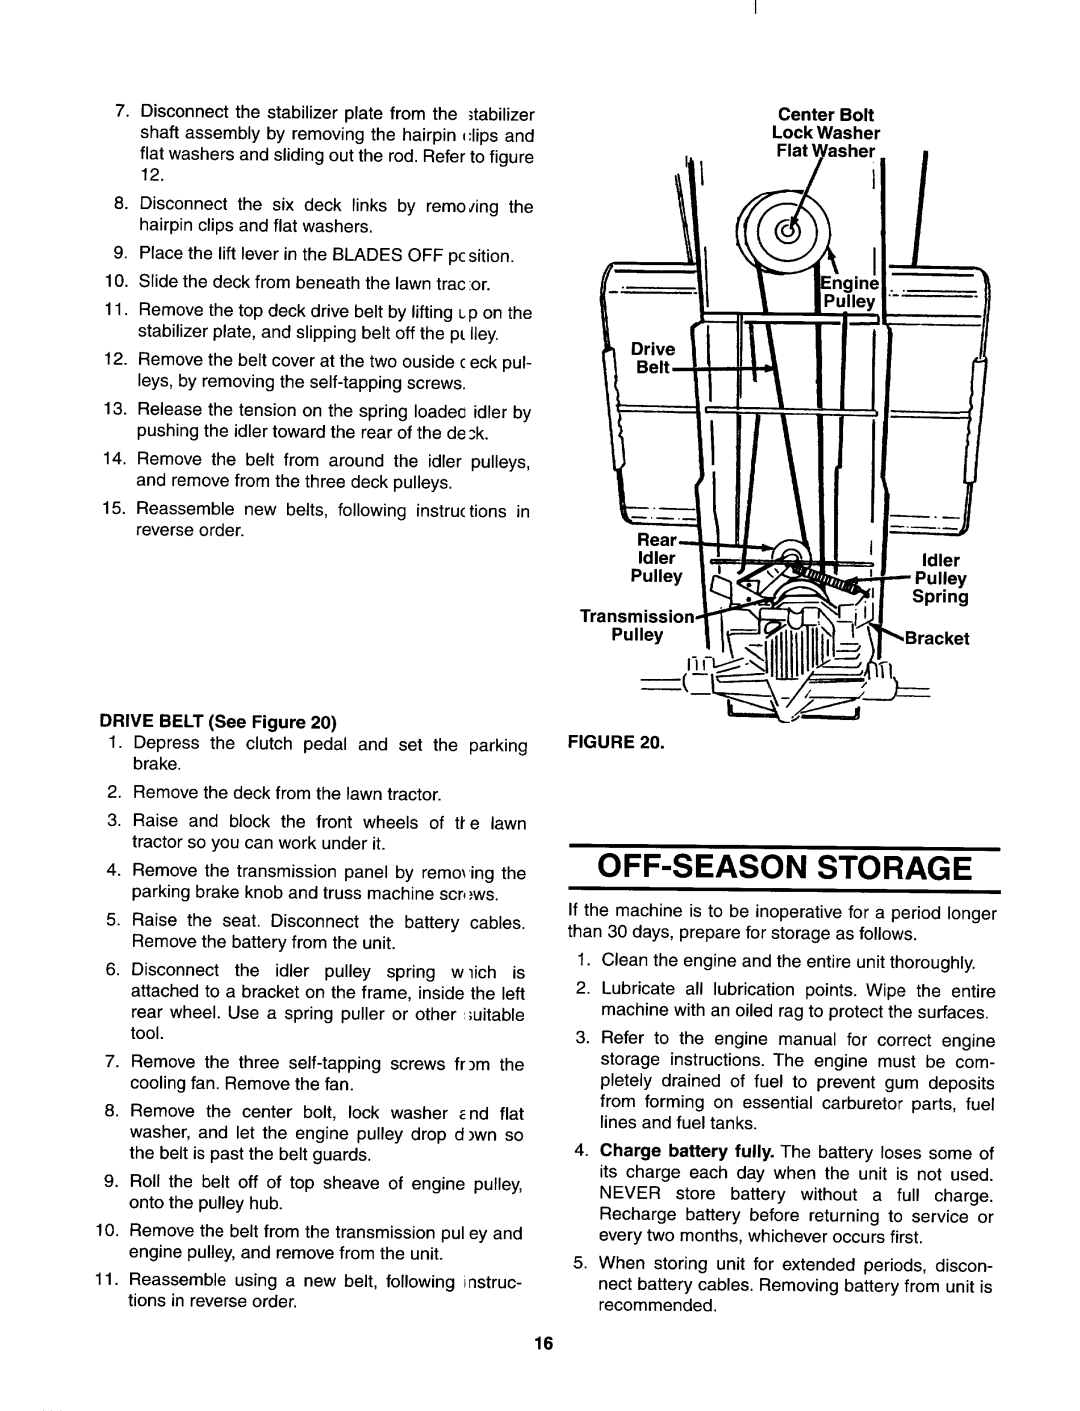
DRIVEBELT (See Figure 20)
1. | Depress the clutch pedal | and set | the | parking | |
| brake. |
|
|
|
|
2. | Remove the deck from | the lawn tractor. |
| ||
3. | Raise and block the | front | wheels | of | tl'e lawn |
| tractor so you can work under it. |
|
| ||
Idler
Pulley
Pulley
Ii
FIGURE 20.
Center Bolt
Lock Washer
Flat Washer
Idler
Spring
:ket
4. | Remove | the | transmission | panel | by remo_ing the | |||||
| parking brake knob and truss machine scr,;ws. |
| ||||||||
5. | Raise the seat. | Disconnect the | battery | cables. | ||||||
| Remove the battery from the unit. |
|
|
|
| |||||
6. | Disconnect | the | idler pulley | spring | w lich | is | ||||
| attached to a bracket on the frame, inside the left | |||||||||
| rear wheel. Use a spring puller or other :;uitable | |||||||||
| tool. |
|
|
|
|
|
|
|
|
|
7. | Remove the three | screws | fr)m | the | ||||||
| cooling fan. Remove the fan. |
|
|
|
|
| ||||
8. | Remove | the | center bolt, | lock | washer | _nd | flat | |||
| washer, and let the engine pulley | drop d)wn so | ||||||||
| the belt is past the belt guards. |
|
|
|
|
| ||||
9. | Roll the belt off of top sheave | of | engine | pulley, | ||||||
| onto the pulley hub. |
|
|
|
|
|
| |||
10.Remove the belt from the transmission pul ey and engine pulley, and remove from the unit.
11.Reassemble using a new belt, following instruc- tions in reverse order.
OFF-SEASON STORAGE
If the machine is to be inoperative for a period longer than 30 days, prepare for storage as follows.
1.Clean the engine and the entire unit thoroughly.
2.Lubricate all lubrication points. Wipe the entire machine with an oiled rag to protect the surfaces.
3.Refer to the engine manual for correct engine storage instructions. The engine must be com- pletely drained of fuel to prevent gum deposits
from forming on essential carburetor parts, fuel lines and fuel tanks.
4.Charge battery fully. The battery loses some of its charge each day when the unit is not used. NEVER store battery without a full charge. Recharge battery before returning to service or every two months, whichever occurs first.
5.When storing unit for extended periods, discon- nect battery cables. Removing battery from unit is recommended.
16
