Poulan HDF825 manual Unpack Carton & Install Handle See Fig, Handle Height, Tilling Width

Page 5

ASSEMBLY

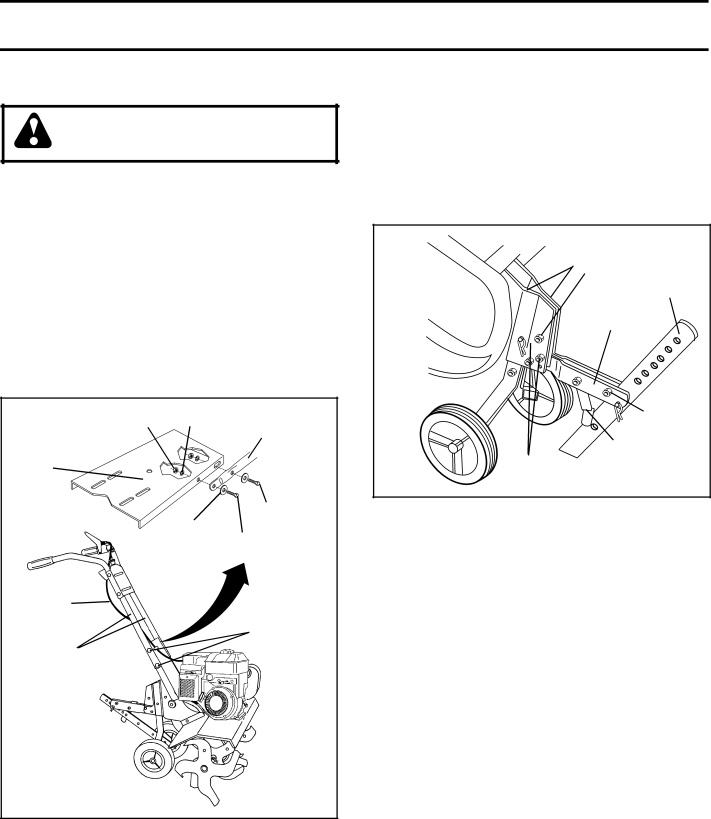
UNPACK CARTON & INSTALL HANDLE (See Fig. 2)

CAUTION: Be careful of exposed staples when handling or disposing of cartoning material.

IMPORTANT: WHEN UNPACKING AND ASSEMBLING TILLER, BE CAREFUL NOT TO STRETCH OR KINK CABLE(S).

Cut cable ties securing handles.

Slowly lift handle assembly up, route cable(s) as shown and align handle holes with handle panel hole and slot.

Loosely assemble hardware as shown. Be sure the shorter (1" long) hex bolt is assembled in lower hole of handle. Repeat for opposite side. Tighten all hard- ware securely.

Cut cable ties securing tiller to skid and remove tiller from skid.

Remove screws securing depth stake to skid and dis- card the screws.

LOCK

NUT WASHER TILLER

HANDLE

HANDLE

PANEL


FLAT


HEX BOLT

_38


5/16-18X1-1/4"

handles


WASHER


HEX BOLT


5/16-18X1"


02

051


CABLE(S)

HANDLE

PANEL

TILLERBOLTS HANDLES

FIG. 2

INSTALL DEPTH STAKE ASSEMBLY (See Fig. 3)

Loosen nut “A”.

Insert stake support between engine bracket halves with stake spring down.

Bolt stake support to engine brackets with bolts, lock washers and nuts. Tighten securely. Tighten nut “A”.

Depth stake must move freely. If it does not, loosen support bolt.

depth_

ENGINE BRACKET

HALVES

stake_

NUT “A”

4

DEPTH


STAKE


DEPTH STAKE


SUPPORT


SUPPORT


BOLT


STAKE


SPRING


HEX BOLTS,


LOCK WASHERS,


AND HEX NUTS

FIG. 3

HANDLE HEIGHT

Handle height may be adjusted to better suit operator. (See “HANDLE HEIGHT” in the Service and Adjust- ments section of this manual).

TILLING WIDTH

Tilling width may be adjusted to better handle your tilling conditions (See “TINE ARRANGEMENT” in the Service and Adjustments section of this manual).

TINE OPERATION

Check tine operation before fi rst use. (See “TINE OP- ERATION CHECK” in the Service and Adjustments section of this manual).

5

Image 5
Contents Always Wear EYE Protection During Operation Operators Manual Model Maintenance and Storage Safety Rules Training PreparationTable of Contents Contents of Hardware Pack AssemblyTools Required for Assembly Handle Height Unpack Carton & Install Handle See FigTilling Width Tine OperationKnow Your Tiller Meets Ansi Safety RequirementsOperation Stopping See Fig HOW to USE Your TillerTine Operation See Fig TillingTo Transport Before Starting EngineFill Engine with OIL See Fig ADD GasolineCultivating Breaking in Your TillerTilling Hints General Recommendations MaintenanceMaintenance Schedule Engine AIR Cleaner See FigCooling System See Fig To Change Engine OIL See FigsTiller Service and AdjustmentsCleaning To Remove Belt Guard See Fig Tine Operation Check See FigTo Replace V-BELTS See Figs Final Check OFF PositionBelt Replacement To Adjust CarburetorBelt Removal Check Tine OperationOther StorageFuel System Engine OILProblem Cause Correction Troubleshooting PointsLimited Warranty Parts and Service Changere DE Pièces LES ET L’ENTRETIEN Bouché dessence Réservoir Dépannage DE GuideSupplementaire Information EntreposageMoteur MotobineuseCarburateur LE Régler Pour Réglages ET Révision15 22 .FIG 21 .FIGFig la Voir Roiecour DE Protecteur LE Enlever Pour Fraises DES Disposition 15 .FIG Fig la Voir Sesfrai DES L’UTILISATION DE VérificationFig la Voir Guidon DU Hauteur LA Régler PourNettoyage Entretien’ALLUMAGE Bougie SilencieuxLubrification MoteurFig la Voir AIR À Filtre Lubrification DE Tableau Générales Recommandations’ENTRETIEN Calendrier LubrificationMotobineuse LA DE Rodage UtilisationCulture Labourage DE ConseilsGfi la Voir Moteur LE Démarrer DE AvantMoteur LE Démarrer Pour ’ESSENCE Réservoir LE RemplirMoto Votre Utiliser Comment BineuseLabourage Fig la FRAISESVoir DES UtilisationMoteur le démarrer de permet Démarrage DE Poignée Motobineuse Votre ConnaissezMotobineuse Votre Montage Manche LE Installer ET DéballerDents DES Utilisation Geraboula DU LargeurFig la Voir D’OPERATEUR Position Pièces DES SAC DU ContenuMontage LE Pour Exiges Outils LES De Clés 2 Pince 1 Tournevis 1 usage tout à CouteauProduit DU Spécifications SommaireClient DU Responsabilités Réglages ET Révision Client DU ResponsabilitésEntreposage ET Entretien Sécurité DE RèglesMotobineuses des Sécurité toute En lUtilisation pour ConseilsAvertissement OpérateurDU Manuel