Generac 005308-0 owner manual Your Generac Manual Transfer Switch is now installed

Page 25

Section 5—Installation for Manual Transfer Switch

9a. The 2 foot conduit that is pre-wired into the manual transfer switch is not fastened to the side of the enclosure when shipped. To secure the conduit to the manual switch enclosure proceed as follows. Remove the cover panel of the manual transfer switch with emergency load center. Insert the 2 foot conduit into the knockout and tighten the lock nut securely on the inside of the enclosure.

10 Connection of Emergency Circuits

UL approved wire nuts are included with installation kit.

NOTE: Balance must be maintained when moving circuit locations from main electrical distribution panel to emergency load center. Circuit breaker positions alternate buss bars vertically. Circuits sharing a neutral wire should either be moved together to adjacent positions in emergency load center or not moved. If you are unsure of proper procedure or if your installation differs from that described in this guide, consult a licensed professional at this time.

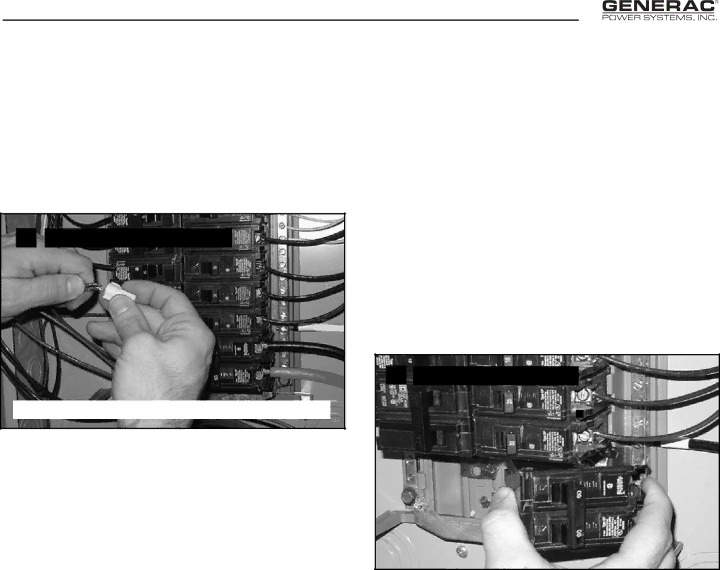
the emergency circuit breaker from load center in the transfer switch. (All circuit wires are color coded and labeled for easy identification). Repeat this process with remaining circuits to be powered by the generator.

Trace each black (hot) wire connected and wire nut the white (neutral) wire from the same Romex cable (circuit) to the matching circuit number on the white (neutral) wire from the emergency load center. Repeat for each circuit. (See page 31)

The emergency load center in the transfer switch supplies the following circuits: (5) 15A/120V, (5) 20A/120V, (1) 20A/240V, (1) 40A/240V and (1) 50A/240V.

11 Install 60 AMP Circuit Breaker

60

10a. Remove the main electrical distribution panel cover. Remove appropriate size knockout from the bottom or side of the main panel. (A 2-foot flexible conduit is pre-wired from the manual transfer switch with built- in load center). Remove threaded lock nut from conduit coupling. Feed all wires through knockout into main panel. Slip lock nut over wires and tighten securely onto conduit coupling.

NOTE: Circuits to be moved must be protected by same size breaker. For example, a 15 amp 120V circuit in emergency load center will replace a 15 amp 120V circuit in main panel.

NOTE: Both grounded and ungrounded conductors for each circuit must be moved to the emergency panel and connected to to the new wiring from the emergency panel using supplied locknuts.

10b. In your main panel, remove the black (hot) wire from a circuit breaker that protects a circuit you want to have powered in the event of a power failure. Wire nut the black wire to the matching circuit lead wire from

11.Install the 60 Amp double pole circuit breaker that you have purchased into main electrical distribution panel. This circuit breaker must be compatible with your main electrical distribution panel. It may be necessary to reposition remaining circuit breakers or remove circuit breakers that have been disconnected to accommodate the insertion of the 60 Amp double pole circuit breaker. Connect white wire to the main distribution panel neutral bar. Connect solid green wire to main electrical panel ground bar. Connect the black and red wires to the 60 Amp double pole circuit breaker. Replace electrical distribution panel cover.

Your GENERAC Manual

Transfer Switch is now installed.

NOTE: If additional circuits are required to be protected. Generac offers an additional 30A manual transfer switch and 30A Power Inlet Kit (Model 5341). This kit can be ordered direct from the factory 1-800-747-1530 (Option 2).

23

Image 25
Contents Authorized Dealer Support Owner’s ManualTroubleshooting Table of Contents Residential Portable Generator SystemRead this Manual Thoroughly Never operate in an enclosed area or indoors General HazardsExplosion Hazards Electrical HazardsFire Hazards Unpacking Accessory BOXAssembling the Wheel KIT Assembling the HandleHandle Assembly Battery ConnectionOperation Residential Portable Generator System Know the GeneratorThis generator Volt AC, 20A Duplex Gfci Receptacle1 AC, 20 AMP, Duplex Receptacle Cord Sets and Connection Plugs2 120V AC, 20 AMP, Gfci Receptacle Provided. This receptacle can not recharge 6 Volt batteries 5 12 Volt DC, 10 AMP ReceptacleConnecting Electrical Loads HOW to USE the GeneratorDON’T Overload the Generator Grounding the GeneratorBefore Starting the Generator Wattage Reference GuideAdding Engine OIL Adding Gasoline To Start the EngineLOW OIL Pressure Shutdown System Automatic Idle ControlStopping the Engine To recharge 12 Volt batteries, proceed as follows Charging a BatteryMaintenance Residential Portable Generator System Maintenance ScheduleEngine Maintenance Checking OIL Level Generator MaintenanceTo Clean the Generator General RecommendationsClean Spark Arrestor Screen Service AIR CleanerReplacing the Spark Plug To adjust valve clearance Adjusting Valve ClearanceLong Term Storage GeneralOther Storage Tips Troubleshooting KIT Includes Installation for Manual Transfer SwitchTools Required Items YOU Must PurchaseSilicone Caulk These Instructions are to Serve AS a Guide only7a Prepare Box For Connections Your Generac Manual Transfer Switch is now installed Operation of Generator with Manual Transfer Switch Using the Ultra Source PortableTransfer to Generator Power Source When Utility Power Fails Transfer Back to Utility Power SourceInterconnection Drawing Residential Portable Generator System Wiring Diagram, Portable Generator Drawing No G0731 Closest to Bearing Schematic, Portable Generator Drawing No G0733 Wiring Diagram, Manual Transfer Switch Drawing No G1065 Manual Transfer Switch with Load Center Drawing No G0939-B Description Exploded Views and Parts ListsSystem 160QTY Description Lists 118 116 119162QTY Description Part NO# Generator Drawing No D4488-F QTY Description Control Panel Drawing No G0727-B Part NO. QTY Description Tray Rubber Tank Mount MANUFACTURER’S Emission Control System Warranty Coverage Emission Control System Warranty Warranty Schedule