Canon LV-7585 user manual Configurations of Terminals, ANALOG/ Monitor OUT Mini D-sub 15 pin

Page 75

Appendix

Configurations of Terminals

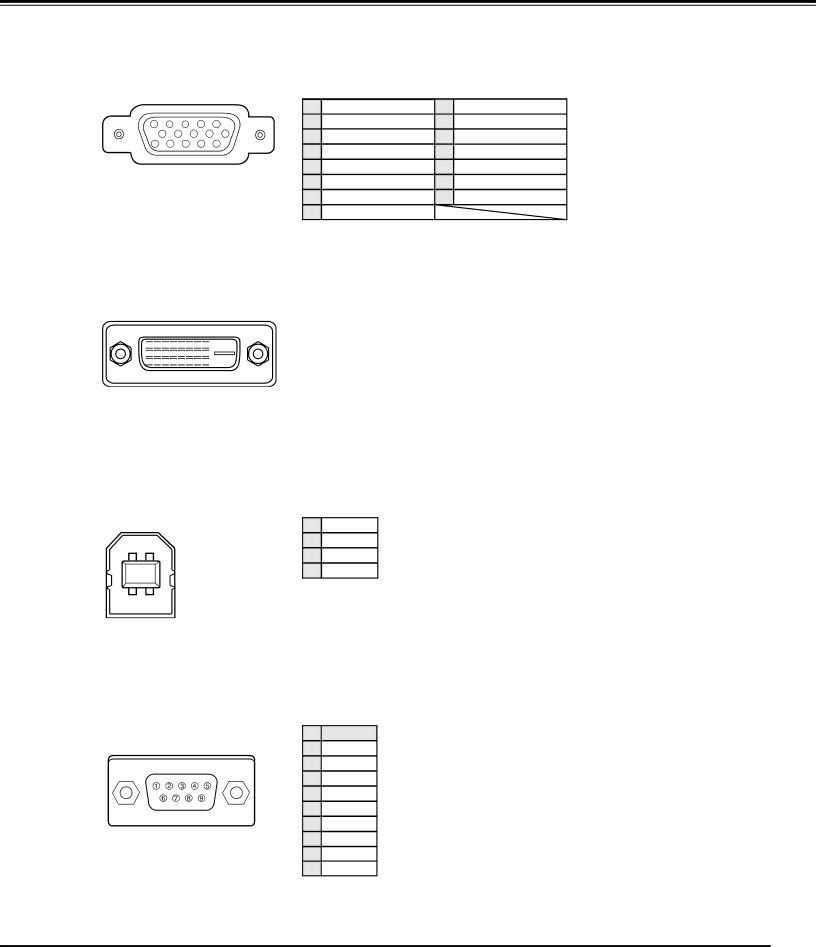
ANALOG/ MONITOR OUT (Mini D-sub 15 pin)


1

Red Input

9

+5V Power

5

4

3

2

1


2

Green Input

10

Ground (Vert. sync.)

10

9


8

7

6

3

Blue Input

11

Sense 0

15

14

13

12

11


Sense 2


DDC Data


4

12


5

Ground (Horiz.sync.)

13

Horiz. sync.


6

Ground (Red)

14

Vert. sync.


7

Ground (Green)

15

DDC Clock


8

Ground (Blue)


DIGITAL DVI-D (DVI 24 PIN)

1 2 3 4 5 6 7 8

9 101112131415161718192021222324

1

T.M.D.S. Data2–

9

T.M.D.S. Data1–

17

T.M.D.S. Data0–

2

T.M.D.S. Data2+

10

T.M.D.S. Data1+

18

T.M.D.S. Data0+

3

T.M.D.S. Data2 Shield

11

T.M.D.S. Data1 Shield

19

T.M.D.S. Data0 Shield

4

No Connect

12

No Connect

20

No Connect

5

No Connect

13

No Connect

21

No Connect

6

DDC Clock

14

+5V Power

22

T.M.D.S. Clock Shield

7

DDC Data

15

Ground (for +5V)

23

T.M.D.S. Clock+

8

No Connect

16

Hot Plug Detect

24

T.M.D.S. Clock–

USB CONNECTOR (Series B)

2

1

3

4

1

Vcc

2

- Data

3

+ Data

4

Ground

CONTROL PORT CONNECTOR (D-sub 9 pin)


Serial

1

-----

2

R X D

3

T X D

4

-----

5

SG

6

-----

7

RTS

8

CTS

9

-----

75

Image 75
Contents User’s Manual Features and Design Table of Contents Risk of Electric Shock Do not Open To The OwnerSafety Instructions Air Circulation Filter MaintenancePositioning Precautions Installing the Projector in Proper DirectionsTransporting the Projector Moving the ProjectorCompliance Federal Communications Commission NoticeCanadian Radio Interference Regulations Back Bottom Indicators w Top Cover Top Cover Release Button r Lens CapPart Names and Functions Front qRear Terminal Side Control and Indicators Remote Control Unit 5D-ZOOM button 4P-TIMER button@0FOCUS buttons Adjust the focus p.28 @1BLANK button 3MENU buttonRemote Control Battery Installation Remote Control Receivers and Operating RangeWired Remote Control Transmitter Remote Control Code Installation Adjustable FeetPositioning the Projector Removing the lens Lens InstallationAttaching the lens to the projector USB R H/V Digital Analog Monitor OUT Control Port Connecting to a Computer Digital and Analog RGBMonitor Out Signal Table Connecting to Video Equipment Video, S-VideoConnecting the AC Power Cord For the U..KFor the U..S..A.. and Canada For Continental Europe Enter a PIN code What is PIN code?Basic Operation Turning On the ProjectorTurning Off the Projector Pointer How to Operate the On-Screen MenuPoint buttons OK button Menu button Menu icon Menu bar Pointer red frameMenu Bar Operating with Projector Control Zoom Focus Lens ShiftLens button Point buttons Operating with Remote Control Unit Mouse Pointer button Timer buttonFilter button Blank buttonPointer button Wireless Mouse OperationPointer Function Mouse Pointer buttonSide Control Operation Remote Control OperationInput Selection InputSource Select Menu Computer Input Source SelectionMenu Operation Input MenuVideo Pb/Cb, Pr/Cr Video Input Source SelectionSelecting Computer System Manually Computer InputComputer System Selection Automatic Multi-Scan SystemAuto PC adj Auto PC AdjustmentPC Adjust Menu Direct OperationManual PC Adjustment Store ResetMode free To store the adjusted dataCustom Image Level SelectionStandard High contrastScreen Menu Screen Size AdjustmentDigital zoom + KeystoneCeiling RearVideo System Selection Video InputCinema Provide the image at the normal video aspect ratio Keystone Picture Image Image AdjustmentImage Adjust Menu Pointer ModeDEL Color MMenu Color PaletteGamma White balance Red/Green/BlueOffset Red/Green/Blue SharpnessSetting SettingLogo Logo selectLogo Capture Change the Logo PIN code lock setting Enter a Logo PIN codeChange the Logo PIN code RC sensor USB Wireless Mouse modeProjector mode Power managementSecurity Key lock PIN code lockSecurity Enter a PIN code Change the PIN Code Lock settingChange the PIN code lock setting Change the PIN CodeFactory default Filter counterTest pattern Filter Instructions Maintenance and CareMaintenance and Care Filter counter Lamp Replacement Lamp Replace indicatorReset the Lamp counter p.60 Order Replacement Lamp Resetting the Lamp CounterLamp Handling Precautions Cleaning the Projector Cabinet Cleaning the Projection LensThen check the matters below Lamp indicator lights on and other four indicators blinkAppendix TroubleshootingFunction does not Remote control unitWireless mouse Does not workInformation Image AdjustMenu Tree Computer Input/Video InputSystem PC AdjustSystem Image Select ScreenUSB SettingProjector Condition Indicators and Projector ConditionAppendix Indicators Resolution Compatible Computer Specifications59.940 Accessories Panel ResolutionSignal Compatibility PowerPJ Link Notice Lens ReplacementTo the sales and service engineers Optional PartsConfigurations of Terminals Control Port Connector D-sub 9 pinANALOG/ Monitor OUT Mini D-sub 15 pin While the projector is locked with the PIN code Dimensions Serial Control Interface OperationExample Format Functional Execution CommandCR0 Status Read CommandCanon INC