Onkyo Understanding Speaker Connection Precautions and Best Practices for Your Receiver

Page 13

Speaker Connection Precautions

Read the following before connecting your speakers:

You can connect speakers with an impedance of between 6 and 16 ohms. If you use speakers with a lower impedance, and use the amplifier at high volume levels for a long period of time, the built-in amp protection circuit may be activated.

Disconnect the power cord from the wall outlet before making any connections.

Read the instructions supplied with your speakers.
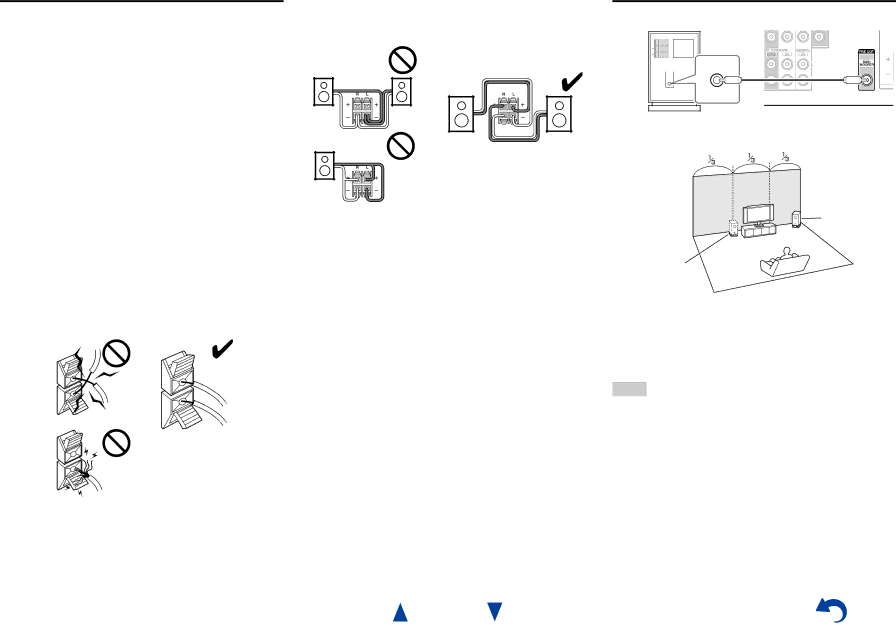
Pay close attention to speaker wiring polarity. In other words, connect positive (+) terminals only to positive (+) terminals, and negative (–) terminals only to negative (–) terminals. If you get them the wrong way around, the sound will be out of phase and will sound unnatural.

Unnecessarily long, or very thin speaker cables may affect the sound quality and should be avoided.

Be careful not to short the positive and negative wires. Doing so may damage the AV receiver.

Make sure the metal core of the wire does not have contact with the AV receiver’s rear panel. Doing so may damage the AV receiver.

Don’t connect more than one cable to each speaker terminal. Doing so may damage the AV receiver.

Don’t connect one speaker to several terminals.

Connections

Using a Powered Subwoofer

LINE INPUT

Powered subwoofer

Corner position

1/3 of wall position

To find the best position for your subwoofer, while playing a movie or some music with good bass, experiment by placing your subwoofer at various positions within the room, and choose the one that provides the most satisfying results.

Tip

If your subwoofer is unpowered and you’re using an external amplifier, connect the subwoofer pre out jack to an input on the amplifier.

En-13

Image 13
Contents HT-RC430 En-2 En-3 PrecautionsMake sure you have the following accessories Supplied AccessoriesEn-4 Table of Contents En-6 FeaturesEn-7 Front & Rear PanelsFront Panel Display En-8Remote Control jack Power cordEn-9 Rear PanelEn-10 Remote ControllerControlling the AV Receiver Connecting Your Speakers Connecting the AV ReceiverConnecting the Speaker Cables En-11En-12 Speaker ConfigurationAttaching the Speaker Cable Labels Number of speakersUsing a Powered Subwoofer Speaker Connection PrecautionsEn-13 TipEn-14 Connecting AV componentsAbout AV Connections AV Cables and JacksEn-15 Connecting Components with HdmiAudio Return Channel ARC function Jack ComponentsHow to record a video source Connecting Your ComponentsEn-16 Assignment can be changed pages 37Connecting a Recording Component Connecting Onkyo uComponentsEn-17 Connecting the Power Cord Connecting the AntennasBe careful not to injure yourself when using thumbtacks Plug the power cord into an AC wall outletEn-19 Turning On/Off the AV ReceiverTurning On Turning Off En-20 PlaybackPlaying the Connected Component En-21 Controlling Contents of USB DevicesStandard Mode Control Extended Mode ControlEn-22 Understanding Icons on the DisplayPlaying a USB Device En-23Press Enter Tuning into Radio Stations Using the TunerEn-24 Listening to AM/FM RadioSelecting Presets Presetting AM/FM StationsDeleting Presets En-25Using the Listening Modes Using Basic FunctionsEn-26 Selecting Listening ModesAbout Listening Modes En-27Explanatory Notes a b Input SourceOnkyo-Original DSP Listening Modes En-28Listening Modes En-29Neo6 En-30En-31 Using the Home MenuSelecting Speakers a and B Setting the Display Brightness Using the Sleep TimerEn-32 Displaying Source InformationEn-33 Using the Music OptimizerChanging the Input Display Muting the AV ReceiverEn-34 Using HeadphonesRecording AV RecordingCommon Procedures in Setup Menu On-screen SetupEn-35 Explanatory NotesMenu item Setting target Setup menu itemsEn-36 En-37 Input selector Default assignmentHdmi Input Component Component Video InputFront En-38Center*1, Surround*1 Crossover Crossover FrequencySp Distance Speaker Distance Level Cal Level Calibration En-39Theater-Dimensional Audio AdjustEn-40 Multiplex/MonoPreset Name For Input Selector Source SetupEn-41 Audio SelectorHardware En-42En-43 Hdmi SetupHdmi Ctrl Rihd Hdmi ThroughEn-44 Using the Audio SettingsTone Control Speaker LevelsLate Night En-45Music Optimizer CinemaFILTERIPod/iPhone Playback via Onkyo Dock Using the Onkyo DockEn-46 RI DockControlling Your iPod/iPhone En-47With the RI Control Without the RI ControlEntering Remote Control Codes Preprogrammed Remote Control CodesRemote Control Codes for Onkyo Components Connected via u Controlling Other Onkyo ComponentsResetting the Remote Controller Resetting the Remote Mode ButtonsEn-49 Controlling Other Components En-50Controlling a Blu-ray Disc/DVD Player, HD DVD Player Blu-ray Disc player / HD-DVD player operationCD player / CD recorder / MD recorder operation En-51Cassette tape deck operation En-52 TroubleshootingCan’t turn on the AV receiver AV receiver turns off unexpectedlyEn-53 En-54 En-55 En-56 En-57 Connection Tips and Video Signal PathEn-58 Using an RIHD- compatible TV, Player, or RecorderPlayers/Recorders For p-compatible TVConfirm the connecting and setting How to connect and setupConfirm the settings En-59En-60 About HdmiEn-61 USB FeaturesEn-62 License and Trademark InformationEn-63 Specifications4 0 1 1 1