Elmo CRP-26 Safety Instructions Air Circulation, Installing the Projector in Proper Position

Page 6

Safety Instructions

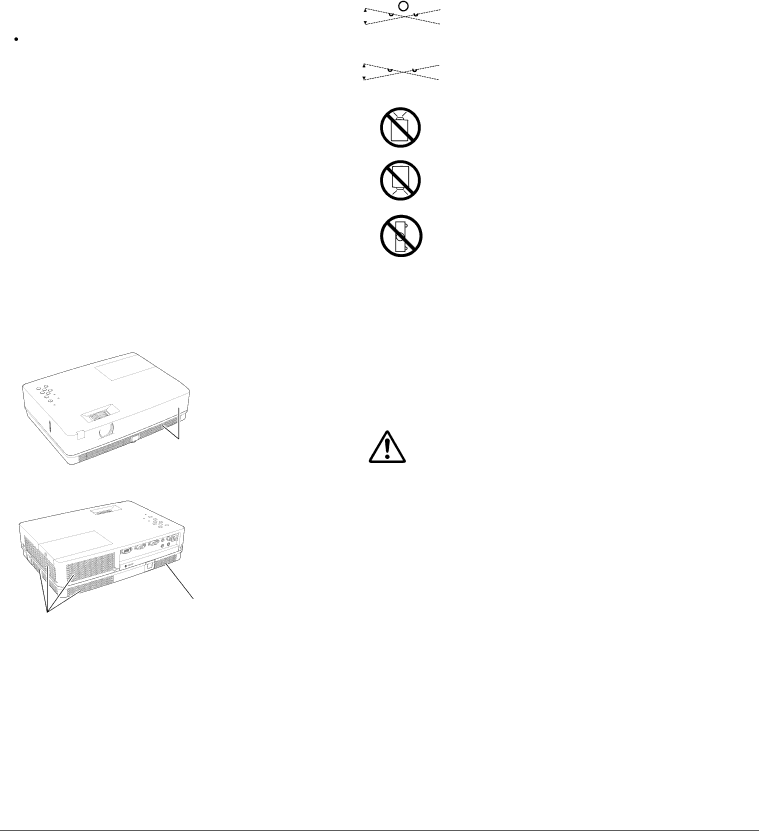
Air Circulation

Openings in the cabinet are provided for ventilation. To ensure reliable operation of the product and to protect it from overheating, these openings must not be blocked or covered.

CAUTION

Hot air is exhausted from the exhaust vent. When using or installing the projector, the following precautions should be taken.

Do not put any flammable object or spray can near the projector, hot air is exhausted from the air vents.

Keep the exhaust vent at least 3’ (1 m) away from any objects.

Do not touch a peripheral part of the exhaust vent, especially screws and metallic parts. These areas will become hot while the projector is being used.

Do not put anything on the cabinet. Objects put on the cabinet will not only get damaged but also may cause fire hazard by heat.

Cooling fans are provided to cool down the projector. The fans’ running speed is changed according to the temperature inside the projector.

Air Intake Vent

Installing the Projector in Proper Position

Install the projector properly. Improper Installation may reduce the lamp life and cause a fire hazard.

20°


Do not tilt the projector more than 20


degrees from side to side.


20°


30°


Do not tilt the projector more than 30


degrees from above and below.


30°


Do not point the projector up to project an image.

Do not point the projector down to project an image.

Do not put the projector on either side to project an image.

Moving the Projector

When moving the projector, replace the lens cap and retract adjustable foot to prevent damage to the lens and cabinet.

When the projector is not in use for an extended period, put it into a suitable case.

CAUTION IN CARRYING OR TRANSPORTING THE PROJECTOR

Exhaust Vent (Hot air exhaust)

Air Intake Vent

Do not drop or bump the projector, otherwise damages or malfunctions may result.

When carrying the projector, use a suitable carrying case.

–Do not transport the projector by courier or any other transport service in an unsuitable transport case. This may cause damage to the projector. For information about transporting the projector by courier or any other transport service, consult your dealer.

–Do not put the projector in a case before the projector is cooled enough.

6

Image 6
Contents CRP-22 CRP-26 Network SupportedFeatures and Design Table of Contents Safety Precaution To the OwnerSafety Instructions Safety Instructions Air Circulation Installing the Projector in Proper PositionMoving the Projector AC Power Cord for the United Kingdom AC Power Cord RequirementAC Power Cord for the United States and Canada CompliancePart Names and Functions Front BackBottom Part Names and Functions Rear Terminal ⑥ LAN Connection Terminal⑧ DC OUT 12V 1.1A Part Names and Functions Top Control Part Names and Functions Remote Control ① ON/STAND-BY buttonRemote Control Operating Range Remote Control CodeInstallation Adjustable FootPositioning the Projector Installation Connecting to a Computer Cables used for connectionInstallation Connecting to Video Equipment Computer in 1/ S-VIDEO in / Component Installation Connecting the AC Power Cord NoteBasic Operation Turning On the ProjectorEnter a PIN code What is PIN code?Basic Operation PIN Code Input Dialog BoxBasic Operation Turning Off the Projector Top Control Basic Operation How to Operate the On-Screen MenuRemote Control On-Screen MenuBasic Operation Menu Bar For detailed functions of each menu, see Menu Tree on pagesKeystone Correction Basic Operation Zoom and Focus AdjustmentAuto Setup Function NotesBasic Operation Sound Adjustment Direct OperationMenu Operation Basic Operation Remote Control Operation Image button Timer buttonNo Show button Screen buttonComputer Input Input Source Selection RGB Computer 1/ComputerInput Menu Computer Input Computer System Selection Selecting Computer System ManuallyPC System Menu To store adjustment parameters Computer Input Auto PC AdjustmentPC adjust Menu Auto PC adjComputer Input Manual PC Adjustment Computer Input ResetMode free StoreComputer Input Image Mode Selection Image select MenuComputer Input Image Adjustment Image Adjust MenuScreen Size Adjustment Screen MenuFor zooming in and out the images Digital zoom + CustomPosition H/V Digital zoomVideo Video InputInput Source Selection Video, S-video Input MenuComponent RGB ScartAV System Menu Video or S-video Video Input Video System SelectionVideo or S-video Component AV System Menu ComponentVideo Input Image Mode Selection CinemaVideo Input Image Adjustment ColorTint Store Menu Off Disabled Lower reduction Higher reduction ProgressiveVideo Input Noise reductionVideo Input Screen Size Adjustment Setting Menu Language SettingSetting LanguageInput search Auto setupAuto setup Auto KeystoneBackground Power off? p.20Keystone UserShow the image you captured Capture CaptureLogo PIN code lock Logo PIN code lockChange the Logo PIN code lock setting Enter a Logo PIN codeLogo PIN code change Terminal CeilingRear ComputerPower management Shut downOn start Standby mode Closed CaptionLamp life control Remote control Lamp controlKey lock Key lock PIN code lockSecurity Key lock and PIN code lock PIN code lockChange the PIN code lock setting Change the PIN codeEnter a PIN code Change the PIN code Fan control Lamp counter resetFan Lamp counterFilter counter Factory defaultFactory default Filter counterInformation Input Source Information DisplayMaintenance and Cleaning Projector is shut down and the Warning indicator lights redNote Then check the matters below Maintenance and Cleaning Cleaning the Filters Resetting the Filter CounterMaintenance and Cleaning Attaching the Lens Cap Cleaning the Projection LensCleaning the Projector Cabinet Maintenance and Cleaning Lamp Replacement Reset the lamp replacement counterMaintenance and Cleaning Service Parts No 345Troubleshooting AppendixAppendix Image is distorted or runs off Remote Control doesIndicator blinks or lights PIN code dialog box appearsAppendix Sound Appendix Menu TreeComputer Input/Video Input Computer InputSetting Video InputAppendix Indicators and Projector Condition IndicatorsAppendix Compatible Computer Specifications ON-SCREEN ResolutionTechnical Specifications Optional Parts Appendix PJ Link Notice Appendix Configurations of Terminals Control Port Connector D-sub 9 pinAppendix PIN Code Number Memo PIN Code Lock NoLogo PIN Code Lock No Dimensions Headquarters West Coast BranchGermany Elmo Europe G.m.b.H