Dell 9100 owner manual Connecting Your Computer to a TV or Audio Device

Page 57

Connecting Your Computer to a TV or Audio Device

NOTE: Unless otherwise indicated, some of the video and audio cables required for connecting your computer to a TV may not be included with your computer. Cables may be purchased at most consumer electronics stores.

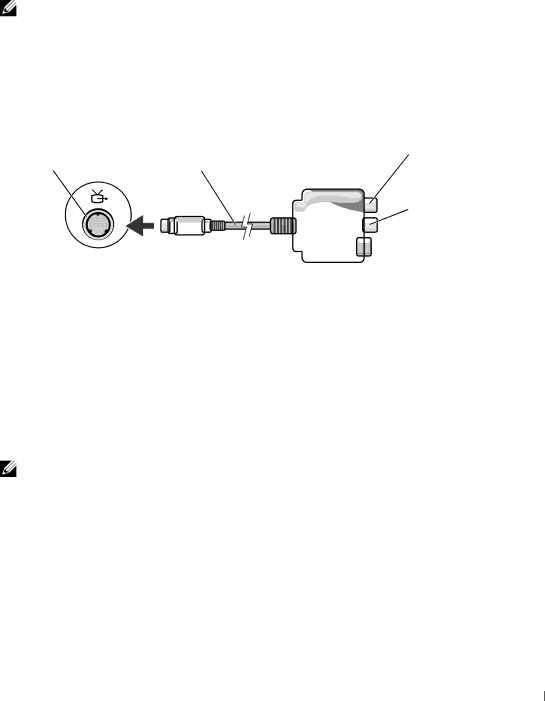
Your computer has an S-video TV-out connector that, together with the TV/digital audio adapter cable (available from Dell), enables you to connect the computer to a TV and/or stereo audio device. The TV/digital audio adapter cable provides connectors for an S-video cable, a composite video cable, and an S/PDIF digital audio cable.

S-video TV-out

TV/digital audio

S/PDIF digital audio

connector

adapter cable

connector

composite video-input connector

S-video input connector

Your TV has either an S-video input connector or a composite video-input connector. Depending on what type of connector is available on your TV, you can use an S-video cable (included with your Dell computer) or a commercially available composite video cable to connect your computer to your TV. For audio devices without support for S/PDIF digital audio, you can use the audio connector on the side of the computer to connect the computer to your audio device.

It is recommended that you connect video and audio cables to your computer in one of the following combinations.

NOTE: See the diagrams at the beginning of each subsection to help you determine which method of connection you should use.

S-video and standard audio (see page 58 )

S-video and S/PDIF digital audio (see page 59)

Composite video and standard audio (see page 61)

Composite video and S/PDIF digital audio (see page 62)

When you finish connecting the video and audio cables between your computer and your TV, you must enable your computer to work with the TV. See "Enabling the Display Settings for a TV" on page 65 to ensure that the computer recognizes and works properly with the TV. Additionally, if you are using S/PDIF digital audio, see "Enabling S/PDIF Digital Audio" on page 64.

Using CDs, DVDs, and Other Multimedia

57

Image 57
Contents Dell Inspiron Abbreviations and Acronyms Contents Optimizing Performance Using the Keyboard and Touch Pad Setting Up a Home and Office Network Adding and Replacing Parts 159 Safety General Safety Battery Safety PowerWhen Using Your Computer Safety Air TravelSafety EMC Instructions Safety When Working Inside Your Computer Safety Ergonomic Computing HabitsSafety Battery Disposal Safety Protecting Against Electrostatic DischargeSafety Instructions Finding Information How to use standby mode and hibernate mode Warranty, and repair information Finding Information Front View Tour of Your ComputerDevice Status Lights Tour of Your Computer Keyboard Status Lights Left Side View Audio Connectors Back View Right Side ViewVideo Connector Modem Connector RJ-11 W . d e l l . c o m s u p p o r t . d e l l . c o m Bottom View Tour of Your Computer Setting Up Your Computer Connecting to the InternetSetting Up Your Internet Connection Next window, click the appropriate option Transferring Information to a New ComputerClick Finished and restart the new computer Setting Up a PrinterPower Protection Devices Connecting a USB PrinterPrinter Cable Turning Off Your Computer Uninterruptible Power SuppliesSurge Protectors Line ConditionersSetting Up Your Computer Optimizing Performance DDR Memory and Processor Front-Side BusHyper-Threading Optimizing Performance Battery Performance Using a BatteryChecking the Battery Charge Dell QuickSet Battery MeterMicrosoft Windows Power Meter Charging the Battery Low-Battery WarningCharge Gauge Removing a Battery Storing a Battery Installing a BatteryUsing a Battery About the Module Bay Using the Module BayPush the new device into the bay until it clicks Pull the device out of the module bayDevice latch release Using the Module Bay Pull the device out of the module bay Using the Keyboard and Touch Pad Numeric KeypadKey Combinations Power Management Display FunctionsSpeaker Functions Microsoft Windows Logo Key Functions Touch PadCustomizing the Touch Pad and Track Stick Changing the Track Stick Cap Using the Keyboard and Touch Pad Using CDs and DVDs Using CDs, DVDs, and Other MultimediaHow to Copy a CD or DVD Copying CDs and DVDsHelpful Tips Using Blank CD-Rs and CD-RWsConnecting Your Computer to a TV or Audio Device Video and Standard Audio Video and S/PDIF Digital Audio Pdif digital audio cable Composite Video and Standard Audio Composite Video and S/PDIF Digital Audio Using CDs, DVDs, and Other Multimedia Click Close Click OK Enabling S/PDIF Digital AudioEnabling the Display Settings for a TV Setting Up the Dolby HeadphoneUsing CDs, DVDs, and Other Multimedia Setting Up a Home and Office Network Connecting to a Network AdapterNetwork Setup Wizard Connecting to a Wireless Local Area Network Determining Your Network TypeOn the welcome screen, click Next Connecting to a Wireless Network in Microsoft Windows XP Click Add Configuring Security Settings Optional Setting Up a Home and Office Network Click Properties Setting Up a Home and Office Network Error Messages Solving ProblemsIf the display is blank Video and Display ProblemsIf the display is difficult to read Hard Drive Problems Scanner ProblemsIf you have problems with a hard drive If only part of the display is readableExternal Keyboard Problems PC Card ProblemsPower Problems Unexpected Characters Printer Problems Touch Pad or Mouse ProblemsNetwork Problems General Program ProblemsProgram crashes Error messages appear CD or DVD ProblemsProgram stops responding Solid blue screen appearsIf you cannot eject the CD, CD-RW, or DVD drive tray If you hear an unfamiliar scraping or grinding soundIf the CD-RW drive stops writing Sound and Speaker Problems If you have a problem with integrated speakersIf you have a problem with external speakers Mail, Modem, and Internet Problems Click the Start button and click Control Panel Resolving Other Technical Problems What Is a Driver?Drivers Identifying Drivers Reinstalling Drivers and UtilitiesInsert the Drivers and Utilities CD Resolving Software and Hardware Incompatibilities Creating a Restore Point Using Microsoft Windows XP System RestoreSelect a restore point and click Next Restoring the Computer to an Earlier Operating StateUsing the Dell Diagnostics Undoing the Last System RestoreWhen to Use the Dell Diagnostics Express Test first to increase the possibility of tracing Reinstalling Microsoft Windows XP To reinstall Windows XP, you need the following itemsBefore You Begin Reinstalling Windows XP When the Welcome to Microsoft screen appears, click Next Before You Begin Adding and Replacing PartsRecommended Tools Shutting Down Your ComputerAdding and Replacing Parts 101 Hard Drive102 Returning a Hard Drive to Dell103 Memory104 105 106 Mini PCI Card107 Replace the cover and tighten the captive screw 109 SubwooferInsert the subwoofer into the compartment within the battery 111 FansFan release lever 113 Hinge CoversLeft hinge cover Right hinge cover 115 DisplayScrews labeled D 117 Lift the display out of the computer at a 90-degree angleKeyboard 119 120 Reserve Battery121 Card with Bluetooth Wireless TechnologyAdding and Replacing Parts Specifications Appendix123 USB 124Lvds 125126 127 128 Viewing the System Setup Screens Using the System Setup ProgramOverview 129Commonly Used Options System Setup Screens131 Enabling the Infrared SensorDell Technical Support Policy U.S. Only Definition of Dell-Installed Software and PeripheralsContacting Dell Definition of Third-Party Software and Peripherals133 134 135 136 137 138 139 140 141 142 143 144 145 146 147 148 What is not covered by this limited warranty? What is covered by this limited warranty?Limited Warranties 149How long does this limited warranty last? What do I do if I need warranty service?150 What will Dell do? What if I purchased a service contract?How will you fix my product? 151152 May I transfer the limited warranty?153 154 Dell Software and Peripherals Canada Only Making a Claim Limitation and Statutory Rights156 157 Intel’s Three Year Limited WarrantyWhat are Errata? 158Index Floppy drive connecting to a USB Programs Device Driver Rollback, 90 enabling display settings for a
Related manuals
Manual 83 pages 12.96 Kb Manual 52 pages 11.04 Kb