– 7 –
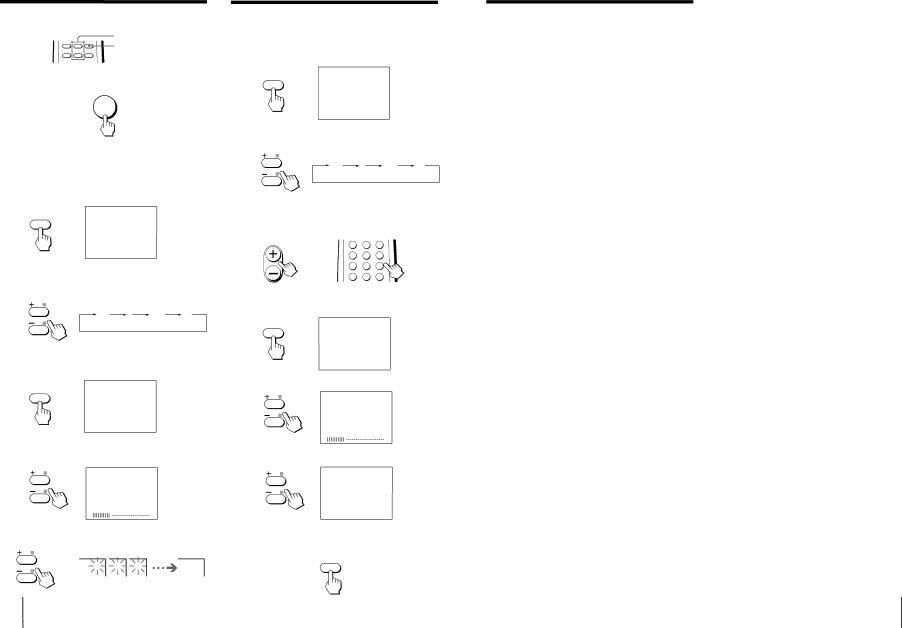
Presetting channels automatically |
| |||
using the remote commander |
| |||
|
| + or – |
|
|
|
| SELECT |
|
|
1 | Press POWER to turn on the TV. |
|
| |
| POWER |
|
| |
| When the TV is turned on in standby mode, press | |||
| POWER on the remote commander. |
|
| |
2 | Press SELECT until “TV SYSTEM” appears | |||
|
|
|
|
|
| SELECT |
|
|
|
| TV SYSTEM : B/G |
|
| |
3 | Press + or – to select your local TV system | |||
|
|
|
| |
| B/G | I | D/K | M |
4 | Press SELECT until “AUTO PROGRAM” |
| ||
| appears. |
|
|
|
| SELECT |
|
|
|
Presetting channels manually using the | |||||
remote commander |
|
|
|
| |
1 | Press SELECT until “TV SYSTEM” appears | ||||
|
|
|
|
|
|
| SELECT |
|
|
|
|
| TV SYSTEM : B/G |
|
| ||
2 | Press + or – to select your local TV system | ||||
|
|
|
|
| |
| B/G |
| I | D/K | M |
3 | Press PROGR +/– or a number button until | ||||
| the required program appears on the |
| |||
| screen. |
|
|
|
|
| PROGR | 1 | 2 | 3 |
|
|
|
| |||
| or | 4 | 5 | 6 |
|
| 7 | 8 | 9 |
| |
|
|
| |||
|
| ÷ | 0 | JUMP |
|
4 | Press SELECT until “MANUAL PROGRAM” | ||||
| appears. |
|
|
|
|
| SELECT |
|
|
|
|
| MANUAL PROGRAM |
| |||
5 | Press + or |
|
|
|
|
If you are not satisfied with the picture | |
and sound quality | |
You may be able to further improve the picture and | |
sound quality by using fine tuning as below: | |
1 | Select the program position you want to |
| adjust. |
2 | Press SELECT until “MANUAL PROGRAM” |
| appears on the screen. |
3 | Press + or – on the remote commander |
| once. |
4 | Press DISP until “FINE” appears on the |
| screen. |
5 | Press + or – continuously until you are |
| satisfied with the picture and sound |
| quality. |
6 | Press SELECT to return to normal screen. |
|
|
| AUTO PROGRAM | ||
5 | Press + or |
|
| ||
|
|
| VHF LOW | B/G | |
6 | Press + or |
|
| ||
|
|
| 1 | 2 | 3 |
8 | Getting Started |
|
| ||
VHF LOW | B/G |
6 | Press + or |
| 1 |
| The selected channel appears on the screen. |
7 | Press SELECT to return to normal screen. |
| SELECT |
1
Getting Started
9