RCA Satellite TV Antenna manual Making the Final Connections, About the Phone Connection

Page 38

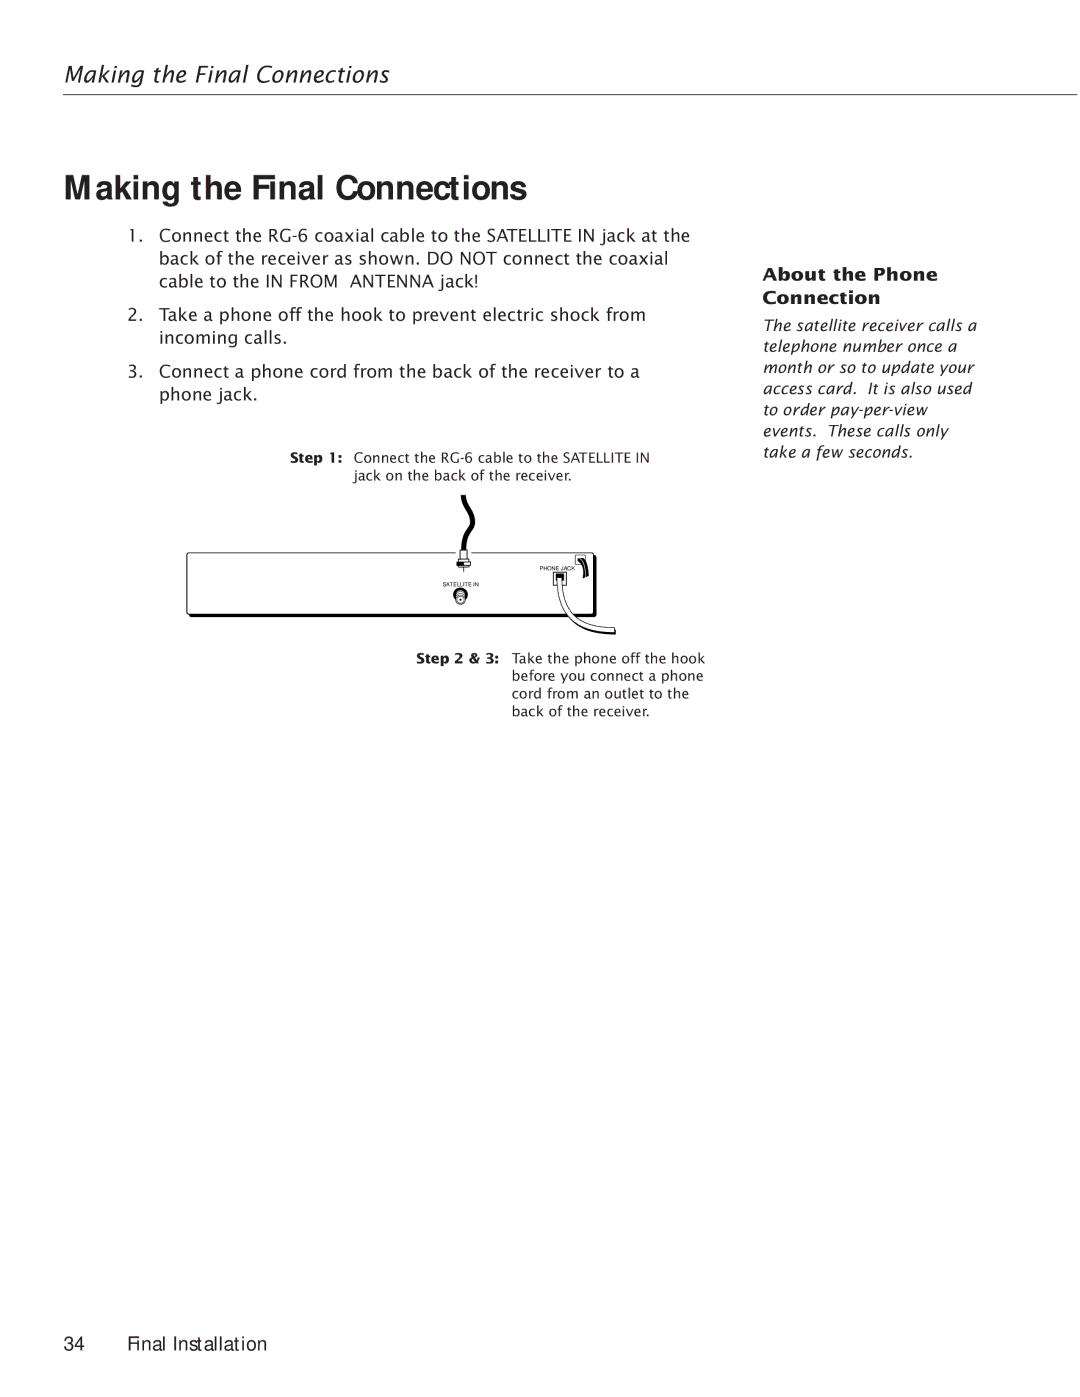
Making the Final Connections

Making the Final Connections

1.Connect the RG-6 coaxial cable to the SATELLITE IN jack at the back of the receiver as shown. DO NOT connect the coaxial cable to the IN FROM ANTENNA jack!

2.Take a phone off the hook to prevent electric shock from incoming calls.

3.Connect a phone cord from the back of the receiver to a phone jack.

Step 1: Connect the RG-6 cable to the SATELLITE IN jack on the back of the receiver.

PHONE JACK

SATELLITE IN

Step 2 & 3: Take the phone off the hook before you connect a phone cord from an outlet to the back of the receiver.

About the Phone Connection

The satellite receiver calls a telephone number once a month or so to update your access card. It is also used to order pay-per-view events. These calls only take a few seconds.

34 Final Installation
Image 38
Contents Satellite Dish Antenna Safety Information D940EXP 2nd Room Kit Universal AccessoriesD916 Wireless Phone Jack System ANT200 Amplified TV AntennaAccessory Order Form Detach HereTable Of Contents Table of Contents Preparing for Installation Preparing for Installation Installation OverviewInstallation Overview Completing the Final InstallationGeneral Site Survey Big Question Should I Do This Myself?General Site Survey Finding a Clear Line of Sight Where Is The Satellite, Anyway?How High Up in the Sky is the Satellite? Finding the Dish Pointing Coordinates Connecting the Receiver to a TVFinding the Dish Pointing Coordinates Additional InformationUsing the Dish Pointing Menu Screen Tip Precise Site SurveyPrecise Site Survey ’m Not sure If I have a Clear View Final Site SurveyDon’t have a clear view to the satellite Have a Clear View to the SatelliteFew Words About Grounding System Estimating Cable RequirementsEstimating Cable Requirements Cable Estimate Procedure If you have a Sony reflector, you should have Dish Assembly OverviewDish Assembly Overview Partial Dish Assembly Partial Dish AssemblySetting the Elevation on the Dish Tighten both nutsMounting the Mast Mounting the Mast on Solid Wood or Lap Siding Mounting The Mast On Solid Wood Or Lap SidingImportant Considerations Materials NeededMounting Instructions YesInstalling a Spacer Mounting the Mast on Solid WoodMounting the Mast on Brick or Poured Concrete Mounting the Mast on Brick or Poured ConcreteMounting the Mast on a Hollow or Cinder Block Wall Materials Needed Tools NeededMounting the Mast on a Hollow or Cinder Block Wall Mounting the Dish on a Hollow or Cinder Block Wall Important Considerations Mounting the Dish On a PoleMounting the Dish on a Pole Top view of pole Mounting the Mast on a Roof Mounting the Mast on a RoofStep-by-step Instructions for Mounting the Mast on a Roof Make sure the top part of the mast points straight up Final Installation Leveling the Mast Leveling the MastLeveling Side-to-Side Leveling Front-to-Back Final Dish AssemblyFinal Dish Assembly Star washer and bolt Few Words About Grounding the System Few Words About Grounding the SystemRouting and Grounding the Cables Acceptable central building ground pointsRouting and Grounding the Cables Cable Routing TipsRunning Cable Into the House Running a Cable into the HouseAbout the Phone Connection Making the Final ConnectionsMaking the Final Connections Acquiring and Fine Tuning the Signal Maximum Signal StrengthAdjusting the Azimuth and Elevation Settings Acquiring and Fine Tuning the SignalElevation Adjustment Ordering ProgrammingTroubleshooting TroubleshootingCan’t Pick Up the Satellite Signal Cabling and Connections ProblemsTemporary Satellite Signal Loss Dish Pointing StepsProgram Providers Digital Satellite System Installers ReferenceSupport Line Digital Satellite System PublicationsIndex IndexPage Page North Meridian Street Indianapolis,