Panasonic TX-68PS12A, TX-68PS13A manual Connecting Equipment to the TV Front Panel Connections

Page 33

Connecting Equipment to the TV

Front Panel Connections

Behind the front panel door is the headphone socket and the AV2 input.

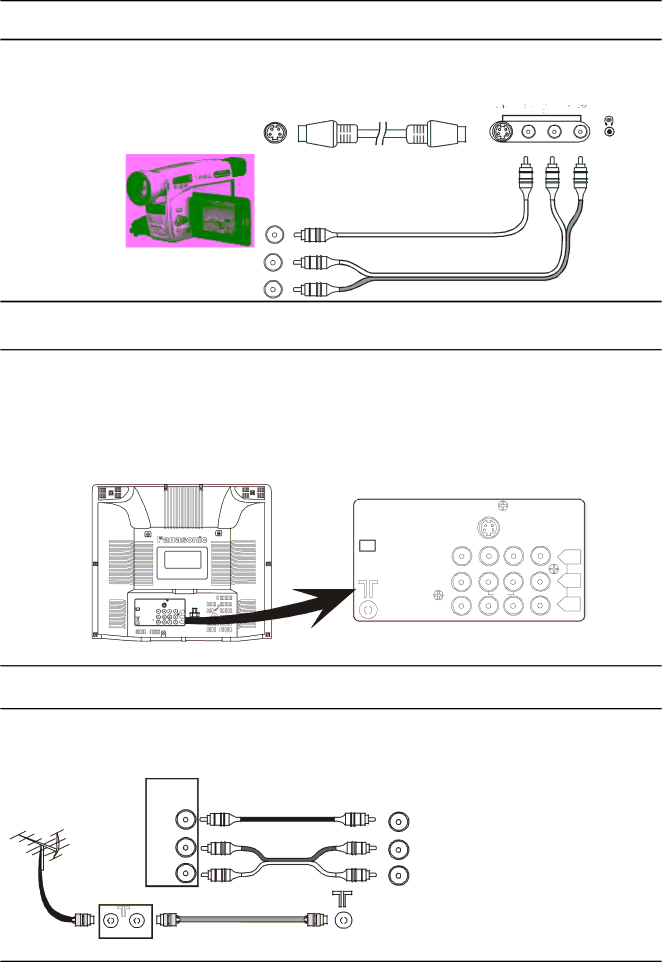
The front input terminals allow quick and easy access for computer games, video cameras and other equipment which is not usually permanently connected.

Rear Panel Connections

When using a VCR with the television always connect the Aerial to the VCR and connect an RF Cable (not supplied) between the VCR RF-Out and the television RF-In.

You can watch videos by either tuning the television to the VCR (see page 26) or by connecting the VCR to the rear AV terminals (see below and page 34).

Note: When connecting a mono VCR through the RF-In, please switch the TV to mono.

S-VIDEO

VIDEO

AUDIO

MONITOR

AV1

AV3

OUT

IN

IN

S-VIDEO


DVD (Y - PB - PR)

VIDEO

Y

L

PB

AUDIO

MONO

R

PR


Connecting a Standard VCR to the AV Input

Most standard Video Cassette Recorders use RCA type video and audio connectors. If your VCR has different type connectors please refer to the VCR instruction book for details.

VCR

OUT

VIDEO

L

AUDIO

R

VCR AV Connections

RF In RF Out

VCR Antenna Connections

VIDEO

AUDIO

Television

AV Connections

AV1

IN

NOTE: A mono VCR can be connected to this television. Connect the VCR Audio out to the Left Audio input on the television. The sound will Automatically be directed to both speakers.

33

Image 33
Contents Stereo Colour Television With Teletext TX-68PS12A TX-68PS13AImportant Information Getting Started Connect the Aerial Connect the Power PlugTurn on the Television RF-INContents Preset Operation Remote Control Teletext OperationConnecting Equipment to the TV 33 ~ Troubleshooting SpecificationsControl Panel Television Control Panel Connecting HeadphonesControl Panel Buttons PRE TV/AVTelevision Control Panel Buttons Volume Down and UPProgramme Number Down and UP PRE.PRETune Mute Normalisation Sound Menu Wake UP Surround OFF-TIMERBattery Precautions Battery Installation and ReplacementRemote Control Television Operation Tune Rapid TunePreset FeaturesPicture SoundTV / AV Button AVL Main MenuMain Menu Picture Menu Operation Effect IndicatorNormalisation Picture Menu FunctionEffect Indicator / Operation Main Menu Sound Menu OperationSound Menu Function Menu Item Indicator Function Main Menu Features Menu OperationMain Menu Language Menu Operation Main Menu Preset Menu Operation Rewind / Review Power Stop VCR LD / DVD Pause / Still Remote Control VCR/LD/DVD OperationLD/DVD VCR LD/DVDOrion Aiwa NECFujitsu Sanyo HitachiList Mode Teletext OperationTV / Text Important Notice Features Menu Preset MenuPicture Menu Preset Operation Automatic Tune Auto Tuning Using the Front Panel ControlsAuto Tuning Using the Remote Control Manual Tuning Using the Front Panel Controls Preset Operation Manual TuneManual Tuning Using the Remote Control Tuning the Television to a VCRPreset Operation Colour SYS Colour SYS Setting Using the Front Panel ControlsColour SYS Setting Using the Remote Control Fine Tuning Using the Front Panel Controls Preset Operation Fine TuningFine Tuning Using the Remote Control Canceling the Fine TuningUsing Front Panel Controls Preset Operation Skip OperationUsing the Remote Control How to Cancel the SkipPreset Operation POS. Change Using the Front Panel ControlsPOS. Change Using the Remote Control Geomagnetic Correction Using the Front Panel Controls Geomagnetic Correction Using the Remote ControlSpecial Note How to Cancel Favorite CH Using the Favorite CHFavorite CH Operation Adding Channels to FavoriteConnecting Equipment to the TV Front Panel Connections Connecting a Standard VCR to the AV InputRear Panel Connections Television Input Monitor OutVideo Monitor Audio Audio HI FI AmplifierFirst Customer InformationCaring for the Remote Control Customer Information Cleaning the TelevisionLocating the Television Caring for the TelevisionQuestion Why are my channels on 1,2,3,4,5? Customer Information Frequently Asked QuestionsPicture Sound Check Customer Information TroubleshootingSpecifications Model No Serial No Purchase Date Purchased From Customer’s Record