![]()
![]()
![]()
![]()
![]()
![]()
![]()
![]()
![]()
![]()
![]()
![]()
![]()
![]()
![]()
![]()
![]()
![]()
![]()
![]()
![]()
![]()
![]()
![]()
![]()
![]()
![]()
![]()
![]()
![]()
![]()
![]()
![]()
![]()
![]()
![]()
![]()
![]()
![]()
![]()
![]()
![]()
![]()
![]()
![]()
![]()
![]()
![]()
![]()
![]()
![]()
![]()
![]()
![]()
![]()
![]()
![]()
![]()
![]()
![]()
![]()
![]()
![]()
![]()
![]()
![]()
![]()
![]()
![]()
![]()
![]()
![]()
![]()
![]()
![]()
![]()
![]()
![]()
![]()
![]()
![]()
![]()
![]()
![]()
![]()
![]()
![]()
![]()
![]()
![]()
![]()
![]()
![]()
![]()
![]() EN
EN![]()
![]() 7
7
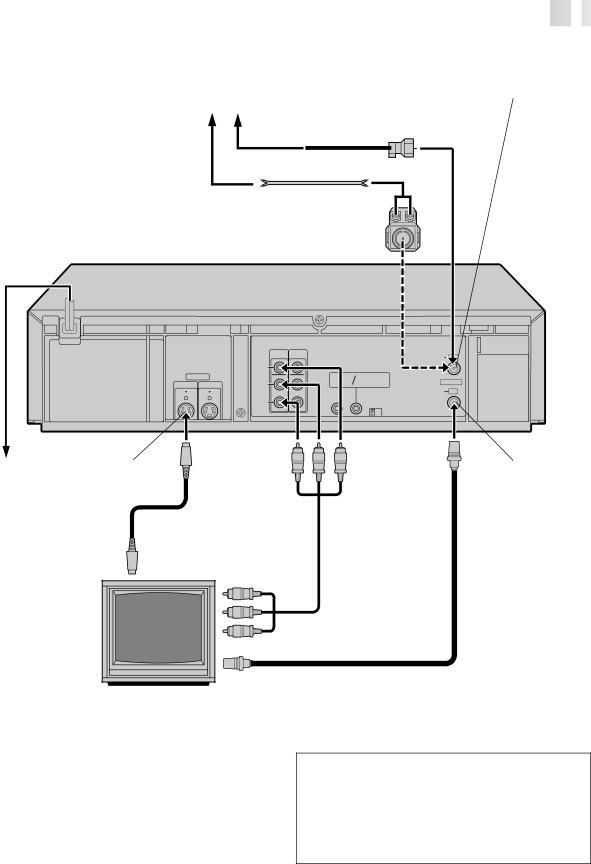
ANTENNA IN
(Antenna or Cable input)
Antenna or Cable
Coaxial Cable
Flat Feeder
AC Power |
Cord |
Back of VCR |
AC Outlet | S VIDEO OUT |
Matching Transformer (not supplied)
|
| OUT | IN |
| ANTENNA |
|
| VIDEO |
|
|
|
S VIDEO |
| (MONO) | REMOTE AV |
| |
OUT | IN | L |
| PAUSE COMPULINK | VHF/UHF |
|
|
| |||
|
| AUDIO |
| CABLE | TV OUT |
|
|
|
| ||
R | BOX | |
CH3 CH4 | ||
|
TV OUT
S VIDEO IN
75 ohm terminal
TV
Audio/Video Cable (supplied)
RF Cable (supplied)
NOTES:
●To make the most of the Super VHS picture performance we recommend that you use the supplied
●To operate the VCR with your TV using the
You can also use the TV/VCR button on the VCR's remote control to set your TV to the AV mode. (☞ pg. 57)
S-VIDEO Connection
CONNECT VCR TO TV
a– Connect both the RF cable and the AV cables to the TV as explained in step 3 of "Basic Connections" (☞ pg. 6).
b– Connect the