7 PLAYBACK AND | ||
|
| � |
|
| |
|
| REC |
REC STOP REC |
| EJECT OPERATE |
CHECK | OPERATE |
|
| HDR | RESET/ |
|
| CANCEL ON SCREEN |
REW REVERSE PAUSE PLAY FF |
| SHIFT |
TRACKING | V. LOCK TIMER SEARCH DISPLAY LOCK CNT RESET | MENU TIME MODE |
– + | – + | – S E T + |
FIELD REV |
| FIELD ADV |
| [SET | [SET +] button |
[REW] button [FF] button | [SEARCH] button | [SHIFT f] button |
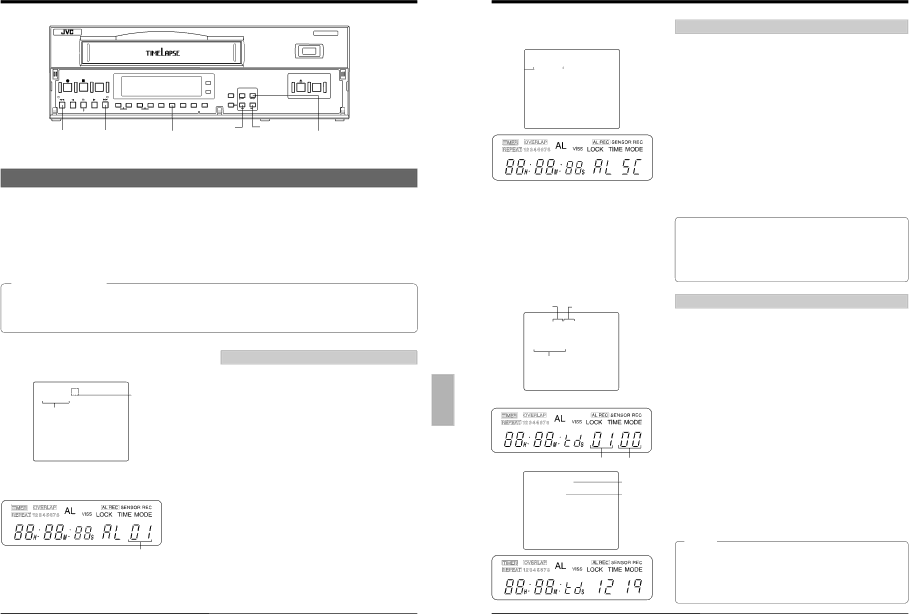
7-4 Alarm Search/Date and Time Search
There are three different ways you can search a tape position. When the [SEARCH] button is pressed, the Search mode is engaged. Each time the [SEARCH] button is pressed, the Search mode changes.
•(Once) alarm search: To search the start of an alarm recording.
(Twice) alarm scan: To play back around the start of each alarm recording for several seconds.
(Three times) date/time search: To search for a recording made at a specified date and time. Press the [SEARCH] button four times to cancel the Search mode.
Note on date/time search
7 | PLAYBACK AND | |||
|
|
|
| Alarm scan |
|
| Alarm scan screen | The section around the start of each alarm recording is played back for | |
|
|
| [MENU] | about 5 seconds. |
|
| ALARM SCAN | * Playback may start a few seconds after the actual start of the alarm | |
Control or | 00H 00M 01S | recording. | ||
|
| |||
reel |
|
|
| * If the interval between alarm recordings is short, the tape may play |
counter |
|
| back continuously for 5 seconds or more. | |
|
|
|
| 1* Sound is not output. |
|
|
|
| Press the [SEARCH] button twice in the Stop mode. |
[The Alarm Scan mode is engaged and the [ALARM SCAN] indication is shown on the monitor screen. The [ALSC] indication is shown in the display’s record/playback speed mode indication section.
2 | * To release the Alarm Scan mode, press the [SEARCH] button twice. |
| Press the [FF] or [REW] button. |
| [The VCR |
| position and the section around the start of each alarm recording |
3 | is played back for about 5 seconds. |
| Press the [PLAY] button when you want to start playback. |
| [Normal playback starts and the Alarm Scan mode is canceled. |
•To cancel alarm search or alarm scan, press the [STOP] button, [PLAY] button, [REVERSE] button or the [REW]/[FF] button (whichever is opposite to the current tape running direction).
•When the end or beginning of the tape is reached during alarm search or alarm scan, the mode is canceled and the Stop mode is engaged.
Recording duration is especially important with timelapse recordings. If the duration is too short, date/time search will not function correctly. The recording duration must be equivalent to at least 5 seconds at Standard (2H) or EP (6H) speed : U model, (3H) speed : E mdel.
(Example) In the
Date/time search setting screen | |
“Day” setting | “Time” setting |
| [MENU] |
TD SRH 01D 00H | |
00H 00M 01S | |
Date/time search
A section recorded at a specified date and time is searched and the Stop1mode is engaged.
Press the [SEARCH] button three times in the Stop mode.
Alarm search setting screen [MENU]
Alarm search |
A specified alarm recording is searched and the Stop mode |
1is engaged. |
Search data during tape |
running (month, day, |
hour, minute) |
| [The Date/Time Search mode is engaged and the date/time |
| search setting screen is shown on the monitor. |
| “td 0100” is shown on the VCR’s display. |
| * To cancel the Date/Time Search mode, press the [SEARCH] |
2 | button once. |
ALARM SRH 01 00H00M01S
Control or reel counter
Alarm number (01- 99) To specify the alarm recording to be cued, enter the alarm number with respect to the current tape
Press the [SEARCH] button once in the Stop mode. |
[The VCR enters the Alarm Search mode and the |
alarm search setting screen is shown on the monitor. |
The [AL01] indication blinks in the record/playback |
speed mode indication section on the display. |
* To cancel the Alarm Search mode, press the |
VCR’s display | Press the [SET +] or [SET | |
3search (01 - 31). | ||
| ||
| 4Press the [SHIFT f] button so that “hour” blinks. | |
| 5Press the [SET |
position in the forward or reverse direction.
2 | [SEARCH] button three times. |
| Specify the alarm recording you want to search. |
| Press the [SET +] or [SET |
| number from 01 to 99. |
| The specified alarm number is shown on the monitor |
“Day” setting
[MENU]
TD SRF 12D 19H
00H 00M 01S
“Hour” setting
Set value 19:00 on 12
Press the [FF] button or [REW] button.
[The VCR
The Date/Time Search mode is canceled.
VCR’s display
and the VCR’s display. The alarm number is not |
3absolute; it depends on the current tape position. |
Press the [FF] or [REW] button. |
[The VCR fast forwards or rewinds. |
10 – 10 15:30
Search data during tape running (15:30 on Oct. 10)
•During date/time search, the month, day, hour and minute which are being searched are shown
•If the specified date and time cannot be found and the tape ends, the Date/Time Search mode is canceled and the Stop mode is engaged.
Alarm number
When the start of the alarm recording with the |
specified alarm number is located, search stops and |
the Stop mode is engaged. |
The Alarm Search mode is automatically canceled. |
Notes:
•If the specified date and time is near the start of an alarm recording, the date/time search may not be successful.
•If the specified date/time is the same as the
•Date/time search cannot be executed if no date and time are available in the search direction.
49 | 50 |