Magnavox MRV660 Additional Playback Features cont’d, Changing audio soundtrack language, Zooming

Page 34

Additional Playback Features (cont’d)

E n g l i s h

Changing audio soundtrack language

This operation works only on DVDs with multiple soundtrack language or VCDs with multiple audio channel.

This function can also be accessed via the Red button on the remote control.

1Press 4 to select { Audio } and press 2 to enter its options.

2For DVD, press 4 repeatedly until the audio language you want is selected, then press 1 to confirm.

The languages may be numbered or abbreviated, such as “En” for English.

If the language selected is not available on the disc, the disc’s default setting language will be used instead.

Helpful Hint:

Some DVDs allow soundtrack language changes only via the DVD disc menu. To access the Disc Menu, press DISC-MENU.

In TV programming mode:

It can be used for changing the audio language setting temporarily - { SAP } or { Off }, if the additional language is available in the TV programs.

Once the DVD recorder is turned off and on again, it will return to the default settings (see page 38.)

Switching camera angles

This option is only available with DVDs that contain sequences recorded from different camera angles. This allows you to view the picture from different angles.

1Press 4 to select { Angle } and press 2 to enter its options.

The camera angles available for selection appears.

2Press 3 4 to select the camera angle you want to switch to, then press 1 to confirm.

Zooming in

This option allows you to enlarge the picture on the screen and to pan through the enlarged picture.

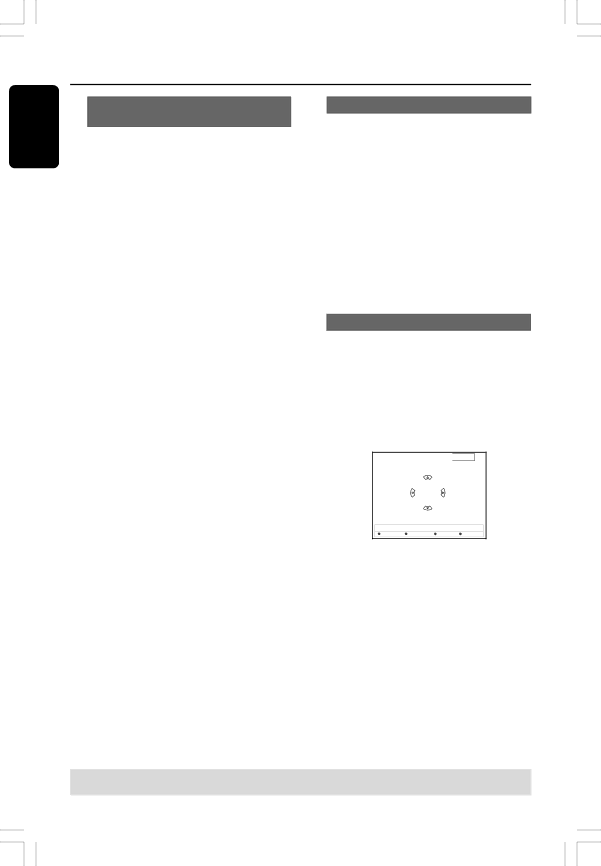
1Press 4 to select { Zoom } and press 2 to enter zoom in mode.

The zoom status bar appears and displays the zoom factor.

Zoom 2

[CURSOR][OK] = Zoom In, [RETURN]=Zoom Out, [ZOOM] = Exit

End

Zoom Out

Zoom In

2Press OK on the remote to zoom in or RETURN to zoom out.

3Use 1 2 3 4 to pan through the zoomed picture.

4To exit zoom mode, press

SYSTEM-MENU.

TIPS: The operating features described here might not be possible for certain discs. Always refer to the instructions supplied with the discs.

34

MRV660_17_Eng40

34

9/3/05, 10:25 AM

3139 246 XXXXX


Image 34
Contents MRV660 Returning the enclosed card By registering your product Guarantees that your date Youll receive notificationFor Customer Use Use only with the cart, stand Only use attachments/accessoriesSpecified by the manufacturer EL 6475-E005 04/01Laser EnglishFrançais Declaration of ConformitySpecial Functions G l i s hTable of Contents Playing your recording on other DVD Editing/Finalizing RecordingMaking the editing compatible Restricting playback by ParentalCleaning discs Care and Safety InformationSetup About recyclingIntroduction Accessories suppliedGeneral Information Region codesGeneral Connecting to TVSetting the TV to the correct video in channel Selecting a suitable connection to your TVOption 1 Using Y Pb Pr jacks Connecting to TV cont’dLanguage and Country will appear on the TV Progressive scan video quality Scan feature after complete the firstInstallation see Is only available through Y Pb PrOption 2 Using S-Video Y/C jack Antenna or Satellite/Cable TV signalOption 3 Using Video Cvbs jack Option 4 Using Antenna jacks only Using the input sockets IN-EXT 1 or IN-EXT2 Connecting to Additional DevicesConnecting a Satellite Receiver/ Cable Box Connecting Additional Devices cont’d Connecting a VCR/DVD playerOption 2 Using S-VIDEO In or Video In jack Connecting a camcorder to the front jacksOption 1 Using DV in jack You can use the front jacks to copy camcorder recordingsJacks Connecting to Additional Devices cont’dUsing analog audio output StereoRemote Control Remote Control cont’d Using the alphanumeric keypad to enter the characters Using the remote control to operate the systemInserting Batteries @ L/R Audio Front PanelVideo # DVLanguage and Country menu appears on the TV Installing the DVD RecorderFirst Installation 169 Letterbox PanscanCheck if the information on the menu is Correct Installing the DVD Recorder cont’dTime and Date menu appears on the TV § Press 4 to select Done and press OK to save the changesAutomatic TV channel search Setting favorite TV channelsTV channel programming Press 4 repeatedly to select Set-upSelecting the channel input signal Automatic time/date settings Setting the time and dateManual time/date settings Select Smart Clock and press 2 to confirmSetting the language Inserting a disc PlaybackPlayable discs MP3-CD Playing a Super Video CDs Playback cont’d Starting disc playback Playing a DVD video disc Playing an audio CDPlaying a picture disc slide show Playing a DVD+RW discPlaying an MP3 CD Playable Jpeg picture discTime search Additional Playback FeaturesUsing Toolbar options Changing subtitle languageSwitching camera angles Additional Playback Features cont’dTV programming mode Changing audio soundtrack languagePausing playback / slow motion play Changing to another title/ chapter/trackRepeating a specific segment A-B Selecting various play modeRepeat play Shuffle playDiscs for recording Recording settingsPress 3 4 to select the setting for Recording Unrecordable picturesPress 1 to confirm Recording mode Recording languageRecording cont’d Inserting chapter markersFilter mode EXT 2 IN-EXT2, S-VIDEO Y/C or Video Cvbs sockets at the backDeleting a recording Pausing a recordingIndex Picture screen or disc content menu appears on the TV Use 1 2 3 4 to select an entry in the menuStop time Timer RecordingStart time DateRepeat Timer Recording cont’dRecord mode Programming recording from a Satellite Receiver/Cable BoxDeleting a programmed recording Changing a programmed recordingChange Index Picture screen Editing/Finalizing RecordingAbout editing Color coded buttons functionsMaking the editing compatible DVD+RW Editing/Finalizing Recording cont’dChanging the disc/title name Playing your recording on other DVD player DVD+RHide To cancel the hidden chaptersHiding unwanted chapter ShowEditing chapter merge/split/hide Editing/Finalising Recording cont’dEditing title divide/append/Index picture Stop Photo editingFor append recording only Deleting chapter markersUsing the Browser Browsing the picture disc Using the Browser cont’dAdding pictures to an album Deleting an album Changing the picture order within an albumDeleting picture in an album Select this to toggle between repeat on and off Changing the slide show settingsSelect this to activate zoom mode Zoom mode Speed Down / Speed UpRecording Accessing the Preferences optionsSystem Menu Preferences SoundSystem Menu Preferences cont’d AccessFeatures DiscAccessing the Setup options System Menu SetupSystem Analog channels System Menu Setup cont’dTime-date Video outputAudio output Progressive96 kHz Digital outputSetting or changing the pin code Setting Access ControlAbout Access Control Setting the country of originChildLock Setting Access Control cont’dActivating/Deactivating the child lock Authorizing discsPress 4 to select Level and press 2 to enter its options Restricting playback by Parental ControlRating explanations Disc types Front Connections Timer RecordingPower Supply Record modesProblem TroubleshootingSolution Troubleshooting cont’d Insert the disc with the label facing upM8 30 minutes Message Collision appears Display panel symbols/messages 0000Display panel symbols/messages cont’d Glossary Magnavox Limited Warranty One 1 Year Labor and Parts Repair Facility3139 246 SgpJP-0511-17-1