Onkyo DV-SP504E instruction manual Viewing a Slideshow of Jpeg Images

Page 33

Playing Discs—Continued

Viewing a Slideshow of JPEG Images

JPEG

This section explains how to display a slideshow of

Use the Left and Right []/[ ] buttons to display other folders that contain JPEG images.

JPEG images on your TV.

1

Load a JPEG disc.


The Disc Navigator appears.


Stop

Disc

DATA


1/17

-/-


/jpg


001. jpg


Repeat

:Off


002. image0


Random

:Off

003. image1

004. image2

005. image3

001. 001

002. 002 003. 003

Initially, the folders in the root direc- tory are displayed.

The DVD player numbers folders and files in hierarchical order. You can use these numbers to select folders and files directly with the Search function (see page 34).

4

Remote

controller

or

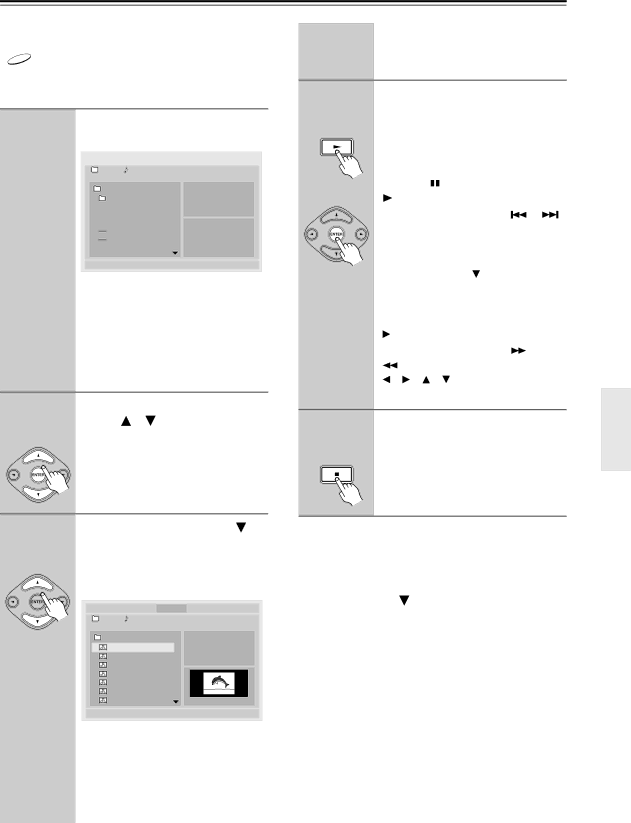
To play a slideshow, press the Play [ ] or [ENTER] button.

Subsequent images are displayed in order, with each image being displayed for five seconds.

To display an image for longer, press

the Pause [ ] button. Press the Play


[ ] button to resume.


Use the Previous and Next [

]/[

]

buttons to view the previous or next image.

To flip a picture 180 degrees, use the Up and Down []/[ ] buttons (not while zoomed in).

To rotate a picture counterclockwise or clockwise, use the Left and Right []/

[

] buttons (not while zoomed in).

To zoom in or out, use the [ ] and

[

] buttons. While zoomed in, use the

[

]/[ ]/[ ]/[ ] buttons to move

around the picture.

2

To open a folder, use the Up and


Remote

Down [ ]/[ ] buttons to select

it, and then press [ENTER].

controller


The contents of the folder are dis-


played.

5

To stop the slideshow, press the


Remote

Stop [


] or [MENU] button.


The slideshow stops automatically

controller


when all pictures have been displayed.

3

Remote

controller

Use the Up and Down []/[ ] buttons to select images and subfolders in the open folder.

A thumbnail-size preview for the cur- rently selected image is displayed.

DATA

Disc

DATA


1/17

-/-


/image1/001.JPG


005. image1

Repeat

:Off

001. 001

Random

:Off

002. 002


003. 003


004. 004


005. 005


006. 006


007. 007

W: 150

H: 120

To open a folder in the list, press the [ENTER] button. To close a folder (i.e., move back up the directory tree), press the [RETURN] button. Alternatively, select the item at the top of the list and press the [ENTER] button.

To display thumbnails

To display thumbnails, in step 3, after opening the folder you want to display, press the [TOP MENU] button. Use the arrow [], [ ], [], [ ] buttons to select the thumbnails, and press [ENTER] to start a slideshow. Press the [MENU] button to return to the Disc Navigator.

About HD JPEG

If your TV is connected via HDMI and the HDMI reso- lution is set to 720p or 1080i, you can view your JPEG images in high definition (see page 47).

33

Image 33
Contents DV-SP504/ DV-SP504E Avis Important Safety InstructionsPrecautions PowerInstalling this Unit Precautions Label on the right is applied on the rear panelFCC Information for User For models having a power cord with a polarized plug Supplied AccessoriesMake sure you have the following accessories Sur les modèles dont la fiche est polariséeIntroduction FeaturesContents Disc Notes IntroductionSupported Discs Function SupportAbout WMA MP3/WMA/JPEG CompatibilityAbout DivX DivX video compatibilityHandling Discs Cleaning DiscsStoring Discs CopyrightInstalling the Batteries Before Using the DVD playerUsing the Remote Controller Open the battery compartment, as shownFront Panel Front & Rear PanelsDisplay Front & Rear PanelsRear Panel North American model European modelOther models AV Connector European model only Surr Mode switchAudio Output 20, 22 JackRemote Controller Memory button Search button 34Repeat button B buttonAV Cables & Connectors Connecting the DVD playerVideo Output/Video Setting Matrix Connecting the DVD playerAudio Output/Audio Setting Matrixes Digital Audio Output/Audio Setting MatrixBefore Making Any Connections Basic SetupOptical Digital Outputs RCA AV Connection Color CodingUsing Scart European model only Using S-VideoUsing Component Video Compatibility of this unit with progressive-scan TVsConnecting the Analog Output Connecting to an AV ReceiverConnecting the Digital Output Before ConnectingConnecting the Multichannel Analog Output Connecting -compatible ComponentsYou can use three stereo audio cables for this If Your AV Receiver has a 7.1-channel Analog Audio InputWhat is HDMI? Connecting your Hdtv or AV receiver with an Hdmi InputUsing Hdmi Hdmi & the DVD playerUsing the Multiroom Control Kits North American model only Using a Multiroom Kit with Other ComponentsUsing a Multiroom Kit with a Cabinet DVD player turns on and the Standby indicator turns off Connecting the Power/Turning on the DVD playerPlug the supplied power cord into Power outlet on the wallFirst Time Setup Initial SetupPlaying Discs Starting, Pausing & Stopping PlaybackSelect Next & Previous track/chapter Playing DiscsStop To stop playback, press the Stop ButtonForward Frame-by-Frame Playback Fast Forward & ReverseSlow-motion Playback Navigating CDs & Super Audio CDs Navigating DVD & VCD Disc MenusNavigating MP3, WMA & DivX Discs Viewing a Slideshow of Jpeg Images Press the Play or Enter Advanced PlaybackButton to start playback Specified title, chapter, or trackSearching by Time Advanced PlaybackTime Specified timeRepeat Playback Random Playback To cancel random playback, useRandom button to select Random OffAdding New Items to the List Memory PlaybackLast Memory Deleting Items from the ListEditing Steps Selecting Camera Angles ZoomingSelecting Subtitles Selecting SoundtracksDisplaying Information Hdmi and Progressive Settings Setting the HdmiSelecting Progressive or Interlaced Configuring the DVD player Menu Setting DescriptionPicture LanguagePress the Setup button Using the Onscreen Setup MenusWhen you’ve finished, press Setup button againHdmi Output Setting View ModeProgressive Setting Picture MenuHD Jpeg mode HD ResolutionPAL Output Setting Not North American and Korean models Video Black LevelAudio Menu Scart Output Setting European model onlyDigital/HDMI Audio Out Linear PCM OutTest Tone Center Delay and Surr. DelayDynamic Range Control Dolby Digital only Pro LogicLanguage Menu Menu Language, Audio Lan Selecting Other LanguagesGuage, or Subtitle menu, Then press EnterDisplay Menu Operation Setting Menu Setting the Parental LockChange the Security Code Sacd Priority Contents DVD Priority ContentsAuto power off DivX RegistrationDisc Content Organization Resetting the playerAdjusting the Display Brightness Additional informationGlossary Additional informationMP3, WMA, Jpeg & DivX Files Mpeg video ISO 9660 formatPBC PlayBack Control Video CD only PCM Pulse Code ModulationSymptom Possible cause Remedy TroubleshootingNo Sound from the Hdmi OUT? TroubleshootingCan’t view Jpeg files? No picture from the Hdmi connection Hdmi Status ModeDisplayed ID Message No sound from the Hdmi connectionGeneral SpecificationsMemo Onkyo Europe UK Office Onkyo Europe Electronics GmbH