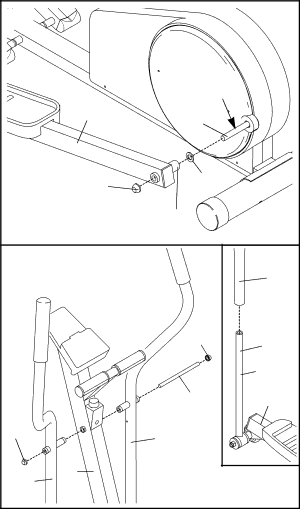
11. Apply a small amount of grease to the axle on the left | 11 |
|
|
|
Crank Arm (6). |
|
|
| |
|
|
|
| |
Slide a Nylon Washer (11) and the Left Pedal Arm (3) |
|
|
|
|
onto the axle on the left Crank Arm (6). Note: It may be |
|
|
|
|
helpful to use a rubber mallet to tap these parts on. Be |
|
| Grease |
|
careful not to confuse the Left Pedal Arm with the |
|
|
| |
| 3 |
|
| |
Right Pedal Arm (not shown); look at the position |
| 6 |
| |
of the round tube to identify the Left Pedal Arm. |
|
|
| |
|
|
|
| |
Next, tap a 3/4Ó Axle Cap (61) onto the axle. |
|
|
|
|
Attach the Right Pedal Arm (not shown) in the same way. |
| 61 | 11 |
|
|
|
|
| |
|
|
| Round Tube |
|
12. Refer to the inset drawing. Apply a small amount of | 12 |
|
|
|
the included Teflon¨ lubricant to a paper towel; rub a |
|
|
| |
|
|
| 7 | |
thin film of the lubricant onto each of the Chrome |
|
|
| |
Tubes (21). Slide an Upper Body Arm (7) onto each |
|
|
|
|
Chrome Tube. Make sure that the Upper Body Arms |
|
|
|
|
are turned as shown. |
|
| 85 | 21 |
|
|
| ||
|
|
|
| |
Tap a 5/8Ó Axle Cap (85) onto one end of the Axle |
|
|
| Lube |
(19). Insert the Axle through one of the Upper Body |
|
|
| |
|
|
|
| |
Arms (7) and then through the Upright (2). Slide the |
|
| 19 | 4 |
other Upper Body Arm (7) onto the Axle. Tap another |
|
| ||
|
|
|
| |
5/8Ó Axle Cap (85) onto the Axle. | 85 |
| 7 |
|
|
|
| ||
|
|
|
| |
|
| 2 |
|
|
|
| 7 |
|
|
13.Make sure that all parts of the elliptical crosstrainer are properly tightened. Note: Some hardware may be left over after assembly is completed. To protect the floor or carpet from damage, place a mat under the elliptical crosstrainer.
9