JVC CA-UXG68 manual Daily Operations-Playback, Mainly explained however, you can use the buttons

Page 9
speakers again.
DO NOT turn off (standby) the System with the volume set to an extremely high level; otherwise, the sudden blast of sound may
damage your hearing, speakers and/or headphones when you turn on the System or start playback.
For private listening
3 Adjust the volume.
4 Operate the target source as explained later.
To turn off (standby) the unit
The STANDBY lamp on the main unit lights in red.
• A small amount of power is always consumed even while on standby.

Daily Operations—Playback
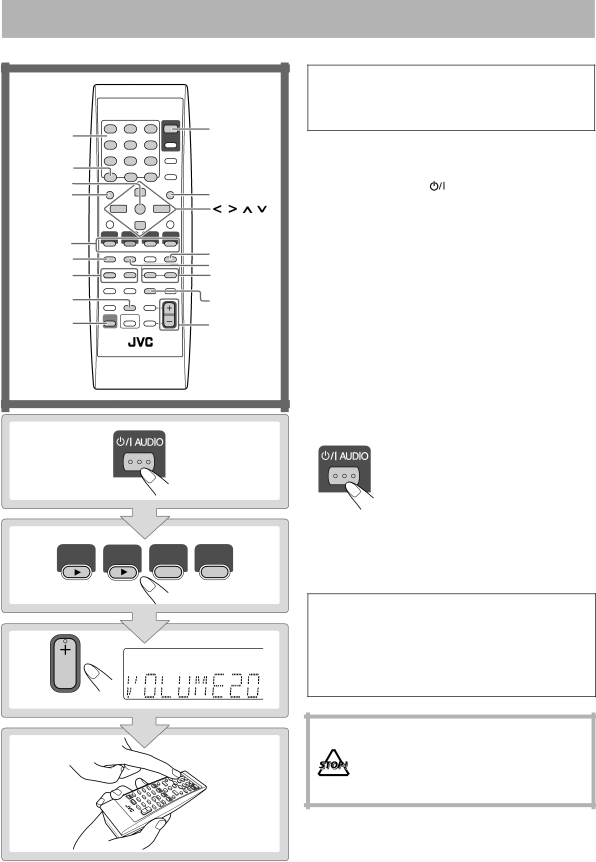
Remote control


In this manual, operations using the remote control are


mainly explained; however, you can use the buttons


and controls on the main unit if they have the same (or

Number

1

similar) name and marks.


buttons


1 Turn on the power.

RETURN


The STANDBY lamp on the main unit turns off.

ENTER/SET

MENU/PL

• Without pressing

AUDIO, the System turns on

TOP MENU/PG

by pressing one of the source buttons.


, , ,


• The System turns on and activates the AUX source


2


by starting playback on an external device when QP

GROUP/TITLE

Link is activated. (See page 11 for details.)

8

2 Select the source.

1,y

7

GROUP/TITLE SKIP

Playback automatically starts if the selected source is


4,x

QP LINK

FM/PLAY MODE

ready.


SHIFT

3

• If you press AUX, start playback on the external

component.


1

2


You can reduce power consumption by pressing DIMMER

USB


FM/AM

(while holding SHIFT) to turn the display off while on

DVD/CD

TAPE

MEMORY

/AUX

standby.


• When the display is turned off, QP Link does not work.


Connect a pair of headphones to the PHONES jack on the

3


main unit. The sound will no longer come out of the


QP Link S V C D V D MP3 WMA 3DPHONICL-BANDIII AM F

speakers. Be sure to turn down the volume before


S.TURBO AHB PRO USB MIC V.MASK C.VOICE PG PL S

connecting or putting on the headphones.


PRGR. B.S.P. BONUS PRGM RND 1 TA NEWS INFO

• Disconnecting the headphones will activate the


TV VOL

AUDIO VOL

4

7

Image 9
Contents Instructions Important for Laser Products Precautions ContentsIntroduction Playable Disc/File Types How to Read This ManualAudio formats About color systemConnections Supplied accessoriesRear panel Front panel~ AM/FM antenna To connect the powered subwooferSpeakers To assemble the AM loop antenna To connect AM/FM antennaTV/monitor Preparing the remote control@ Digital audio component Before plugging in the System except for AustraliaQ w e rt y u i o a s Display IndicatorsConnecting or putting on the headphones Speakers. Be sure to turn down the volume beforeDaily Operations-Playback Mainly explained however, you can use the buttonsListening to the Radio Info To preset the stationsTo select the band FM or AM To tune in to a stationPlaying Back a Tape Select a preset number for the station you store ExamplesTo insert a tape To startTo insert a disc Playing Back a Disc/File InfoTo playback a disc/file To select a title/groupPortable Audio Device Playing Back aTo activate QP Link To locate an item directlyAdjusting the Sound Info Adjusting the VolumeTo drop the volume in a moment To reinforce the heavy soundPresetting Automatic DVD Video Sound Using Headphone SurroundCreating 3-dimensional Sound Field -3D Phonic While playing a disc Remote controlTo adjust the picture tone To select a preset picture toneChanging the Scanning Mode Changing the Picture ToneAuto Standby Sleep TimerUnique DVD/VCD Operations Selecting the Audio TrackWhile playing a DVD Video Selecting the View Angle Selecting the Subtitle LanguagePlaying Back Bonus Group Selecting the Browsable Still PicturesSlow-motion playback Frame-by-frame playbackZoom To replay the previous scenes One-Touch ReplayProgramming the Playing Order Advanced Playback OperationsBefore starting playback, activate Program Play For SVCD/VCD/CDTo modify the program To check the programmed contentsTo exit from Random Play To exit from Program PlayPlaying Repeatedly Repeat PlayRepeat On-screen Bar Operations On-screen Bar InformationDisc type Playback information Operation modesTo change the time information To operate using the On-screen BarChapter/Track Search Time SearchControl screen for DVD-R/-RW in DVD-VR format Browsable Still PicturesTo select the Program To select the Play List Operations on the Control Screen Audio/Video File OperationsTo move the highlight bar between group list and track list To select an item in the listFor Jpeg To select a groupTo skip a track To stop playback Recording on a Tape Info Advanced Tape OperationsInsert a recordable cassette Start recordingSynchronized Recording Info To record the entire tracksTo record only your favorite track To sing along using the Karaoke discs Enjoying KaraokeSinging Along Karaoke Info To adjust the Key disc/file playback only Microphone MixingTo apply echo to your voice Karaoke Program Play Reserving Karaoke SongsTo exit from Karaoke Program Play Setting the Timer Timer OperationsTo turn on or off the Timer How Daily Timer worksHow Recording Timer works Contents Setup Menu Operations InfoLanguage menu Picture menuOthers menu Audio menuLearning More about This System Additional InformationDaily Operations-Playback see pages 7 to Listening to the RadioPlaying Back a Portable Audio Device Advanced Playback Operations see pages Daily Operations-Sound & Other AdjustmentsAudio/Video File Operations see pages Unique DVD/VCD Operations see pages 16 toSetup Menu Operations see pages 35 MaintenanceCleaning the System Handling discsTroubleshooting Serbian Language Code ListOperating JVC’s TVs Using the Remote Control Optical Digital OUT SignalsSpecifications Remote control Parts IndexMain unit UX-G68 Micro Component System