Pioneer SX-X360 Listening to your system Using Front Surround, Using Advanced Surround, Extpower

Page 19

Listening to your system

Using Front Surround

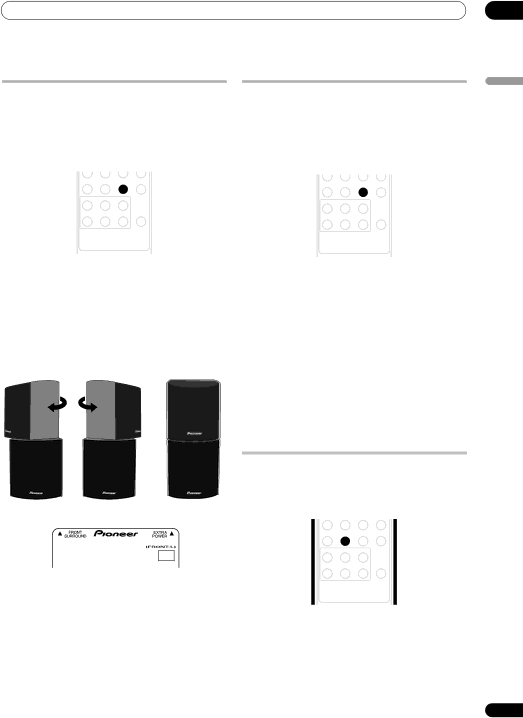
The Front Surround modes are effective when you are using the Front surround speaker setup as described on page 7. The surround speakers should be placed on top of the front speakers and oriented either towards the walls, or straight ahead, depending on which mode you are using (see below).

7 8 9

SURROUND ADVANCED

+ +

INPUT CHANNEL VOLUME DISPLAY

– –

RDS DISP

AXD7442

Press ADVANCED to select a Front Surround mode. Press repeatedly to select FRTMOVIE, FRTMUSIC or

EXTPOWER.

Turn each surround speaker so that the arrow at the base is lined up with the FRONT SURROUND arrow on the front speaker. This is only necessary with the FRTMOVIE or FRTMUSIC modes. With EXTPOWER (Extra Power), line up the arrow with the EXTRA POWER arrow (the surround speakers should be in the same direction as the front speakers.).

FRTMOVIE / FRTMUSIC

EXTPOWER


Using Advanced Surround

The Advanced Surround effects can be used with any multichannel or stereo source for a variety of additional surround sound effects.

If you set up the system for Front surround (page 7), the Front Surround modes will give the best results (see Using Front Surround above).

7 8 9

SURROUND ADVANCED

+ +

INPUT CHANNEL VOLUME DISPLAY

– –

RDS DISP

AXD7442

Press ADVANCED to select an Advanced Surround mode.

Press repeatedly to select:

ADVMOVIE Ð Suitable for movies

ADVMUSIC Ð Suitable for music

EXPANDED Ð Wide sound field

TV SURR. Ð Surround sound for mono or stereo TV broadcasts

SPORTS Ð Suitable for sports programming

GAME Ð Suitable for TV game units

VIRTUAL Ð A virtual surround effect using just the subwoofer and front speakers.

¥5 STEREO Ð Powerful surround sound for stereo music sources

Listening in stereo

You can listen to any sourceÑstereo or multichannelÑin stereo. When playing a multichannel source, all channels are downmixed to the front left/right speakers and the subwoofer.

MCACC

/TUNE TESTTONE VIDEO IN

7 8 9

SURROUND SOUND

+ +

INPUT CHANNEL VOLUME DISPLAY

– –

RDS DISP

AXD7442

Press SURROUND repeatedly until STEREO shows in the display.

¥You can also use the SURROUND button on the display unit to change the listening mode.

05

English

19

En

Image 19
Contents HTP-GS1 Risk of Electric Shock Do not Open Operating EnvironmentImportant the Moulded Plug Speakers S-X360 box What’s in the boxContents Home theater sound setup Speaker Setup GuideSpeaker Setup Guide Chapter Safety precautions when setting upFront surround setup Speaker Setup GuideBracket screw supplied Mm 10 mm Additional notes on speaker placementAttaching the brackets Mm to 7 mm Before mountingEnglish Receiver subwoofer Connecting upConnecting up Chapter Basic connectionsConnecting up Center Green Receiver subwooferTo AC outlet Listening positionConnecting up Using this system for TV audio Display Controls and displaysControls and displays Chapter Display unitControls and displays Remote control Putting the batteries in the remote control Controls and displays Using the remote controlGetting started Chapter System demo settingUsing the Auto Mcacc setup for optimal surround sound Getting startedPress Mcacc Getting startedListening to your system Chapter Auto listening modeDolby Pro Logic II Music settings Listening to your systemListening in stereo Listening to your system Using Front SurroundUsing Advanced Surround ExtpowerEnhancing dialogue Listening to your system Using the Sound RetrieverUsing Quiet and Midnight listening modes Adjusting the bass and trebleBassmode then press Enter Listening to your system Boosting the bass levelListening to the radio Chapter Listening to the radioListening to the radio You can search for a program type listed above Listening to the radio Using RDSSearching for RDS programs Displaying RDS informationSurround sound settings Chapter Surround sound settingsUsing the Setup menu Adjusting the channel levels using the test tone Surround sound settingsDual mono setting Other connections Chapter Connecting auxiliary componentsConnecting external antennas Other connectionsDisplay SR+ Setup for Pioneer plasma displaysAutomatic plasma display volume muting Other connectionsAutomatic plasma display input switching Using the SR+ mode with a Pioneer plasma displayAbout the control out jack Additional information Additional information Setting up the remote to control yourGlossary Input Using the TV remote control buttonsPreset code list TV VolumeGeneral Additional information TroubleshootingTuner Error MessagesX360 Speaker system Additional information SpecificationsPioneer Electronics DE Mexico S.A. DE C.V Pioneer Electronics USA INCPioneer Electronics of CANADA, INC Pioneer Europe NV