Sony MDS-S37 Synchro-Recording With a Sony CD Player, If the CD player does not start playing

Page 14

Recording on MDs

Synchro-Recording With a Sony CD Player

By connecting your deck to a Sony CD player or Hi-Fi Component System, you can easily dub CDs onto MDs using the CD synchro buttons on the remote. If your deck is connected to a Sony CD player by a digital input cable, track numbers are automatically marked as appear on the original regardless of whether “LevelSync ON” or “LevelSyncOFF” is selected. If your deck is connected to a Sony CD player by audio connecting cords through LINE (ANALOG) IN, track numbers are automatically marked when you select “LevelSync ON” (see “Marking Track Numbers While Recording” on page 12).

As the same remote controls both the CD player and the deck, you may have trouble operating both units if they are far from each other. If you do, place the CD player close to this deck.
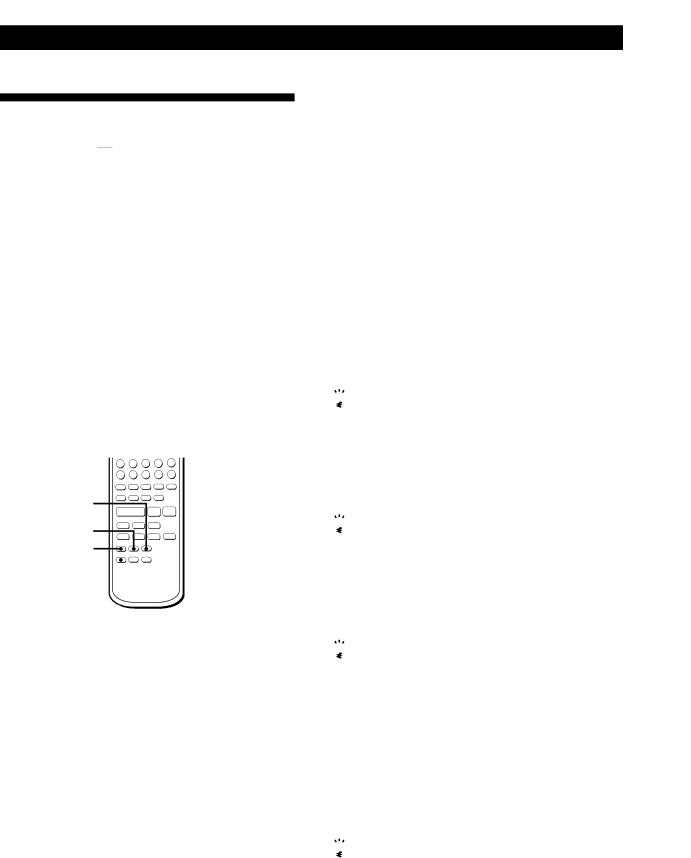
STANDBY


á


P p

=

+

r

START

)


0


STOP

P = +

CD PLAYER P

1Set the source selector on the amplifier to CD.

2Do Steps 2 to 5 in “Recording on an MD” on page 6 to prepare the deck for recording.

3Insert a CD into the CD player.

4Select the playback mode (Shuffle Play, Program Play, etc.) on the CD player.

5Press STANDBY.

The CD player pauses for playing and the deck pauses for recording.

6Press START.

The deck starts recording and the CD player starts playback.

The track number and elapsed recording time of the track appear in the display.

If the CD player does not start playing

SomeCDplayermodelsmaynotrespondwhenyou pressSTARTontheremoteofthedeck.Press Ponthe remoteoftheCDplayerinstead.

7Press STOP to stop synchro-recording.

To pause recording

PressSTANDBYorCDPLAYER P. Torestartrecording,pressSTARTorCDPLAYER P.

A new track number is marked each time you pause recording.

You can use the remote of the CD player during synchro-recording

Whenyoupress p,theCDplayerstopsandthedeck pausesforrecording.

Whenyoupress P,theCDplayerpausesandthedeck pausesforrecording.

Torestartsynchro-recording,press á.

You can change CDs during synchro-recording

DothefollowingstepsinsteadofStep7above.

1Press pontheremoteoftheCDplayer. Thedeckpausesforrecording.

2ChangetheCD.

3Press áontheremoteoftheCDplayer. Synchro-recordingrestarts.

You can also do synchro-recording with a Sony video CD player

Usingtheprocedureforsynchro-recordingwithaSony CDplayer,youcandosynchro-recordingwithaSony videoCDplayeralso.

ToselectthevideoCDplayer,pressbuttonnumber2 whilepressingdownthePOWERbuttonbeforestarting theprocedure. ToselecttheCDplayeragain,pressbuttonnumber1 whilepressingdownthePOWERbutton. ThedeckisfactorysettoaCDplayerforsynchro- recording.

You can check the remaining recordable time on the

MD

PressDISPLAY(seepage15).

14

Image 14
Contents MiniDisc Deck Precautions Welcome About This ManualInserting batteries into the remote UnpackingHooking Up the System OverviewHookups Connecting the AC power cordConnecting the deck to an amplifier To record Set REC Mode to To record through Set Input toWhen TOC flashes in the display PressPlaying an MD Do the followingUseful Tips for Recording Checking the remaining recordable time on the MDIf Smart Space appears in the display Smart Space Monitoring the input signal Input MonitorIf Auto Cut appears in the display Auto Cut Playing back tracks just recorded While Track flashes in the display Adjusting the Recording Level Recording Over Existing Tracks To record from the middle of the trackTo cancel Automatic Track Marking Marking Track Numbers While Recording Track MarkingTo stop Time Machine Recording To stop Music Synchro-RecordingTo pause recording Synchro-Recording With a Sony CD PlayerIf the CD player does not start playing You can change CDs during synchro-recordingUsing the Display Checking remaining time and the title of a trackLocating a Specific Track Repeating the current track Locating a Particular Point in a TrackPlaying Tracks Repeatedly Playing in Random Order Shuffle Play Repeating a specific portion A-B RepeatChanging the track order Creating Your Own Program Program PlayChecking the track order Inserting blank spaces while recording to tape Auto Space Pausing after each track Auto PauseErasing Recordings Erase Function Erasing all tracks on an MD To cancel the Erase FunctionErasing a single track Erasing a part of a trackYou can divide a track while recording To cancel the Divide FunctionYou can undo a track division To cancel the Combine Function You can undo a track combinationTo label Make sure that the deck is To cancel the Move FunctionLabeling Recordings Title Function Until To cancel labelingTo select If you entered the wrong characterLabeling tracks and MDs with the remote To select PressErasing all titles on a disc Name Erase Function Undoing the Last Edit Undo FunctionChanging an existing title Z Message Meaning Display MessagesSystem Limitations Some tracks cannot be combined with othersTroubleshooting Inputs SpecificationsOptional accessories OutputsBeep Output During Operations Operation Beep soundGuide to the Serial Copy Management System Turntable Tuner Index W, X, Y, ZAdditional InformationIndex Names of controls