OPERATIONS
Loading
When replacing nails in your Model H6145, follow these guidelines:
Diameter:
Length:
Capacity: 100
Strip Angle: 28°
NOTICE: A number of manufacturers' nails may fit the H6145. However, for best performance, we recommend you use Grizzly nail Models
1.DISCONNECT NAILER FROM THE AIR SUPPLY!
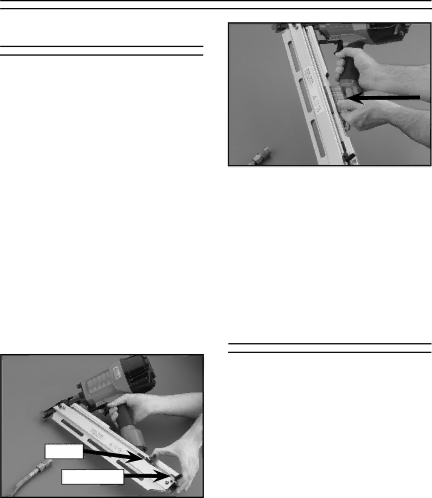
2.Gripping the nailer firmly, pull the mag- azine pusher back and engage the catch lever, as shown in Figure 3.
Pusher
Catch Lever
Figure 3. Sliding pusher toward the catch
lever pusher.
3.Insert a strip of nails, pointed-end down, into the magazine as shown in Figure 4.
Figure 4. Loading nails into magazine.
4.Slide the nails all the way down to the nose of the nailer.
5.Release the catch lever. The pusher slides forward until it rests against the nail stick.
Operating
If you have not read the safety instruc- tions in this manual, do not operate the nailer.
Before you operate your nailer, place five to six drops of the included oil into the quick connect fitting where the nailer con- nects to the air supply.
To operate your nailer:
1.Connect the air supply to the quick connect fitting.
2.To test for proper nail penetration, hold the nailer perpendicular to the surface of a piece of clean scrap wood that is thick enough for the length of nails you have loaded.
H6145 28° Clipped Head Framing Nailer |