Chuck replacement
Always wear eye protection.
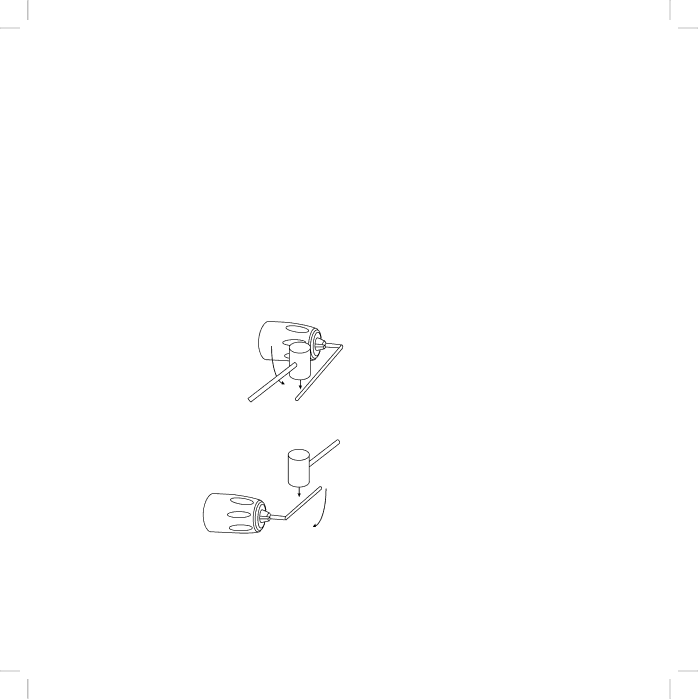
Chuck removal
The chucks of reversible drills are always fixed by a screw with
1.Tighten the chuck around the shorter end of a hex key (not supplied) of 1/4” or greater size. Using a wooden mallet or similar object, strike the longer end in the clockwise direction. This will loosen the screw inside the chuck.
2.Open chuck jaws fully.
3.Insert a screwdriver into front of chuck between jaws to engage screw head. Remove screw by turning clockwise.
4.Place a hex key in chuck and tighten. Using a wooden mallet or
similar object, strike key sharply in the counterclockwise direction. This will loosen the chuck so that it can be unscrewed by hand.
Chuck installation
1.Screw the chuck on by hand as far as it will go and insert screw (LH thread).
2.Tighten the chuck around the shorter end of a
1/4” or large hex key (not supplied) strike the longer end in the clockwise direction with a wooden mallet.
3.Remove the hex key and open the jaws fully. Tighten the screw in the centre of the chuck firmly.
Hints for use
NOTE. When drilling into masonry the drilling rate is fast and burnout of the tip will occur if the drill bit is not constantly cleared.
•Use only correctly sharpened drill bits, which are suitable for the material being drilled.
•To drill hard materials, firm pressure is required on the power tool. However, excessive pressure does not improve performance and places unnecessary pressure on the tool and its bit.
•When screw driving always use a pilot hole and set the speed dial to low. Press firmly on the screw head and pull the trigger gradually increasing the speed. It is always wiser to test the screw driving on a scrap piece of the same material you are using.
•Larger diameter holes in hard wood, steel and concrete have to be drilled at slower speeds. However, the motor must not be struggling with the operation. If the motor is struggling DO NOT continue working, pull the drill clear of the workpiece and run it on fast speed for a minute or so allowing the motor time to cool down before you attempt a little more of the work. If the job is too hard for the drill do not continue otherwise permanent damage to the motor will occur.
•Wire brushing or sanding should be carried out on the highest speed.
•Concrete drilling should be carried out on the highest speed.
DO NOT overload motor when drilling concrete.
DO NOT use too much pressure as the hammer action relies on the drill bit being able to move back and forward in the hole being drilled.
Always clear the flutes of the drill bit by removing it from the hole regularly.
10