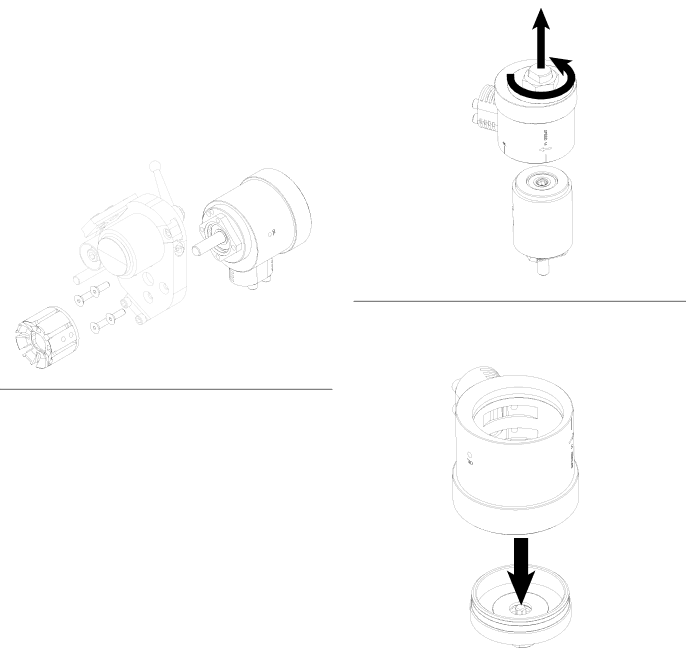
Graco 332574D important safety instructions Repair, Air Motor Component Removal

Page 15

Repair

Repair

Air Motor Component Removal

6. Pull upwards to remove the muffler housing.

Refer to FIG. 10 for the following steps.

1. Loosen the set screws and pull gently to remove the cutter head assembly.

2.Remove the four screws that secure the air motor to the plate.

3.Separate the air motor from the plate.

r_258900_3a0232_1k

FIG. 10

Refer to FIG. 11 for the following steps.

4.Clamp the air motor flats into a vise.

5.Unscrew the nut bearing cap.

r_258899_3a0232_1a

FIG. 11

7. Use an arbor press to remove the nut bearing cap from the muffler housing.

r_258899_3a0232_2a

8. Replace damaged parts as required.

332574D

15

Image 15
Contents RS Gun Cutter Assemblies Important Safety InstructionsContents Related Manuals Key Component IdentificationAnvil to Blade Tension Lockdown Setup Operation Cutter AssemblyAnvil and Blade Replacement See Replace Anvil and Replace Blades procedures on pages 11Adjust Anvil to Cutter Head Tension Adjust Cutter SpeedAdjust Anvil to Idler Tension Adjust Cutter Air Pressure Adjust Blower AirNumber Strands Metric Maintenance Air Motor OilingTask Schedule Replace Anvil Adjust Anvil to Cutter Head Tension,Replace Blades Replace Muffler Filters Kit 24H280 Replace Chopper Chute LinerTroubleshooting Air Motor Component Removal RepairAir Motor Component Installation Air Motor Replacement Parts Ref Part Description QtyPart Description Qty Ti21021a Ring Air Motor, 24E511 Part Description Qty Accessories Tools Cover and ChutesBlade Cartridges Cutter Chute Liner, 16P833Cutter Head Kits RS Cutter Assemblies Metric Technical DataGraco Information Graco Standard Warranty