HP E2S18UAABA manual Using an Internet service provider, Setting up a Wlan

Page 27

NOTE: The terms wireless router and wireless access point are often used interchangeably.

A large-scale WLAN, such as a corporate or public WLAN, typically uses wireless access points that can accommodate a large number of computers and accessories and can separate critical network functions.

A home or small office WLAN typically uses a wireless router, which allows several wireless and wired computers to share an Internet connection, a printer, and files without requiring additional pieces of hardware or software.

To use the WLAN device in your computer, you must connect to a WLAN infrastructure (provided through a service provider or a public or corporate network).

Using an Internet service provider

When you are setting up Internet access in your home, you must establish an account with an Internet service provider (ISP). To purchase Internet service and a modem, contact a local ISP. The ISP will help set up the modem, install a network cable to connect your wireless router to the modem, and test the Internet service.

NOTE: Your ISP will give you a user ID and a password to use for Internet access. Record this information and store it in a safe place.

Setting up a WLAN

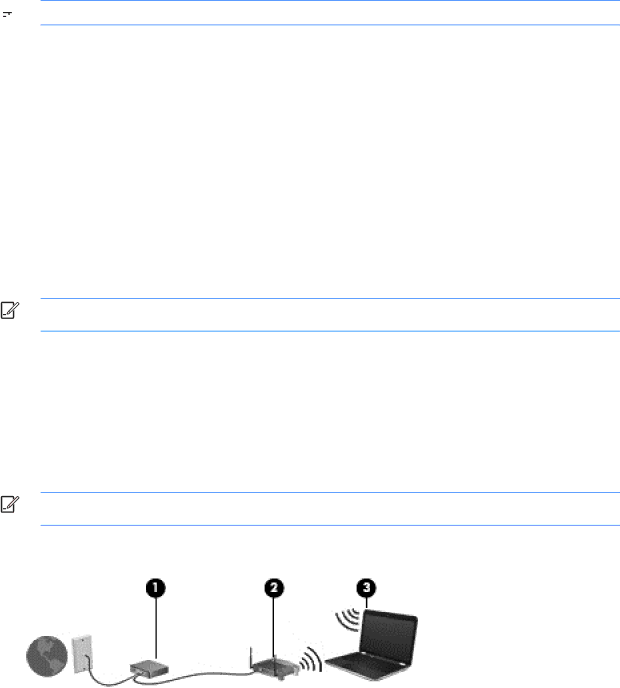
To set up a WLAN and connect to the Internet, you need the following equipment:

A broadband modem (either DSL or cable) (1) and high-speed Internet service purchased from an Internet service provider

A wireless router (2) (purchased separately)

A wireless computer (3)

NOTE: Some modems have a built-in wireless router. Check with your ISP to determine what type of modem you have.

The illustration below shows an example of a wireless network installation that is connected to the Internet.

As your network grows, additional wireless and wired computers can be connected to the network to access the Internet.

For help in setting up your WLAN, see the information provided by your router manufacturer or your ISP.

Configuring a wireless router

For help in setting up a WLAN, see the information provided by your router manufacturer or your ISP.

Connecting to a wireless network 17

Image 27
Contents User Guide Software terms Product noticeSafety warning notice Iv Safety warning notice Table of contents Enjoying entertainment features Using the hot keys Securing your computer and information Input power Operating environment Page Starting right Best practicesFun things to do More HP resources Resource ContentsMore HP resources Locating software Getting to know your computerFinding your hardware and software information Locating hardwareRight side Component DescriptionSelect User guides Left side See Using HP 3D DriveGuard select models onlyDisplay TouchPad TopLights Buttons and speakers Fn key KeysSupport BottomComponent LabelsModel number select models only Revision number Using the wireless button Connecting to a networkConnecting to a wireless network Using the wireless controlsUsing a Wlan Sharing data and drives and accessing softwareUsing an Internet service provider Setting up a WlanConfiguring a wireless router Protecting your Wlan Connecting to a WlanConnecting to a wired network Using Bluetooth wireless devices select models onlyConnecting to a local area network LAN Multimedia features Enjoying entertainment featuresUsing the webcam Using audioConnecting speakers Checking the sound Using videoConnecting headphones Connecting a microphoneConnecting a VGA monitor or projector Configuring Hdmi audio settings Connecting an Hdmi deviceManaging your audio and video files select models only Using TouchPad gestures Using the TouchPadScrolling TappingRotating select models only Pinching/zoomingFlicking select models only Finger click select models onlyEdge swipes Right-edge swipeTop-edge swipe Left-edge swipe One-finger slide Using touch screen gestures select models onlyTapping Pinching/stretching Edge swipes Using the keyboard and mouse Using the keysTop-edge swipe and bottom-edge swipe Icon Key Description Using the action keysFunction Hot key Description Using Microsoft Windows 8 shortcut keysUsing the hot keys Shortcut Key DescriptionManaging power Initiating Sleep and HibernationManually initiating and exiting Sleep Using the power meter and power settings Running on battery powerSetting password protection on wakeup Finding battery information Removing a user-replaceable batteryConserving battery power Identifying low battery levelsResolving a low battery level Replacing a user-replaceable battery Running on external AC powerStoring a user-replaceable battery Disposing of a user-replaceable batteryHP CoolSense select models only Troubleshooting power problemsShutting down turning off the computer Type Description Using a USB deviceConnecting a USB device Managing and sharing informationRemoving a USB device Inserting and removing a memory cardPage Replacing a hard drive Maintaining your computerImproving performance Handling drivesPage Page Identifying HP 3D DriveGuard status Using HP 3D DriveGuard select models onlyUsing Disk Defragmenter Using Disk CleanupAdding or replacing memory modules Page Page Updating programs and drivers Cleaning your computerCleaning the TouchPad, keyboard, or mouse Cleaning proceduresCleaning the display All-in-Ones or Notebooks Cleaning the sides or coverTraveling with or shipping your computer Using passwords Computer risk Security featureSecuring your computer and information Password Function Using Internet security softwareSetting Windows passwords Setting Setup Utility Bios passwordsInstalling critical security updates Installing software updatesUsing antivirus software Using firewall softwareSecuring your wireless network Using an optional security cable lockBacking up your software applications and information Starting Setup Utility Bios Updating the BiosDetermining the Bios version Downloading a Bios update Using HP PC Hardware Diagnostics UefiDownloading HP PC Hardware Diagnostics Uefi to a USB device Creating recovery media and backups Backing up, restoring, and recoveringCreating HP Recovery media Restore and recovery Remove everything and reinstall Windows Using Windows Refresh for quick and easy recoveryRecovering using HP Recovery Manager Using the HP Recovery partition select models onlyWhat you need to know Changing the computer boot order Using HP Recovery media to recoverRemoving the HP Recovery partition Specifications Input powerOperating environment Electrostatic Discharge Index BiosWlan