HP d3000 manual Using Pre-composition Mode

Page 35

To activate Blink Detection

1.Select Blink Detection Mode from Scene Mode submenu.

2.Half press the Shutter button to focus the subject. The frame turns green to indicate focus is set.

3.Press the Shutter button to capture the image and automatically save the Image.

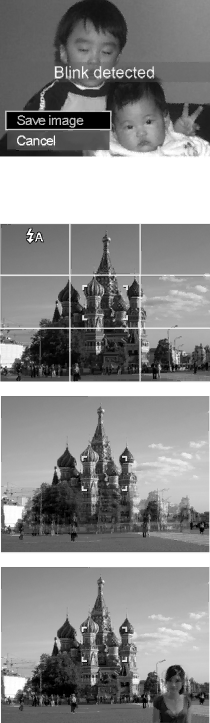
4.If the camera detects subject blinked eye, a "Save image" or "Cancel" option appears on the screen.

5.Select Save image to save or Cancel to disregard.

Using Pre-composition Mode

When asking someone else to take images for you, but the images always don’t come up right?

Pre-composition helps you get the background you want, even if you need to ask someone else to record the image for you.

Basically, Pre-composition is a two-step process.

1.Compose the background you want and press the Shutter button (full press), which causes 1/3 of semi-transparent image of the background to remain on the LCD monitor. Press Menu button to cancel the semi-transparent temporarily image.

2.Ask someone else to record a shot of you against your original pre-composed background, telling him/her to compose the image by using the 1/3 semi-transparent screen image as a guide.

3.Move your position until photographer confirm your whole or half body in the frame and in the right place.

4.Press the Shutter button. Camera stores the image produced by this step only.

34

Image 35
Contents D3000 Table of Contents About Folder and File Names About this Manual Safety and Handling PrecautionsPreface Battery Information Using this MenuSystem Requirements Main FeaturesIntroduction Package Contents Back View Self-timer LED AF Assist Lamp Microphone LensCamera Views Front ViewBottom View Top ViewLeft View Camera ButtonsRight View Navigation Control Internal memory Camera MemoryAttach the Camera Strap Inserting the BatteryGetting Started Inserting an SD/SDHC/SDXC Memory Card Turning the Power On and OffInitial Settings Please remove the lens cover before doing Power onHolding down or keys to change the values continuously Modes Record ModeLCD Monitor Layout Using the LCD monitorMovie Mode Screen Layout Playback mode of videos Playback mode of audio clips Taking Images Recording Images, Videos and VoicesChanging the LCD Monitor Display Digital zoom is not activated in recording videos Setting the Zoom ControlTo adjusts the optical zoom To adjusts the digital zoomTo activate Flash Using FlashSetting the Focus Mode To set the Focus modePhoto Size Using the Function MenuMy Mode EV Compensation Settings of Recording VideosRecording Videos QualityMovie Size Internet ModeISO White BalanceMetering Color ModeIcon Mode Description Mode dialTo activate Intelligent Scene Using Intelligent SceneSetting the Scene Mode Using Kids Mode Using Food Mode Using Sports ModeUsing Party Mode Using Soft Skin modeImage is set to low quality and VGA 640x480 size only Using Smile Capture ModeUsing Blink Detection Mode Using Pre-composition Mode Using D-Lighting Mode Using Voices RecordingUsing Love Portrait Using Self PortraitTo stitch the still image Using Continuous ShootingUsing Photo Stitch Mode To activate Manual Exposure Using Manual ExposureRecord Menu Using the Record MenuUsing Aperture Priority Mode Using Shutter Priority ModeTo set the Drive Mode Setting the Drive ModeSetting the AF Area Setting the AF LampSetting Contrast Setting SharpnessSetting Saturation To set Digital Zoom Setting the Digital ZoomTo set Contrast To set Date Stamp Setting the Date StampSetting Auto Review Setting StabilizerViewing in Single Navigation To set 9-images modeTo set calendar mode PlaybackThumbnail icons Zooming imagesPlaying Videos Playing Voice Memo Volume cannot be adjusted during Pause modeVolume cannot be adjusted when you pause the voice memo Playing Voice RecordingTo go to Playback Menu Using the Delete ButtonDeleting an Image/Video/Audio Playback MenuTo delete attached voice memo DeleteTo delete an image/video/audio clip To delete a single fileTo view slideshow To change slide show settingsSlide Show To delete all filesRed-eye Correction ProtectTo record voice memo Voice MemoTo activate Red-eye Correction To activate Color Mode To trim an image TrimTo resize an image ResizeStartup Image To set Dpof on a single image/all images To reset DpofRadial Blur To set DpofTo go to Setup Menu Using the Setup MenuSetting Sounds Setting Power SaveSetting File Numbering Setting LCD SaveSetting Date & Time Setting LanguageSetting Memory Kit Setting TV OutSetting LCD Brightness Setting Battery TypeReset All Making Connections Connecting the Camera to a PCPage Connecting the Camera to a Printer To set Print All and Print Index Setting the Print Mode MenuTo set Printer Settings To set Print SelectAbout Folder and File Names TroubleshootingSpecifications AppendixFile Format Interface
Related manuals
Manual 3 pages 46.31 Kb