HP d3000 manual Playback, Viewing in Single Navigation, Viewing Thumbnails, To set 9-images mode

Page 44

Playback

You can playback the still images, video and audio clips on the LCD monitor.

Viewing in Single Navigation

The Single navigation mode displays the image one by one on the LCD monitor. To view images/videos/audio clips, follow the steps below.

1.Press the Playback button on the camera.

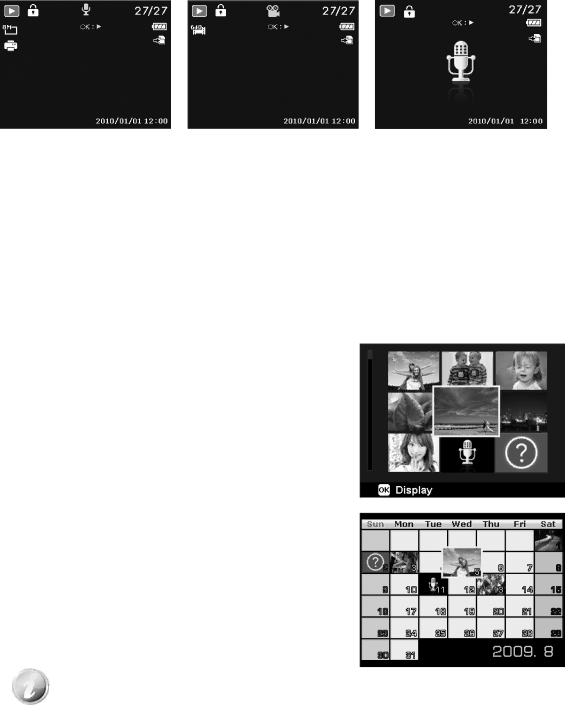
2.The LCD monitor displays an image. To understand the icons and other information on the screen, please see "Photo Mode Screen Layout" on page 16.

Still Image

Video

Audio Clip

3.Use the or keys to view next/previous image/video/audio.

4.To play a video or audio clip, press the OK button. See "Playing Videos" on page 44 and "Playing Voice Recording" on page 45 for more details.

Viewing Thumbnails

This function allows you to view 9-thumbnail images or by calendar mode on the LCD monitor at the same time. Searching numerous of images is much easier then single view navigation.

To set 9-images mode

1.Press the Playback button on the camera.

2.Spin the Zoom lever counterclockwise (left) once to enter 9-images mode.

3.Use the navigation controls to move through the items.

4.Press the OK button to select the image and view it normally.

Scroll bar.

If scroll bars appear, it indicates that the screen can be scrolled.

Thumbnail view

To set calendar mode

1.Press the Playback button on the camera.

2.Spin the Zoom lever counterclockwise (left) twice to view thumbnails in calendar mode.

3.Use the navigation controls to move through the items.

4.Press the OK button to select an image and view it normally.

In calendar mode:

The first file (Including image, video, audio and error file) recorded on each date appears on the screen.

Spin the Zoom lever clockwise (right) would back to 9-images mode.

43

Image 44
Contents D3000 Table of Contents About Folder and File Names About this Manual Safety and Handling PrecautionsPreface Using this Menu Battery InformationSystem Requirements Main FeaturesIntroduction Package Contents Self-timer LED AF Assist Lamp Microphone Lens Camera ViewsFront View Back ViewTop View Bottom ViewLeft View Camera ButtonsRight View Navigation Control Camera Memory Internal memoryAttach the Camera Strap Inserting the BatteryGetting Started Turning the Power On and Off Initial SettingsPlease remove the lens cover before doing Power on Inserting an SD/SDHC/SDXC Memory CardHolding down or keys to change the values continuously Record Mode ModesUsing the LCD monitor LCD Monitor LayoutMovie Mode Screen Layout Playback mode of videos Playback mode of audio clips Taking Images Recording Images, Videos and VoicesChanging the LCD Monitor Display Setting the Zoom Control To adjusts the optical zoomTo adjusts the digital zoom Digital zoom is not activated in recording videosUsing Flash Setting the Focus ModeTo set the Focus mode To activate FlashPhoto Size Using the Function MenuMy Mode Settings of Recording Videos Recording VideosQuality EV CompensationInternet Mode Movie SizeWhite Balance ISOColor Mode MeteringMode dial Icon Mode DescriptionUsing Intelligent Scene To activate Intelligent SceneSetting the Scene Mode Using Kids Mode Using Sports Mode Using Party ModeUsing Soft Skin mode Using Food ModeImage is set to low quality and VGA 640x480 size only Using Smile Capture ModeUsing Blink Detection Mode Using Pre-composition Mode Using Voices Recording Using Love PortraitUsing Self Portrait Using D-Lighting ModeTo stitch the still image Using Continuous ShootingUsing Photo Stitch Mode Using Manual Exposure To activate Manual ExposureUsing the Record Menu Using Aperture Priority ModeUsing Shutter Priority Mode Record MenuSetting the Drive Mode Setting the AF AreaSetting the AF Lamp To set the Drive ModeSetting Contrast Setting SharpnessSetting Saturation To set Digital Zoom Setting the Digital ZoomTo set Contrast Setting the Date Stamp Setting Auto ReviewSetting Stabilizer To set Date StampTo set 9-images mode To set calendar modePlayback Viewing in Single NavigationThumbnail icons Zooming imagesPlaying Videos Volume cannot be adjusted during Pause mode Volume cannot be adjusted when you pause the voice memoPlaying Voice Recording Playing Voice MemoUsing the Delete Button Deleting an Image/Video/AudioPlayback Menu To go to Playback MenuDelete To delete an image/video/audio clipTo delete a single file To delete attached voice memoTo change slide show settings Slide ShowTo delete all files To view slideshowProtect Red-eye CorrectionTo record voice memo Voice MemoTo activate Red-eye Correction To activate Color Mode Trim To trim an imageTo resize an image ResizeStartup Image To reset Dpof Radial BlurTo set Dpof To set Dpof on a single image/all imagesUsing the Setup Menu Setting SoundsSetting Power Save To go to Setup MenuSetting LCD Save Setting Date & TimeSetting Language Setting File NumberingSetting TV Out Setting LCD BrightnessSetting Battery Type Setting Memory KitReset All Connecting the Camera to a PC Making ConnectionsPage Connecting the Camera to a Printer Setting the Print Mode Menu To set Printer SettingsTo set Print Select To set Print All and Print IndexTroubleshooting SpecificationsAppendix About Folder and File NamesFile Format Interface
Related manuals
Manual 3 pages 46.31 Kb