HP CW-450t Setting the Print Mode Menu, To set Print Select, To set Print All and Print Index

Page 74

Setting the Print Mode Menu

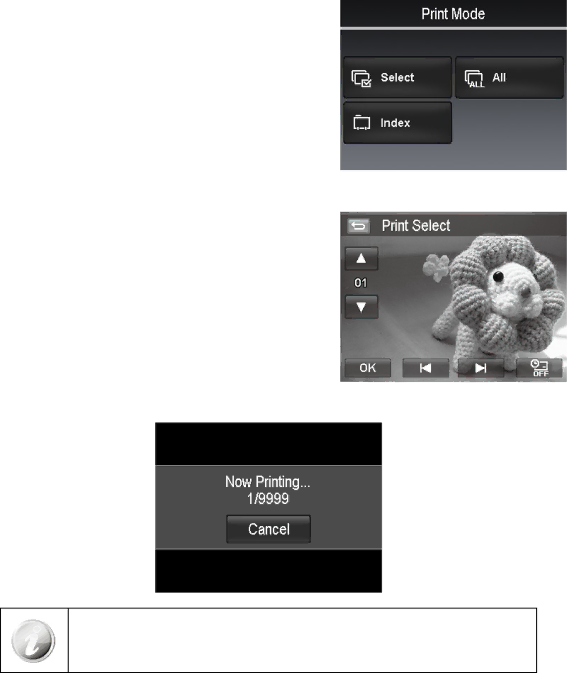
Print Mode menu appears on the screen after the connection between a printer and your camera is established. Print Mode includes three major settings:

Select. An image can then be selected to print.

All. Prints all images.

Index. Prints all images as thumbnails.

To set Print Select

1.Tap the or button to scroll and select an image for printing.

2.Specify the number of copies. Tap or to increase/ decrease the number.

3.Tap the button to set date stamp On/Off

4.Tap the button to start printing.

To set Print All and Print Index

Repeat the same steps 2 to 4, then start printing.

After the printer has printed all the images that had been selected, disconnect the camera from the printer.

70

Image 74
Contents HP CW450t Page Table of Contents Playback PlayingPreface About this ManualImportant Notes and Information Safety and Handling Precautions Camera InformationBattery Information Package Contents Inserting the Batteries Getting StartedAttach the Camera Strap Internal memory Inserting an SD/SDHC Memory CardCamera Memory External storageCamera Views Bottom View Camera Buttons Onscreen Touch ButtonsTurning the Power On and Off Initial SettingsRecord Mode ModesTouch screen Layout Using the Touch ScreenPhoto Mode Screen Layout ISO Scene Mode Video Mode Screen Layout Playback Mode Screen Layout Playback mode display of still imagesPlayback mode of videos Playback mode of audio clips Changing the LCD Monitor Display Taking Photos Using Voices RecordingRecording Photos, Videos and Voices Recording Videos Internet Mode Using the Stabilizer FeatureSettings of Recording Videos Movie sizeSetting the Zoom Control Zoom buttonsUsing Flash Features To activate FlashSetting the Focus Mode Setting the Drive ModeTable below shows the available Drive mode settings How to use Touch shot Setting the AF Area/Face tracking/Touch ShotHow to use Face tracking To set AF AreaTo go to Record Menu Using the Record MenuRecord Menu Setting the Scene Mode Button Shutter button HDR To activate Intelligent Scene Using Intelligent SceneUsing Kids Mode Using Soft Skin mode Using Sports ModeUsing Party Mode Using Food ModePage To activate Blink Detection Using Smile Capture ModeUsing Blink Detection Mode Using Pre-composition Mode Using Love PortraitUsing Self Portrait Using HDR ModeSetting Photo Size Setting QualityTo adjust EV settings Setting EV CompensationSetting White Balance Setting ISO Setting MeteringSetting AF Lamp Setting AEBSetting AF area To set AEBTo set Sharpness Setting SharpnessSetting Saturation To set SaturationSetting Drive Mode Setting ContrastSetting Flash Setting Focus ModeSetting Color Mode To set Digital Zoom Setting the Digital ZoomSetting the Date Stamp To set Date StampTo set Auto Review Setting Auto ReviewWhite Balance, Metering, Color Mode Pre-Record To set Pre-RecordFile Navigation Viewing in Single Navigation ModePlayback To set thumbnail mode Viewing in Photo Stream ModeViewing in Thumbnail Mode To use photo stream navigationTo use thumbnail navigation Viewing in Calendar ModeTo set calendar mode Thumbnail iconsZooming images Playing Voice Memo Playing VideosPlaying Voice Recording Playback Menu Volume ControlTo set volume control To go to Playback MenuTo use the search function Favorite To configure slideshow settingsTo view slideshow Red Eye Correction Perspective ControlQuick Retouch Radial Blur Color ModeTo set Color Mode for an image To set Radial blur for an imagePainter To use the Painter for an imageVoice Memo DeleteTo delete attached voice memo To delete all filesTo protect/unprotect a single file ProtectTo protect files To protect/unprotect multiple filesTo trim an image To unlock all filesTrim Startup Image ResizeRotate To set Dpof on a single image/all images To reset DpofTo set Dpof To go to Setup Menu Using the Setup MenuSetting Sounds Setting Date & Time Setting Power SaveSetting LCD Save Setting LanguageSetting Battery Type Setting TV OutSetting LCD Brightness Setting Memory Kit Reset AllMaking Connections Connecting the Camera to a TVConnecting the Camera to a PC To connect your camera to a TVConnecting the Camera to a Printer To set Print All and Print Index Setting the Print Mode MenuTo set Print Select File Naming AppendixAbout Folder and File Names Troubleshooting Problem Cause and/or ActionGetting Help Contact/phone Support LanguageContact/phone Support Country Page 7525C00167A
Related manuals
Manual 22 pages 61.97 Kb