Samsung SHR-2040N, SHR-2040P manual SHR-2041 HDD Addition

Page 23

SHR-2040/2041/2042 USER’S MANUAL

SHR-2041 HDD ADDITION

The user can add 3 HDDs to this product.

However, there are many factors that can cause electrical shock, accidents, and malfunctioning of the device inside of the product. When the user does not correctly install or apply the proper settings, the device may not recognize the HDD or the device will not run. Therefore, before adding any HDDs, it is recommended that the user contacts a specialist where you purchased the product.

[Caution when adding a HDD]

When adding HDDs, pay attention so that the cable doesn’t get caught between unsuitable places or the cable’s insulation doesn’t come off. (This may cause a malfunction or fire.)

When adding HDDs, be careful not to receive any injury from the pointed edges inside the product.

Pay attention so as not to lose the disassembled screws or accessories.

If the screws or accessories are not put together, the product will either malfunction or will be inop erable.

[How to Add a HDD]

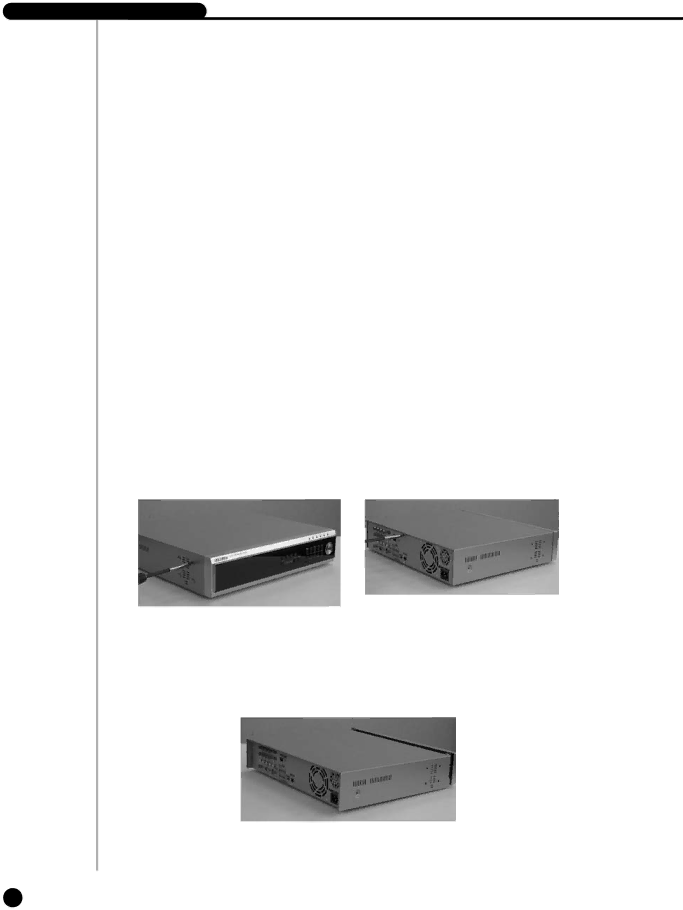
1.To remove the product’s cover, take out the screws on the left and right sides (5 spots each) and on the back (1 spot).

2.Remove the cover from the product. (Remove the cover by first lifting its back part upward after sliding the cover slightly backward.)

2-7English

Image 23
Contents Real Time DVR Ii English Safety RegulationsEnglish Before we startContents PTZ camera Control Mode Recording ModeBackup Network Setup10-1 10-4 10-5 10-7 10-9 10-11 TroubleshootingFAQ Vi EnglishOverview 1English 1Introduction2Features Search 3Part Names and FunctionsDisplay ModeZoomtele ReverseEject Button 5EnglishFreezewide Fast / Step7English AlarmUSB Chapter Installation 1Installation Environment Setup 2Checking Product & Accessory SHR-2040 HDD Addition 3HDD AdditionBRACKET-HDD 5English English SHR-2041 HDD Addition BRACKET-HDD 9English Master HDD Slave HDD 11English SHR-2042 HDD AdditionBRACKET-HDDA BRACKET-HDDB 13English Master HDD Slave HDD 15English English 17English $ The cable should be out from the left hole Connecting with other device 1Connecting the Video, Audio, and Monitor SHR-2041/2042 2Connecting the Network English 3Connecting the USB Name Function 4Connecting the Alarm Input/Output7English 5Connecting the RS-485 Device Chapter Live 1System Operation Definition of Live Screen Icon 2Live Screen ModeAuto sequence Mode Definition of Live Screen ModeSplit Mode PIPPicture In Picture ModeSelecting Live Screen Mode Channel Selection and Audio On/Off Setup in the PIP Mode Audio On/Off Setup in the Full ScreenAudio On/Off Setup in the 4 Split Mode Zoom Function 4Freeze and ZoomFreeze Function 5Event Monitoring 6Spot-out monitoring Chapter Menu Setup Before Use 1System Date/Time/Language Setup3English Password System Log Load Factory DefaultSystem Log List Event LogDevice Erase System Information and SetupUSB S/W Upgrade HDD Information HDD SetupExternal HDD Setup HDD End Beep HDD Mode SetupHDD End Mode Remote control Device System Shutdown 2Camera Camera Config13English Baurate PTZ DeviceProtocol Screen Setup Spot Out Event Monitor 3MonitoringOSG Display Spot Out ChannelCH Support MonitorMulti-channel change Rate 4Recording ModeRecord Mode Quality19English Record Video size ModeAuto Deletion Size Video Size 5Event Record ModeEvent Record Mode setup Event Record Mode setupPost-Event Duration Alarm Detection SetupAlarm-out 23English Motion Detection SetupMotion Detection Mode AreaVideo Loss State Video Loss Detection SetupSensitivity 6Record Schedule Holiday Schedule / Event Record27English 7BackupBackup 8Network IP SetupAdsl User ID PasswordGateway Subnet MaskYou may select either TCP or UDP for the protocol type Transfer Protocol Settings31English Callback SettingsOn/Off Off is default but you may choose On Event of UDP Setup from Transfer Protocol Setup 9Network SetupPort Setup for SmartViewer Connection Event of TCP Setup from Transfer Protocol SetupChapter PTZ Camera Control 1PTZ Camera Control Mode English 2Basic Operation of PAN, TILT, & Zoom 3Preset Setup 5English 4Camera Menu Setup 5Preset View For example, Samsung Protocol 6Other ViewRecording 1REC Normal Recording 2Schedule Recording Motion Detection Alarm DetectionEvent Recording Mode 3Event RecordingChapter Search and Play Before Use 1Calendar Search 2Event Search 3Date/Time Search 4Go to First Search 5Go to Last Search 6Backup 7Playback Definition Play Screen Mode Play at Faster Speed Chapter Smart Viewer 1Introduction 2Feature 3PC SpecificationRecommendation Smart Viewer Installation 4Smart Viewer Installation5English English 5Smart Viewer Program Execution 6Smart Viewer Initial Screen Connection Failure Cases 7Monitoring ModeMonitoring Mode Connection Screen 11English Real-time with an icon Motion Detection 13English English 15English English 17English Change Favorite at the set intervals 19English @ Zoom in / OUT @ Sequence # Autopan $ Sort English 8Search Mode English 25English English 27English English 29English 9Setup Mode 31English DVR Setup 33English For the detailed items of DVR Setup, refer to ChapterEnglish 35English English 37English English 39English Ntsc PAL 41English English 43English English 45English Viewer Setup2040/2041/2042 47English Site Setup 49English English 51English English 53English English 55English English 57English VersionSHR-2040/2041/2042 59English Appendix 10-1English 1Product SpecificationDetails Remarks USB HDD 10-3English Details2The specification of HDD and peripheral device 10-5English 3Outline DrawingsSHR-2042 10-7English 4Factory DefaultClassification Detailed Items Factory Setup 10-9English PAL Frame 10-11English 6TroubleshootingFAQEnglish 10-13English AB68-00541B
Related manuals
Manual 93 pages 60.86 Kb Manual 207 pages 55.28 Kb Manual 207 pages 31.62 Kb Manual 93 pages 36.32 Kb Manual 207 pages 9.98 Kb Manual 178 pages 37.62 Kb Manual 178 pages 24.5 Kb Manual 93 pages 35 Kb Manual 93 pages 57.27 Kb Manual 96 pages 55.64 Kb