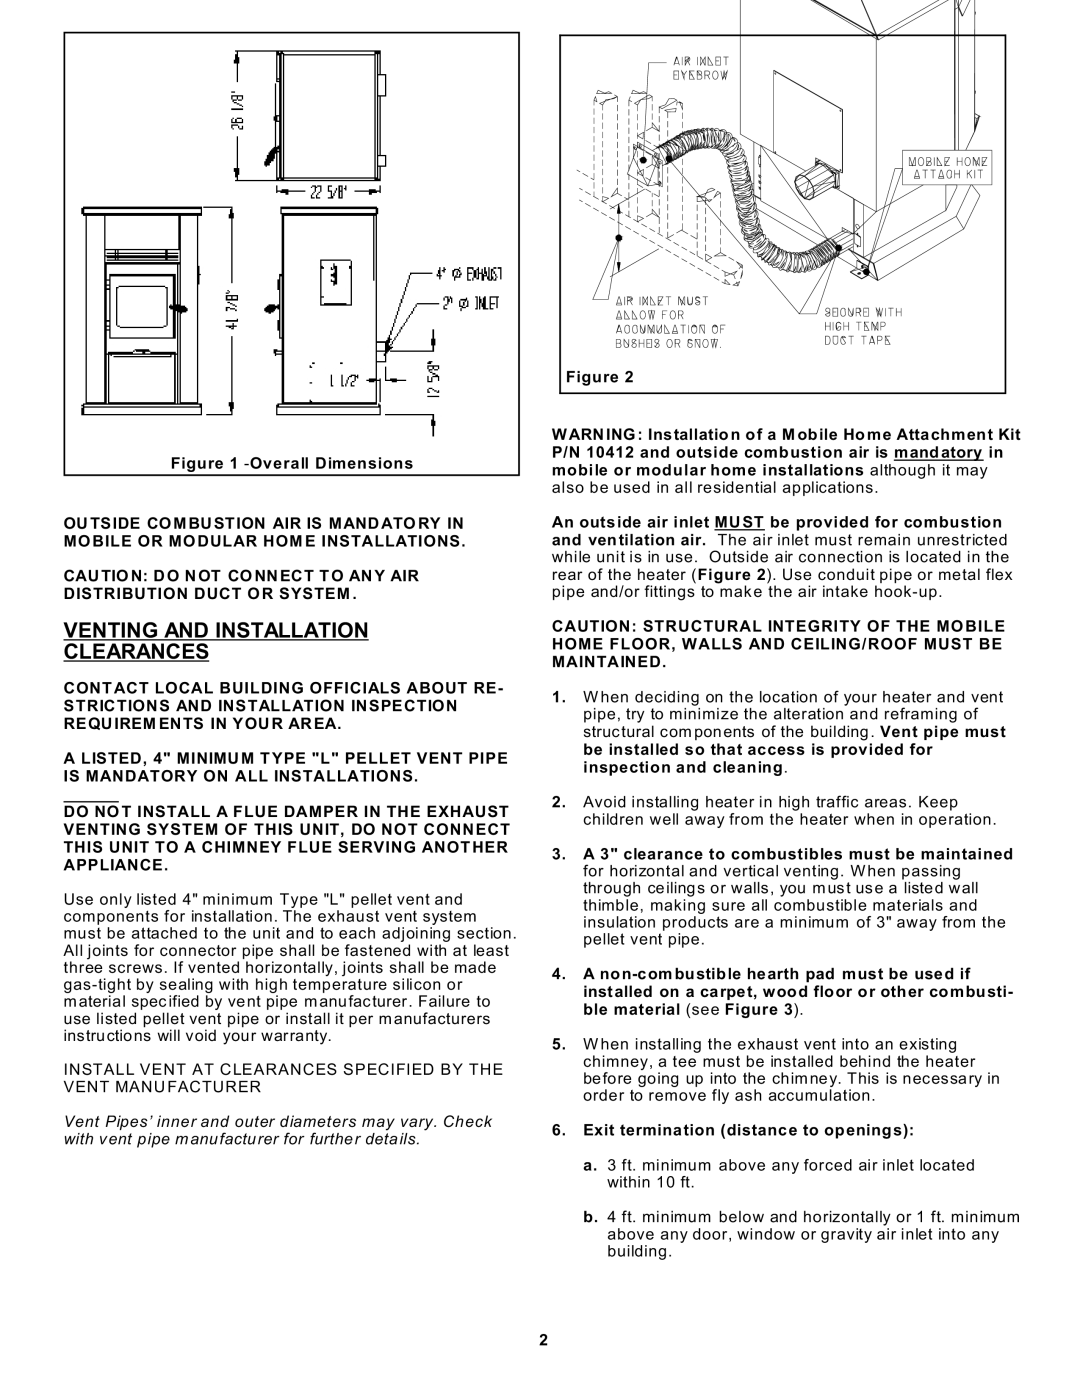
Sierra Products EF-5001UB owner manual Unit Installation, Autolite Installation Instructions

Page 4

UNIT INSTALLATION

Route the power supply cord so that it does not touch any of the exterior components of the he ater.

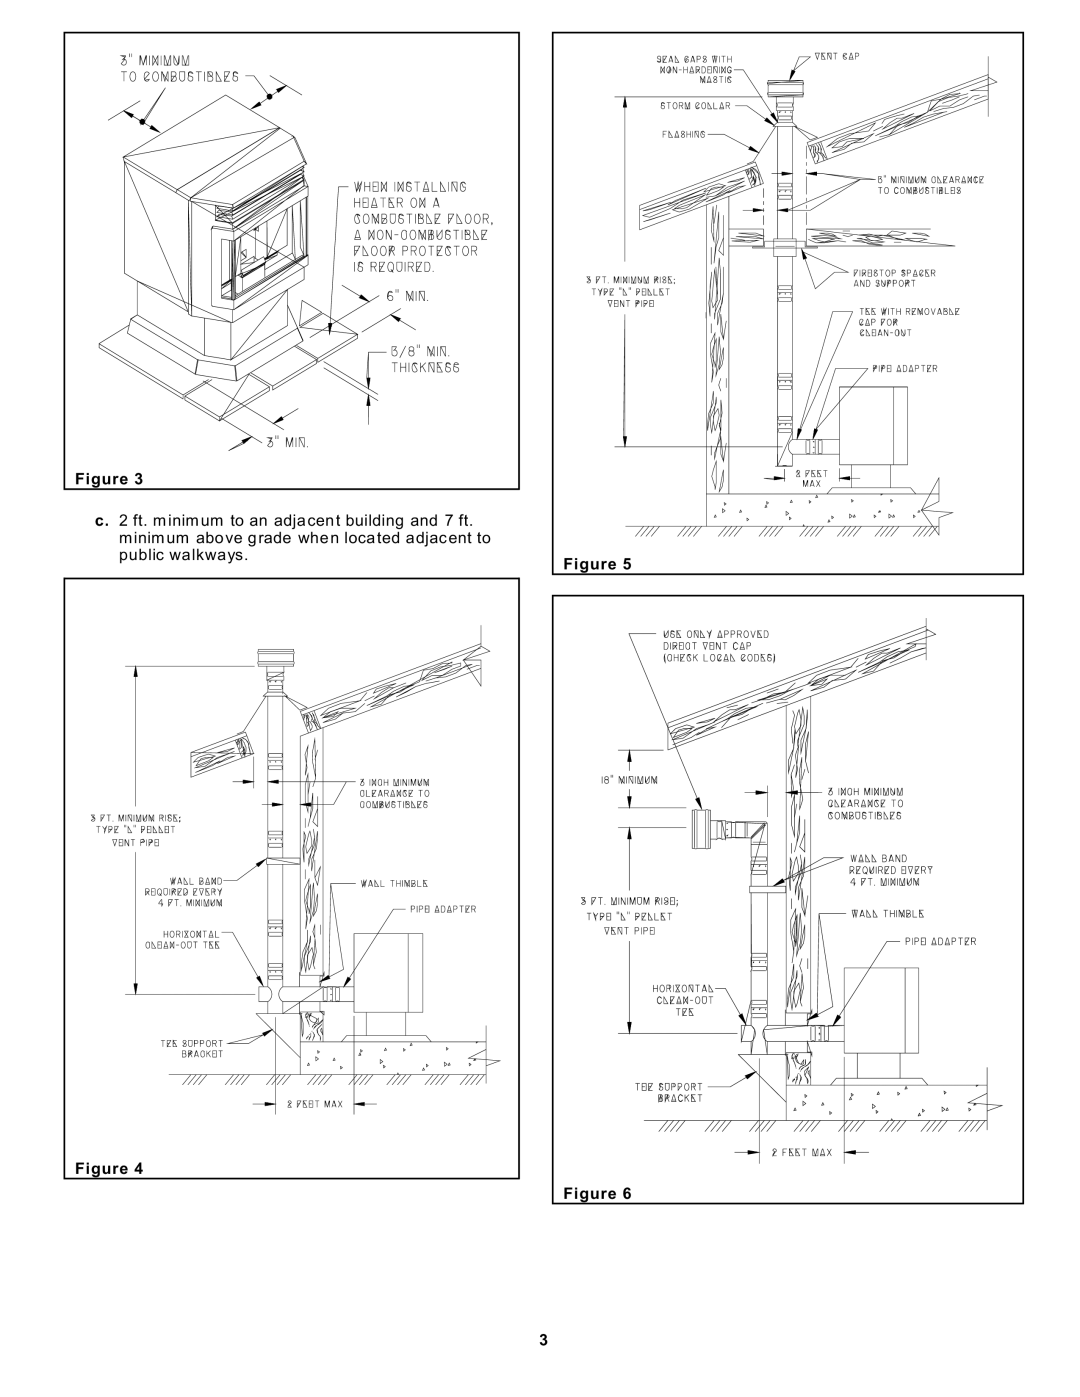
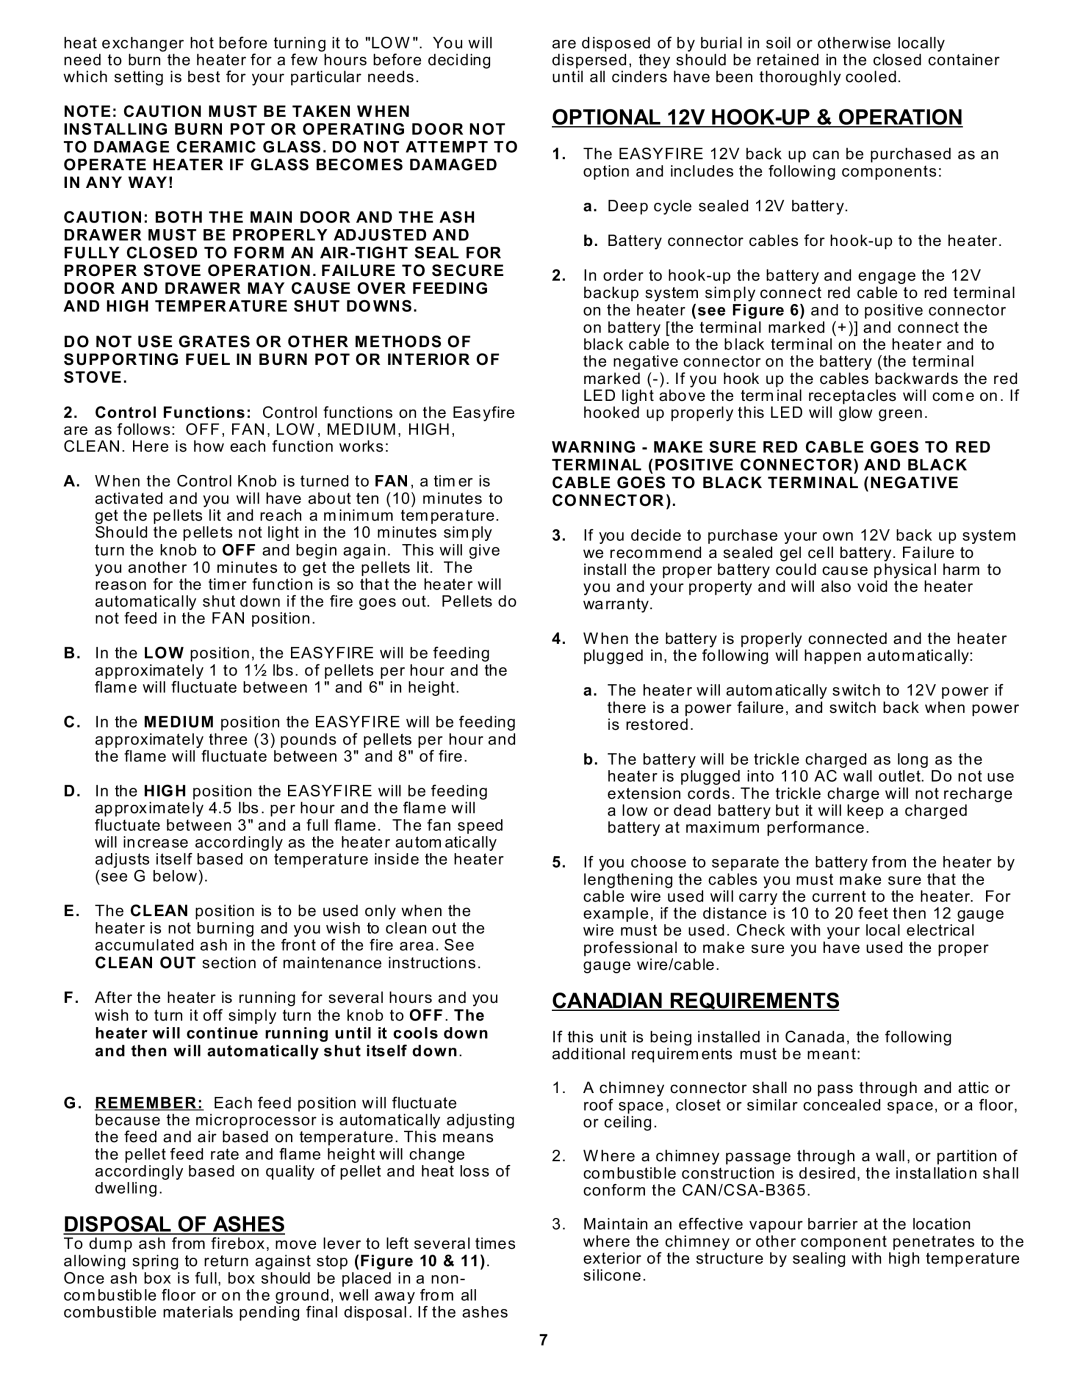
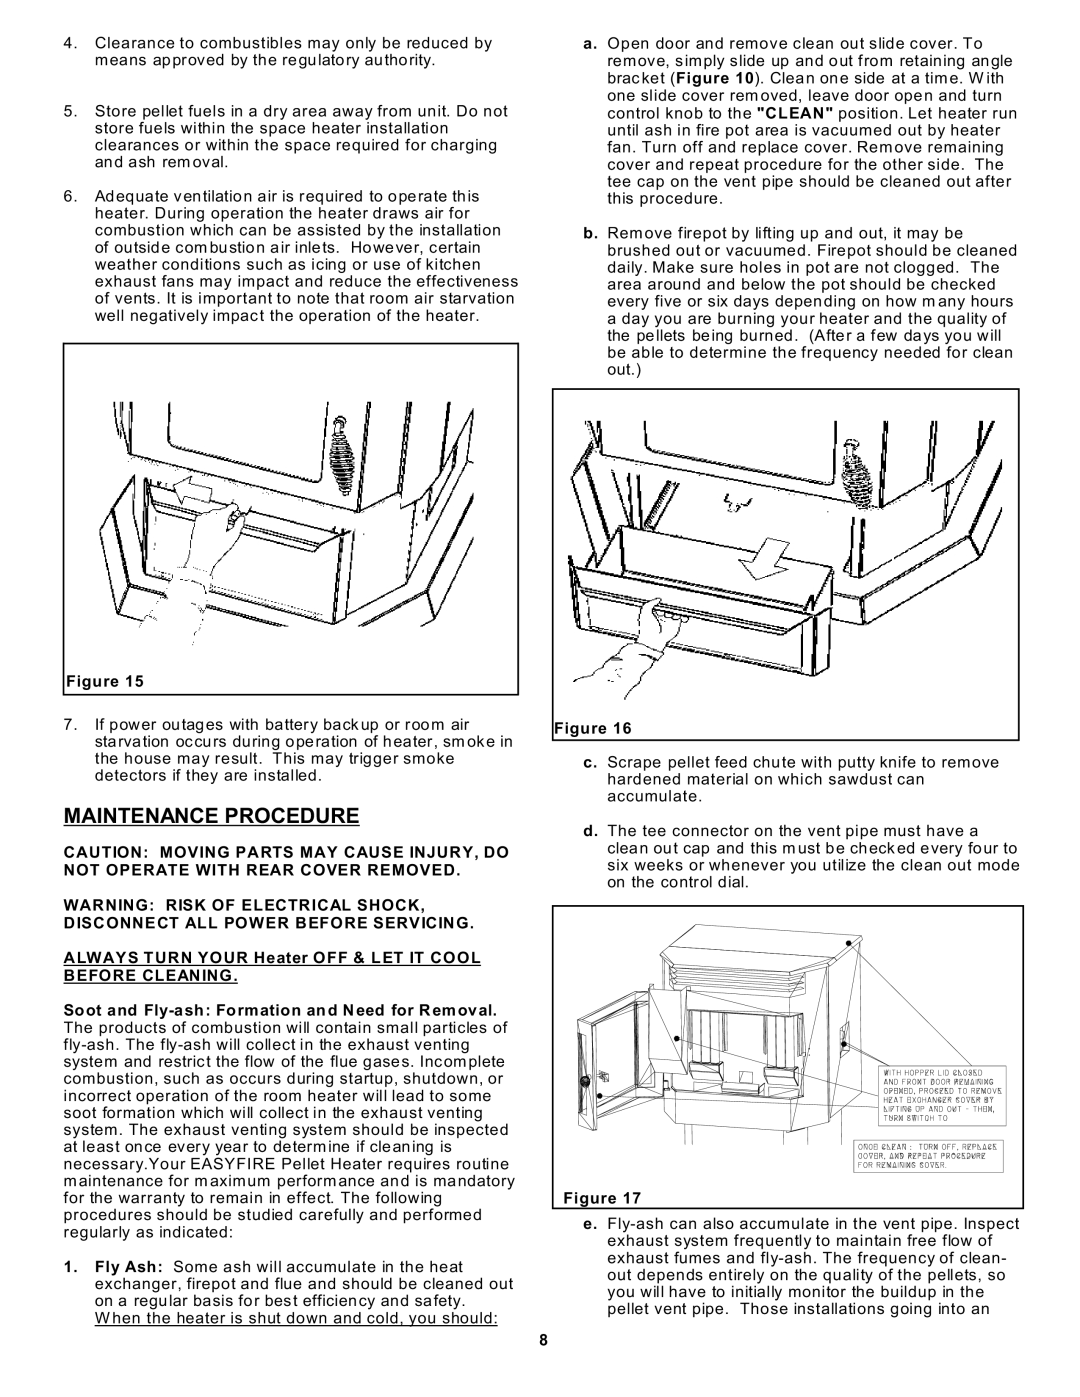
1.W hen exiting through the wall with your type L Pellet vent pipe, you may go straight out through a wall thim ble . You m ust connect a pellet vent tee at this point and extend the vent pipe at least 3' (three feet) vertically outside to provide good draft and allow the gases to exit. The tee must have a clean out cap for inspection and regular cleaning (Figure 4). Horizontal runs must be limited to 2' (two fe et). A w all band is required fo r every 4' (four feet) minimum on a vertical run at an exterior wall.

2.All pellet vent pipe connections including exit at the rear of the heater should be sealed with high

tem perature silicone (45 0°) or metallic duct tape. T his prevents smok e and soot leakage into the living area. If this is not done, there is a possibility that the room fan will pick up any leakage and blow it into the room.

AUTOLITE INSTALLATION INSTRUCTIONS

Th e AutoLite System is factory ins talled with the only installation requirem ents being the optional therm ostat.

Wall Thermostat Installation:

The wall therm ostat is designed to autom atically regulate the room tem perature from the control panel heat setting to the “Off” setting based upon room temperature.

Rem ember to leave the control panel on the "Medium or High" position when utilizing the wall thermostat feature.

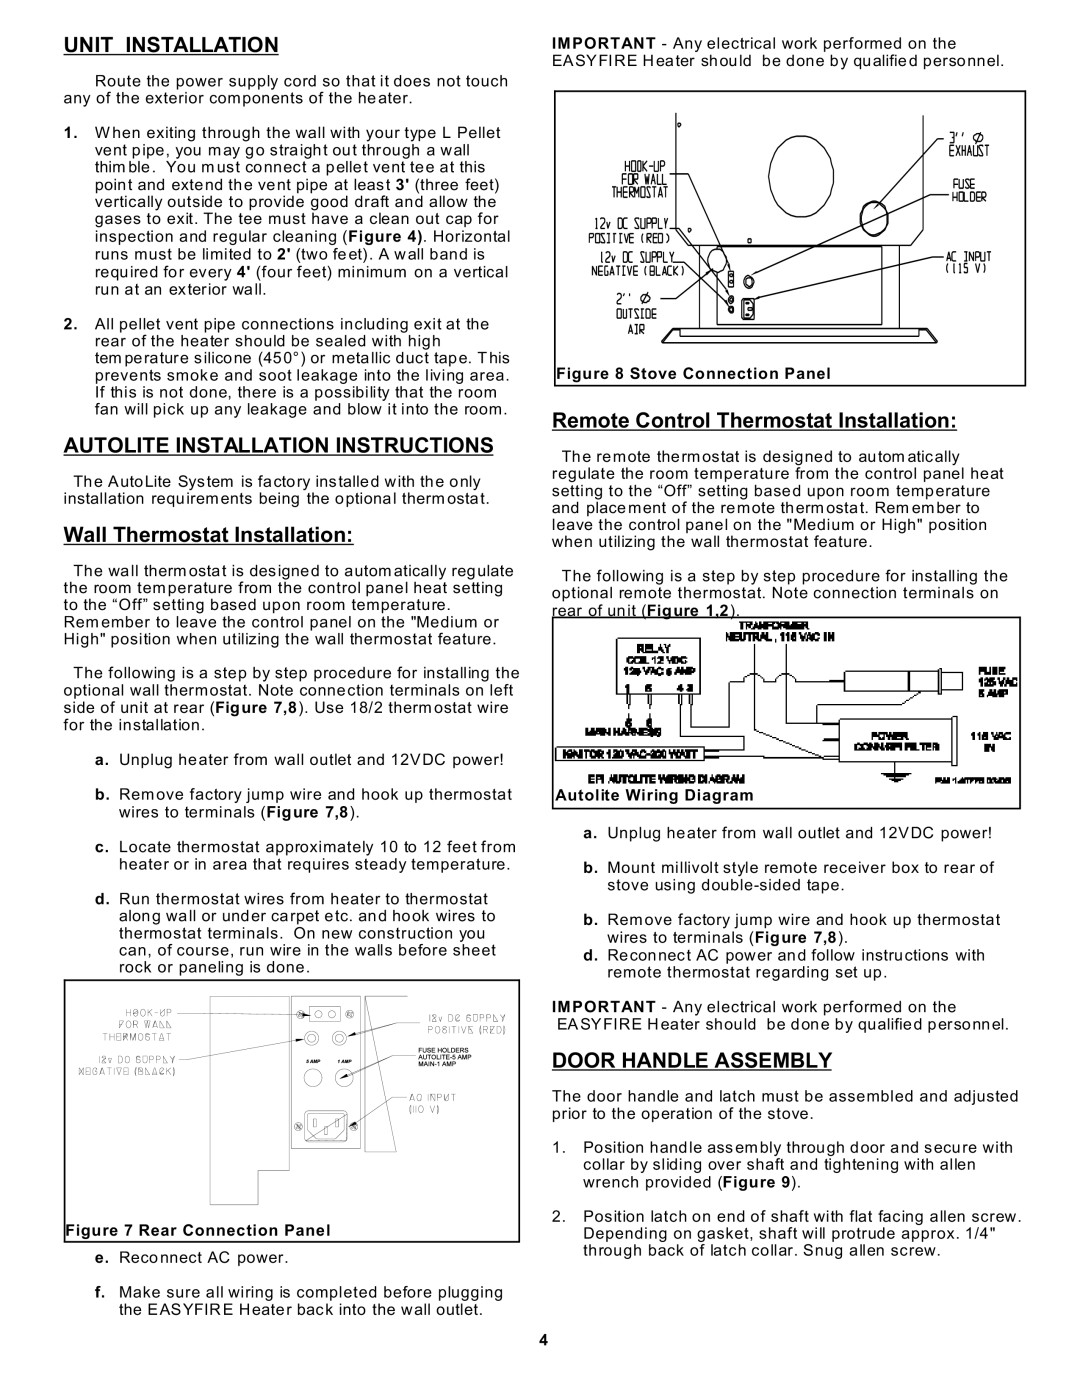
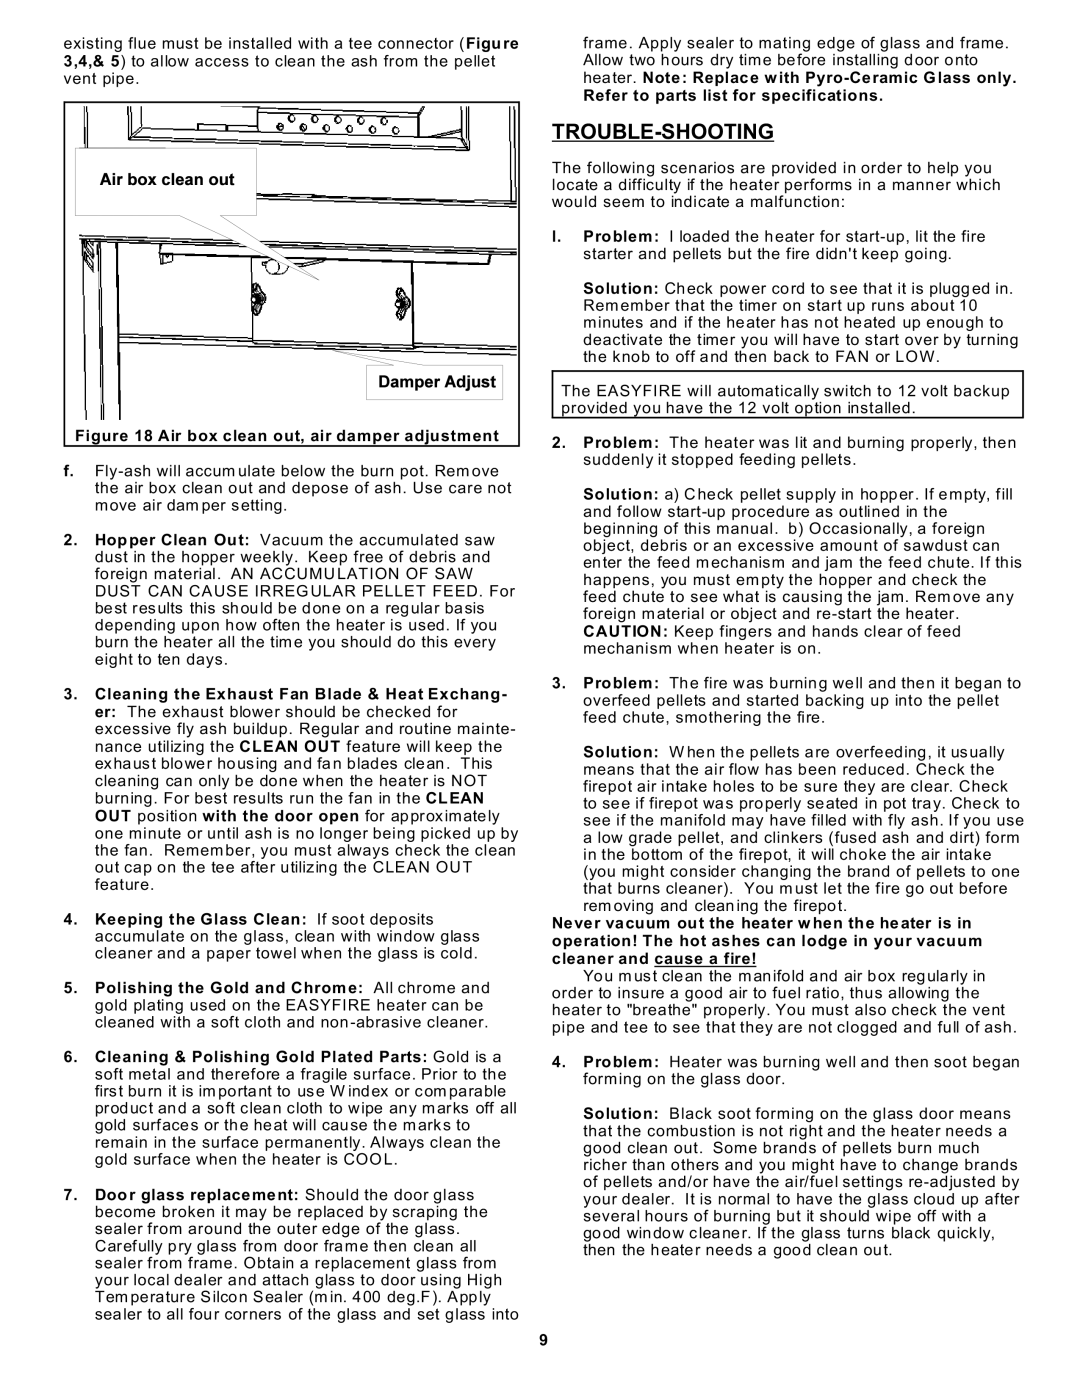
The following is a step by step procedure for installing the optional wall therm ostat. Note connection terminals on left side of unit at rear (Figure 7,8). Use 18/2 therm ostat wire for the installation.

a.Unplug heater from wall outlet and 12VDC power!

b. Rem ove factory jump wire and hook up thermostat wires to terminals (Figure 7,8).

c.Locate thermostat approximately 10 to 12 feet from heater or in area that requires steady temperature.

d. Run thermostat wires from heater to thermostat along wall or under ca rpet etc. and hook wires to thermostat terminals. On new construction you can, of course, run wire in the walls before sheet rock or paneling is done.

Figure 7 Rear Connection Panel

e.Reco nnect AC power.

f.Make sure all wiring is completed before plugging the EASYFIR E Heater bac k into the wall outlet.

IMPORTANT - Any electrical work performed on the

EA SYFIRE H eater should be done by qualifie d personnel.

Figure 8 Stove Connection Panel

Remote Control Thermostat Installation:

Th e re m ote therm ostat is designed to autom atically regulate the room temperature from the control panel heat setting to the “Off” setting based upon room temp erature and place m ent of the rem ote therm ostat. Rem em ber to leave the control panel on the "Medium or High" position when utilizing the wall thermostat feature.

The following is a step by step procedure for installing the optional remote thermostat. Note connection terminals on rear of unit (Figure 1,2).

Autolite Wiring Diagram

a.Unplug heater from wall outlet and 12VDC power!

b. Mount millivolt style remote receiver box to rear of stove using double-sided tape.

b. Rem ove factory jump wire and hook up thermostat wires to terminals (Figure 7,8).

d. Reconnect AC power and follow instructions with remote thermostat regarding set up.

IMPORTANT - Any electrical work performed on the EASYFIRE H eater should be done by qualifie d personnel.

DOOR HANDLE ASSEMBLY

The door handle and latch must be assembled and adjusted prior to the operation of the stove.

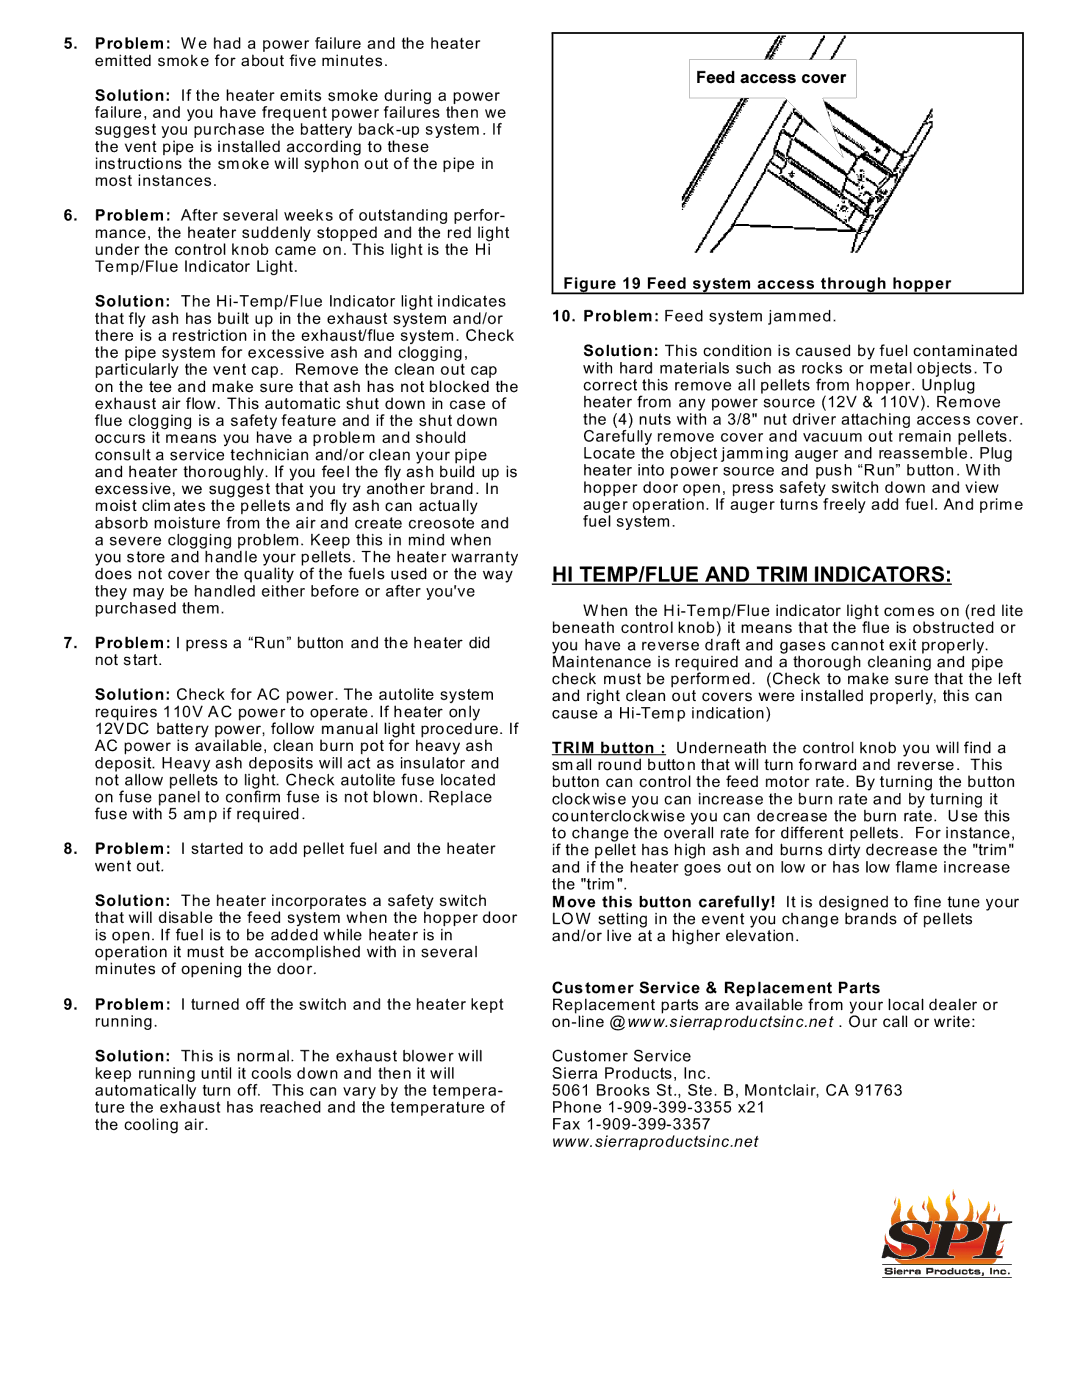
1.Position handle ass em bly through door and secure with collar by sliding over shaft and tightening with allen wrench provided (Figure 9).

2.Position latch on end of shaft with flat facing allen screw. Depending on gasket, shaft will protrude approx. 1/4" through back of latch collar. Snug allen screw.

4

Image 4
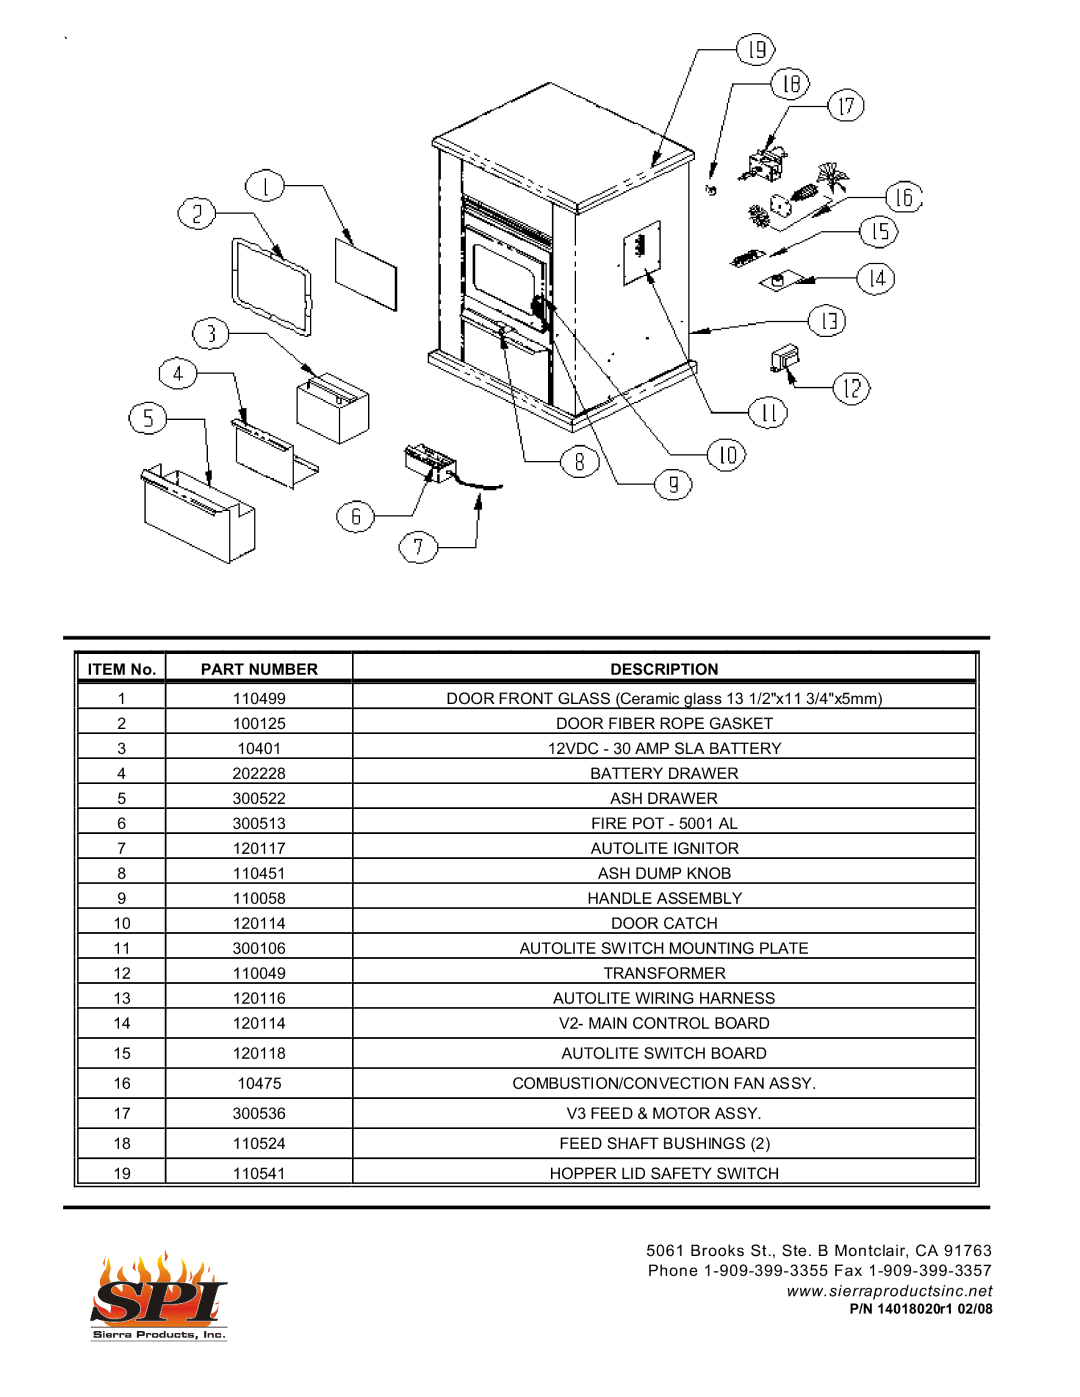
Contents 2006 General InformationListed by OMNI-Test Laboratories, Inc Report No -S-01-4 An outside air inlet MU ST be provided for combustion Venting and Installation ClearancesExit termination distance to openings Page Unit Installation Autolite Installation InstructionsWall Thermostat Installation Remote Control Thermostat InstallationFuel Selection Autolite OperationSTART-UP and Operation Priming the feed systemMatch Light Fire and START-UP Feed Trim AdjustmentFilling the Hopper and Start-Up Optional 12V HOOK-UP & Operation Disposal of AshesCanadian Requirements Maintenance Procedure TROUBLE-SHOOTING Air box clean out, air damper adjustmentHI TEMP/FLUE and Trim Indicators Customer Service & Replacement PartsItem No Part Number Description

EF-5001UB specifications

The Sierra Products EF-5001UB is a highly efficient, versatile, and user-friendly product that caters to a range of needs, making it an essential addition to any workspace. This multifaceted unit excels in offering an array of features and technologies designed to enhance productivity and user experience.

One of the standout characteristics of the EF-5001UB is its robust design. Built to withstand rigorous use, it combines durability with a sleek aesthetic, making it suitable for both industrial and office environments. The compact size of the unit allows for easy placement, enabling users to maximize their workspace without sacrificing performance.

The EF-5001UB is equipped with advanced energy-efficient technology that not only reduces power consumption but also minimizes the environmental impact. This feature aligns with the growing trend towards sustainable practices, making it an ideal choice for organizations focused on green initiatives. Furthermore, its operational design aids in reducing noise levels, allowing for a quieter working environment.

On the technology front, the EF-5001UB boasts an intuitive interface that simplifies its operation. Users can easily navigate through settings thanks to its user-friendly controls, which include digital displays and programmable options. This ease of use is complemented by superior connectivity features, enabling seamless integration with a variety of devices and networks. Whether connecting via USB or wireless options, users enjoy a hassle-free experience.

The performance specifications of the EF-5001UB are impressive, offering high-speed processing capabilities that enhance its functionality. Its reliable performance ensures that tasks are completed efficiently, making it suitable for both heavy-duty jobs and everyday applications.

Furthermore, the Sierra Products EF-5001UB emphasizes versatility. Its multi-function capabilities allow it to perform various tasks, catering to diverse business needs—from printing and scanning to data storage and retrieval. This adaptability makes it a valuable asset for businesses looking to streamline operations and improve productivity.

In summary, the Sierra Products EF-5001UB combines innovative technologies, efficiency, and durability in a compact and versatile unit. Its user-friendly interface, sustainable design, and multifunctional abilities make it a premier choice for anyone seeking a reliable solution to enhance their workflow. As organizations continue to prioritize performance and sustainability, the EF-5001UB stands out as a forward-thinking product poised to meet the demands of modern workplaces.