Harman-Kardon AVR 7550HD Step ONE Determine Speaker Crossover, Step TWO Measure Speaker Distances

Page 42

ADVANCED FUNCTIONS

are unable to run EzSet/EQ II calibration, or if you wish to make further adjustments, use the Manual Speaker Setup on-screen menus.

Before beginning, place your loudspeakers as explained in the Speaker Placement section, and connect them to the AVR. Consult the owner’s guide for the speakers or the manufacturer’s Web site for the frequency range specification. Although you may set the out- put levels “by ear,” an SPL (sound-pressure level) meter purchased at a local electronics store will provide greater accuracy.

Record your configuration settings in Tables A3 through A12 in the appendix for easy re-entry after a system reset, or if the AVR’s Master Power Switch is turned off or the unit is unplugged for more than four weeks.

NOTE: When using the AVR’s Speaker Setup menus, select a video output resolution of 720p or higher to view graphics that simplify configuration.

STEP ONE – Determine Speaker Crossover

Without using the EzSet/EQ II process, the AVR 7550HD can’t detect how many speakers you’ve connected to it; nor can it determine their capabilities. Consult the speaker’s technical specifications and locate the frequency response, usually given as a range, e.g., 100Hz – 20kHz (±3dB). Write down the lowest frequency that each of your main speakers is capable of playing (100Hz in the example) as the crossover in Table A3 in the appendix. This is not the same as the crossover frequency listed in the speaker’s specifications. For the subwoofer, write down the transducer size.

The receiver’s bass management determines which speakers will be used to play back the low-frequency (bass) portion of the source program. Sending the lowest notes to small satellite speakers won’t sound right, and may even damage the speaker. The highest notes may not be heard at all through the subwoofer.

With proper bass management, the AVR 7550HD divides the source signal at a crossover point. All information above the crossover point is played through the satellite speaker, and all information below the crossover point is played through the subwoofer. Each loudspeaker in your system performs at its best, delivering an enjoyable sound experience.

STEP TWO – Measure Speaker Distances

Ideally, all of your speakers would be placed in a circle, with the listening position at the center. However, you may have had to place some speakers a little further away from the listening position than others. Sounds that are supposed to arrive simultaneously from different speakers may blur, due to different arrival times.

Use the AVR’s delay adjustment to compensate for real-world speaker placements.

Measure the distance from each speaker to the listening position, and write it down in Table A4 in the appendix. Even if all of your speakers are the same distance from the listening position, enter your speaker distances as described in Step Three.

STEP THREE – Manual Setup Menu

Now you are ready to program the receiver. Sit in the usual listening position and make the room as quiet as possible.

With the receiver and video display turned on, press the AVR Settings Button to display the menu system. Use the 5 Button to move the cursor to the Speaker Setup line, and press the OK Button to display the Speaker Setup menu. See Figure 21.

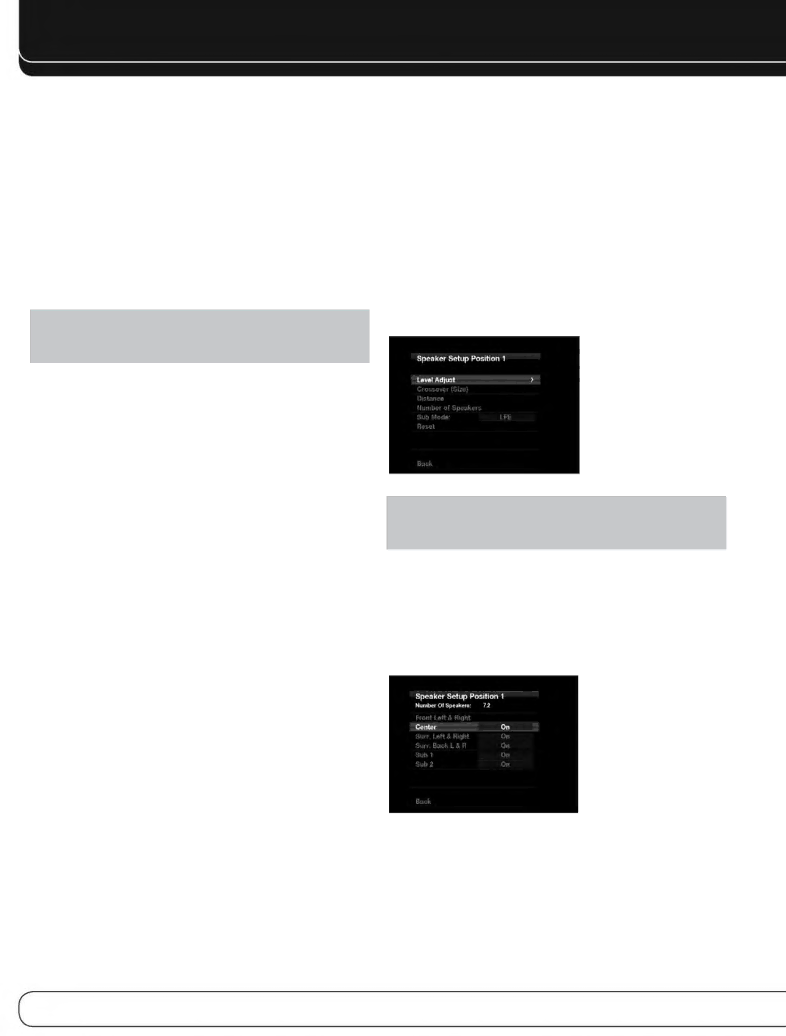
If you have run the EzSet/EQ II process, the results were saved in one of the two listening positions. Adjust the Speaker Setup setting in the Audio Effects menu to activate the results for either position (see page 45). To tweak the EzSet/EQ II results, or to con- figure the AVR from scratch, select Setup Listening Position 1 or Setup Listening Position 2. A screen similar to the one shown in Figure 28 will appear.

Figure 28 – Speaker Setup Position Menu

NOTE: All of the speaker setup submenus include the Back option, as shown at the bottom of Figure 28. To save the current settings, select the Back option.

To reconfigure the speakers from scratch, select the Reset option.

For best results, adjust the submenus in this order: Number of Speakers, Crossover (Size), Sub Mode, Distance and Level Adjust.

Number of Speakers

Move the cursor to the Number of Speakers line and press the OK Button. See Figure 29.

Figure 29 – Number of Speakers Menu

Program the correct setting for each speaker group: ON when the speakers are present in the system, and OFF for positions where no speakers are installed. The Front Left & Right speakers are always ON and may not be disabled. Any changes will be reflected in the total number of speakers displayed at the top of the screen.

The setting for the surround back speakers includes a third option: Zone 2. The AVR 7550HD is capable of multizone operation, supporting placement of a pair of speakers in another room. The AVR 7550HD’s assignable surround back amplifier channels make multizone operation

42

Image 42
Contents AVR7550HD Service Instructions Outdoor Use Marking Safety InformationImportant Safety Instructions Wet Location MarkingImportant Safety Information UnpackingTable of Contents Introduction Surround ModesAudio/Video Inputs Supplied AccessoriesAudio Inputs Digital Audio InputsFRONT-PANEL Controls Back/ExitOn When the AVR is turned on, this LED turns white Resolution setting 480i, 480p, 720p, 1080i or 1080pREAR-PANEL Connections Video Hdmi 1, 2, 3 Output XM AntennaREAR-PANEL Connections Front, Center and Surround Speaker Outputs Main Remote Control Functions AVR Power OnZone Selector Main Remote Control Functions Main Remote Control Functions IR Transmitter Mute Zone 2 Remote Control FunctionsSleep Settings MenuZone 2 Remote Control Functions Multichannel Audio Introduction to Home TheaterTypical Home Theater System Harman International the Harman Kardon parent company LogicSpeaker Connections Connecting Source Devices to the AVRConnections SubwooferAnalog Audio Video ConnectionsIncluding Dolby TrueHD and DTS-HD Master Audio Digital VideoAntennas RS-232 Serial PortSpeaker Placement Front Speaker PlacementSubwoofer Placement Getting Started Best audio connection for each source ForSource Assignment Worksheet Getting Started Installation Connect IR Control Devices to the Zone 2 IR Input Step Eleven Install a Multizone SystemConnect a Video Display Device or Switcher Select one or all of these methods for audio distributionStep Fourteen Program Sources Into the Remote Step Twelve Plug in AC Power CordsStep Thirteen Insert Batteries in Remote To program the codes for a source device into the remoteTo delete a programmed or learned code To change the device type of a Source SelectorTo learn individual key codes To rename a key or deviceStep Fifteen Turn On the AVR 7550HD Configure the AVR 7550HD, Using EzSet/EQ II Technology Initial SetupUsing the ON-SCREEN Menu System Select Automatic Setup-EzSet/EQSet Up Sources Audio and Video Input SelectionChannel Inputs You are now ready to begin enjoying your new receiver Dolby Volume Calibration Offset Volume ControlDolby Volume OperationUsing the Tuner Sleep TimerHeadphones Mute FunctionXM Radio Operation Video display is in useUSB Playback Internet RadioTo return to the beginning of the current track, press Network Playback Using Docking StationUsing The Bridge IPod Function Remote Control Key RecordingPlay Pause Menu Back/Exit or Left Arrow Select IPod Manual ModeTV Out setting to take effect Next Track Next 33 Previous Track Previous ISelecting a Surround Mode Surround Modes MenuAdvanced Functions Analog Audio SignalsDigital Audio Signals Audio Processing and Surround SoundDolby Surround Settings Manual Speaker SetupVideo Game Logic 7 Game Step TWO Measure Speaker Distances Step Three Manual Setup MenuStep ONE Determine Speaker Crossover Number of SpeakersAdjust Crossover Frequencies Menu Adjust Speaker Distance MenuSub Mode Step Four Setting Channel Output Levels Manually Video Adjustments Video ModesHow to Adjust the Custom Picture Settings System Settings Sharpness AdjustmentMenu Appearance General AVR SettingsAdvanced Remote Control Functions System InformationTo end the command sequence, press the OK Button Main MenuActivities Macros Remote Reset Back LightPunch-Through Programming Processor Reset MemoryTroubleshooting Guide Symptom Cause SolutionTable A2 Source Setting Defaults AppendixTable A1 Recommended Source Component Connections Table A3 Speaker/Channel Setting Defaults Table A20mS Table A4 Delay Setting DefaultsTable A5 Source Settings BridgeTable A5 Table A6 Audio Effects SettingsDefault Table A6Table A7 Video Modes Settings Off Black Level Deinterlacing Film Mode Detect 302Table A7 Table A8 Table A9 Remote Control CodesTable A8 Surround Modes Source Input Device Type if changedTable A10 System Settings Table A11 Network SettingsTable A12 Zone 2 Settings Surround Mode Description Incoming Bitstream or Signal Table A13 Surround ModesTable A13 Presentation DTS Neo6 DTS-ES MatrixDTS Stereo DTS 2/2/.0 or .1, 3/2/.0 orFor multichannel Subwoofer is usedAnalog Bypass Remote Control Function List Reference Table A14 Remote Control Function List RadioTable A14 AUXAVR 7550HD Technical Specifications Audio Section