- STEP 1: INSTALL COLD WATER SUPPLY FITTING -
Check and comply with local plumbing codes as you plan, then install fitting must provide a leak- tight connection to the RO 1/4" tubing (see using the included water supply fitting is shown in FIG.3 - A below. An plumbing fittings (not included), is shown in B.
a cold feed (supply) water fitting. The FIG. 8, page 8). A typical connection optional connection, using standard
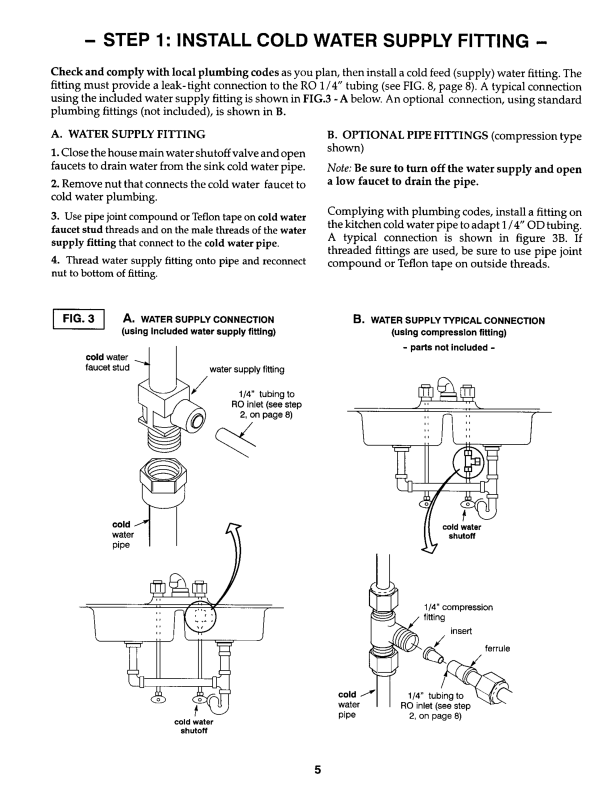
A. WATER SUPPLY FITTING
1.Close the house main water shutoff valve and open faucets to drain water from the sink cold water pipe.
2.Remove nut that connects the cold water faucet to
cold water plumbing.
3.Use pipe joint compound or Teflon tape on cold water faucet stud threads and on the male threads of the water
supply fitting that connect to the cold water pipe.
4.Thread water supply fitting onto pipe and reconnect nut to bottom of fitting.
B. OPTIONAL PIPE FITTINGS (compression type shown)
Note: Be sure to turn offthe water supply and open a low faucet to drain the pipe.
Complying with plumbing codes, install a fitting on the kitchen cold water pipe to adapt 1/4" OD tubing.
A typical connection is shown in figure 3B. If
threaded fittings are used, be sure to use pipe joint
compound or Teflon tape on outside threads.
1 | A. WATER SUPPLY CONNECTION |
|
| ||
FIG. 3 | B. WATER SUPPLYTYPICAL | CONNECTION | |||
J | (using Included water supply fitting) | (using compression | fitting) | ||
| |||||
cold water |
|
| - parts not included - | ||
|
|
|
| ||
faucet | stud | water supply | fitting |
|
|
|
|
|
| ||
|
| RO inlet | (see step | f | |
|
|
|
| ii | |
|
| 2, on page 8) |
| ||
|
| 1/4" tubing | to |
| |
H
H
cold water shutoff
_;ter
cold /
f
._/ 1/4" compression
fitting
\
| cold _ | 1/4" tubing to | |
| water | RO inlet (see step | _ " |
cold water | pipe | 2, on page 8) |
|
|
|
| |
shutoff |
|
|
|
5