3. SETTING UP THE PRINTER
3.1. Inserting the Batteries
The battery compartment is located on the underside of the device (See illustration).
a) | Remove cover as illustrated. |
b) | Insert the batteries (4 x size “AA”), |
| thereby observing the indicated polarity. |
c) | If the green LED starts flashing, the batteries |
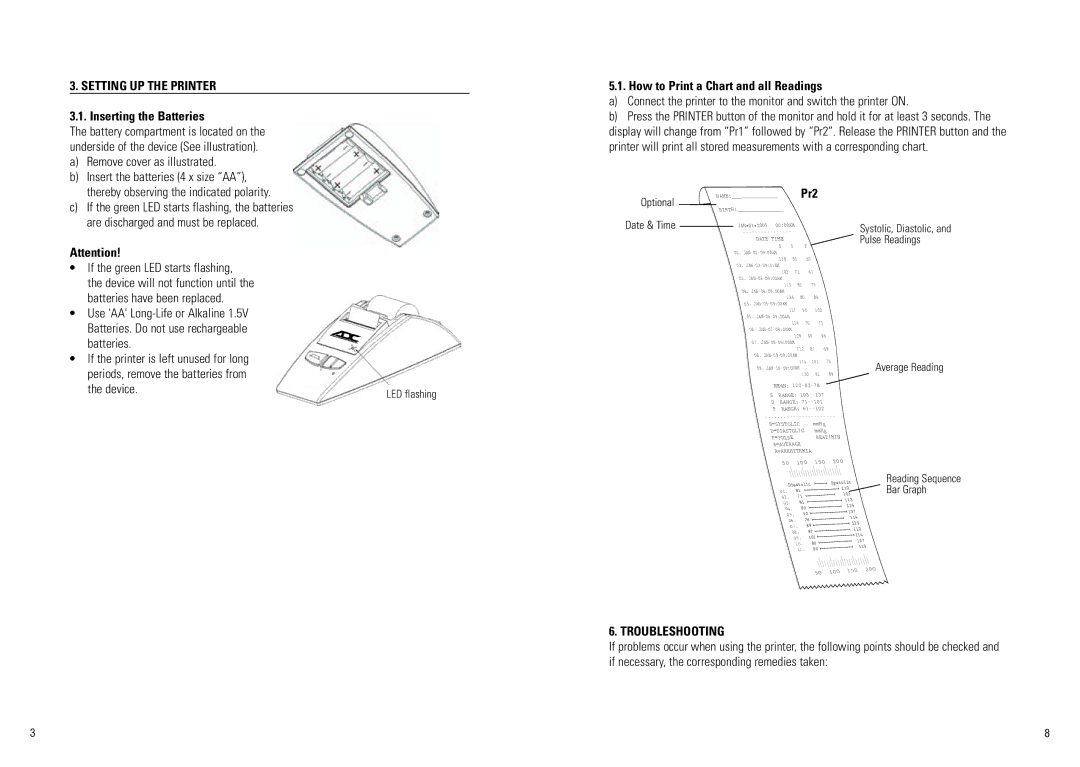
5.1. How to Print a Chart and all Readings
a)Connect the printer to the monitor and switch the printer ON.
b)Press the PRINTER button of the monitor and hold it for at least 3 seconds. The display will change from “Pr1” followed by “Pr2”. Release the PRINTER button and the printer will print all stored measurements with a corresponding chart.
NAME:_______________ | Pr2 |
Optional |
|
BIRTH:_______________ |
|
are discharged and must be replaced. |
Attention!
•If the green LED starts flashing,
the device will not function until the batteries have been replaced.
•Use 'AA'
•If the printer is left unused for long periods, remove the batteries from
the device. | LED flashing |
|
Date & Time
JAN•01•2005 00:09AM |
|
|
|
|
| |
|
|
|
|
| ||
DATE TIME |
|
|
|
|
|
|
S | D |
| P |
|
|
|
01. |
|
|
|
|
|
|
130 | 81 | 89 |
|
| ||
02. |
|
|
|
|
|
|
103 | 71 |
| 61 |
| ||
03. |
|
|
|
|
|
|
113 | 81 |
| 79 |
| ||
04. |
|
|
|
|
|
|
124 | 80 |
| 84 |
| ||
05. |
|
|
|
|
|
|
137 | 90 |
| 102 | |||
05. |
|
|
|
|
|
|
| 114 | 76 | 71 | |||
06. |
|
|
|
|
| |
| 129 | 89 |
| 96 | ||
07. |
|
|
|
|
| |
| 112 |
| 87 | 69 | ||
08. |
|
|
|
| ||
|
| 114 | 101 | 76 | ||
09. |
|
|
|
| ||
|
| 130 | 81 | 89 | ||
MEAN: |
| |||||
SRANGE:
S=SYSTOLIC | mmHg |
| |
D=DIASTOLIC | mmHg |
| |
P=PULSE |
| BEAT/MIN | |
A=AVERAGE |
|
| |
R=ARRHYTHMIA |
|
| |
50 | 100 | 150 | 200 |
Systolic, Diastolic, and Pulse Readings
Average Reading
Diastolic | Systolic | ||||
130 | |||||
01. | 81 |
|
| ||
|
| 103 | |||
02. | 71 |
|
| ||
|
| 113 | |||
03. | 81 |
| |||
| 124 | ||||
04. | 80 | ||||
137 | |||||
05. | 90 | ||||
114 | |||||
06. | 76 | ||||
129 | |||||
07. |
| 89 | |||
| 112 | ||||
08. |
| 87 | |||
| 114 | ||||
09. |
| 101 | |||
| 127 | ||||
| 10. |
| 80 | ||
|
| 119 | |||
| 11. | 80 | |||
|
| ||||
Reading Sequence Bar Graph
50 | 100 | 150 | 200 |
|
|
6. TROUBLESHOOTING
If problems occur when using the printer, the following points should be checked and if necessary, the corresponding remedies taken:
3 | 8 |